> ## Documentation Index
> Fetch the complete documentation index at: https://aci.dev/docs/llms.txt
> Use this file to discover all available pages before exploring further.
# Unified MCP Server
> Unified, Dynamic Function (Tool) Discovery and Execution
## Overview
The Unified MCP Server provides a smart, scalable approach to function calling by exposing just two meta functions (tools) that can:
1. Dynamically discover the right functions (tools) based on user intent
2. Execute any function on the ACI.dev platform retrieved from the search results
## How It Works
The `Unified MCP Server` exposes two meta-functions:
1. `ACI_SEARCH_FUNCTIONS` - Discovers functions based on your intent/needs
2. `ACI_EXECUTE_FUNCTION` - Executes any function discovered by the search
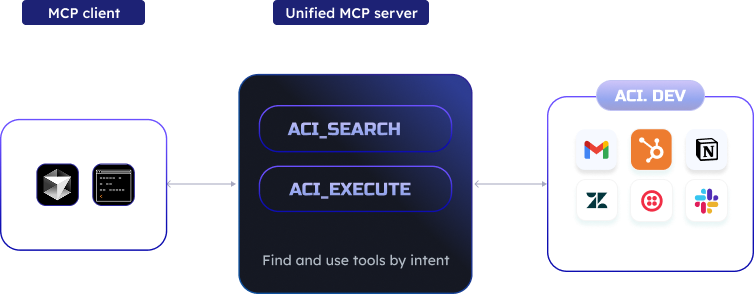 This approach allows LLMs to first search for the right tool based on the user's needs and then execute it, without needing to list all available functions upfront.
## Benefits
* **Reduced Context Window Usage** - Instead of loading hundreds of function definitions into your LLM's context window, the unified server keeps it minimal with just two functions (tools)
* **Dynamic Discovery** - The server intelligently finds the most relevant tools for your specific task
* **Complete Function Coverage** - Access to ALL functions on the ACI.dev platform without configuration changes
* **Simplified Integration** - No need to manage multiple MCP servers for different apps or groups of functions (tools)
## Prerequisites
Before using the `Unified MCP Server`, you need to complete several setup steps on the ACI.dev platform.
You'll need an API key from one of your ACI.dev agents. Find this in your [project setting ](https://platform.aci.dev/project-setting)
Navigate to the [App Store ](https://platform.aci.dev/apps) to configure the apps you want to use with your MCP servers.
For more details on what is an app and how to configure it, please refer to the [App](../core-concepts/app) section.
In your [Project Setting ](https://platform.aci.dev/project-setting), enable the apps you want your agent to access by adding them to the `Allowed Apps` list.
For more details on how and why to set allowed apps, please refer to the [Agent](../core-concepts/agent) section.
For each app you want to use, you'll need to link end-user (or your own) accounts. During account linking, you'll specify a `linked-account-owner-id` which you'll later provide when starting the MCP servers.
For more details on how to link accounts and what `linked-account-owner-id` is, please refer to the [Linked Accounts](../core-concepts/linked-account) section.
```bash theme={null}
# Install uv if you don't have it already
curl -sSf https://install.pypa.io/get-pip.py | python3 -
pip install uv
```
## Integration with MCP Clients
For a more reliable experience when using the **Unified MCP Server**, we recommend using the prompt below at the start of your conversation (feel free to modify it to your liking):
```json prompt theme={null}
You are a helpful assistant with access to a unlimited number of tools via two meta functions:
- ACI_SEARCH_FUNCTIONS
- ACI_EXECUTE_FUNCTION
You can use ACI_SEARCH_FUNCTIONS to find relevant, executable functionss that can help you with your task.
Once you have identified the function you need to use, you can use ACI_EXECUTE_FUNCTION to execute the function provided you have the correct input arguments.
```
Replace the `` and `` below with the `linked-account-owner-id` of your linked accounts and your ACI.dev API key respectively.
Make sure you hit the refresh button on the MCP settings page after entering your own API key and Owner ID.
This approach allows LLMs to first search for the right tool based on the user's needs and then execute it, without needing to list all available functions upfront.
## Benefits
* **Reduced Context Window Usage** - Instead of loading hundreds of function definitions into your LLM's context window, the unified server keeps it minimal with just two functions (tools)
* **Dynamic Discovery** - The server intelligently finds the most relevant tools for your specific task
* **Complete Function Coverage** - Access to ALL functions on the ACI.dev platform without configuration changes
* **Simplified Integration** - No need to manage multiple MCP servers for different apps or groups of functions (tools)
## Prerequisites
Before using the `Unified MCP Server`, you need to complete several setup steps on the ACI.dev platform.
You'll need an API key from one of your ACI.dev agents. Find this in your [project setting ](https://platform.aci.dev/project-setting)
Navigate to the [App Store ](https://platform.aci.dev/apps) to configure the apps you want to use with your MCP servers.
For more details on what is an app and how to configure it, please refer to the [App](../core-concepts/app) section.
In your [Project Setting ](https://platform.aci.dev/project-setting), enable the apps you want your agent to access by adding them to the `Allowed Apps` list.
For more details on how and why to set allowed apps, please refer to the [Agent](../core-concepts/agent) section.
For each app you want to use, you'll need to link end-user (or your own) accounts. During account linking, you'll specify a `linked-account-owner-id` which you'll later provide when starting the MCP servers.
For more details on how to link accounts and what `linked-account-owner-id` is, please refer to the [Linked Accounts](../core-concepts/linked-account) section.
```bash theme={null}
# Install uv if you don't have it already
curl -sSf https://install.pypa.io/get-pip.py | python3 -
pip install uv
```
## Integration with MCP Clients
For a more reliable experience when using the **Unified MCP Server**, we recommend using the prompt below at the start of your conversation (feel free to modify it to your liking):
```json prompt theme={null}
You are a helpful assistant with access to a unlimited number of tools via two meta functions:
- ACI_SEARCH_FUNCTIONS
- ACI_EXECUTE_FUNCTION
You can use ACI_SEARCH_FUNCTIONS to find relevant, executable functionss that can help you with your task.
Once you have identified the function you need to use, you can use ACI_EXECUTE_FUNCTION to execute the function provided you have the correct input arguments.
```
Replace the `` and `` below with the `linked-account-owner-id` of your linked accounts and your ACI.dev API key respectively.
Make sure you hit the refresh button on the MCP settings page after entering your own API key and Owner ID.
 ```json mcp.json theme={null}
{
"mcpServers": {
"aci-mcp-unified": {
"command": "uvx",
"args": ["aci-mcp@latest", "unified-server", "--linked-account-owner-id", "", "--allowed-apps-only"],
"env": {
"ACI_API_KEY": ""
}
}
}
}
```
Make sure to restart the Claude Desktop app after adding the MCP server configuration.
```json claude_desktop_config.json theme={null}
{
"mcpServers": {
"aci-mcp-unified": {
"command": "bash",
"args": [
"-c",
"ACI_API_KEY= uvx aci-mcp@latest unified-server --linked-account-owner-id --allowed-apps-only"
]
}
}
}
```
```bash terminal theme={null}
# Set API key
export ACI_API_KEY=
# Option 1: Run in stdio mode (default)
uvx aci-mcp@latest unified-server --linked-account-owner-id --allowed-apps-only
# Option 2: Run in sse mode
uvx aci-mcp@latest unified-server --linked-account-owner-id --allowed-apps-only --transport sse --port 8000
```
## Commandline Arguments
The `allowed-apps-only` flag is used to limit the apps/functions (tools) search (via `ACI_SEARCH_FUNCTIONS`) to only the allowed apps that are accessible to this agent (which is identified by the `ACI_API_KEY`). If not provided, the `ACI_SEARCH_FUNCTIONS` will be conducted on all apps/functions available on the ACI.dev platform.
The `linked-account-owner-id` is the owner ID of the linked accounts you want to use for the function execution. E.g., `--linked-account-owner-id johndoe` means that the function execution (e.g, `GMAIL__SEND_EMAIL`) will be done on behalf of the linked account of `GMAIL` app with owner ID `johndoe`.
The `transport` argument is used to specify the transport protocol to use for the MCP server.
The default transport is `stdio`.
The `port` argument is used to specify the port to listen on for the MCP server if the `--transport` is set to `sse`.
The default port is `8000`.
```bash help theme={null}
$ uvx aci-mcp@latest unified-server --help
Usage: aci-mcp unified-server [OPTIONS]
Start the unified MCP server with unlimited tool access.
Options:
--allowed-apps-only Limit the functions (tools) search to only
the allowed apps that are accessible to this
agent. (identified by ACI_API_KEY)
--linked-account-owner-id TEXT the owner id of the linked account to use
for the tool calls [required]
--transport [stdio|sse] Transport type
--port INTEGER Port to listen on for SSE
--help Show this message and exit.
```
```json mcp.json theme={null}
{
"mcpServers": {
"aci-mcp-unified": {
"command": "uvx",
"args": ["aci-mcp@latest", "unified-server", "--linked-account-owner-id", "", "--allowed-apps-only"],
"env": {
"ACI_API_KEY": ""
}
}
}
}
```
Make sure to restart the Claude Desktop app after adding the MCP server configuration.
```json claude_desktop_config.json theme={null}
{
"mcpServers": {
"aci-mcp-unified": {
"command": "bash",
"args": [
"-c",
"ACI_API_KEY= uvx aci-mcp@latest unified-server --linked-account-owner-id --allowed-apps-only"
]
}
}
}
```
```bash terminal theme={null}
# Set API key
export ACI_API_KEY=
# Option 1: Run in stdio mode (default)
uvx aci-mcp@latest unified-server --linked-account-owner-id --allowed-apps-only
# Option 2: Run in sse mode
uvx aci-mcp@latest unified-server --linked-account-owner-id --allowed-apps-only --transport sse --port 8000
```
## Commandline Arguments
The `allowed-apps-only` flag is used to limit the apps/functions (tools) search (via `ACI_SEARCH_FUNCTIONS`) to only the allowed apps that are accessible to this agent (which is identified by the `ACI_API_KEY`). If not provided, the `ACI_SEARCH_FUNCTIONS` will be conducted on all apps/functions available on the ACI.dev platform.
The `linked-account-owner-id` is the owner ID of the linked accounts you want to use for the function execution. E.g., `--linked-account-owner-id johndoe` means that the function execution (e.g, `GMAIL__SEND_EMAIL`) will be done on behalf of the linked account of `GMAIL` app with owner ID `johndoe`.
The `transport` argument is used to specify the transport protocol to use for the MCP server.
The default transport is `stdio`.
The `port` argument is used to specify the port to listen on for the MCP server if the `--transport` is set to `sse`.
The default port is `8000`.
```bash help theme={null}
$ uvx aci-mcp@latest unified-server --help
Usage: aci-mcp unified-server [OPTIONS]
Start the unified MCP server with unlimited tool access.
Options:
--allowed-apps-only Limit the functions (tools) search to only
the allowed apps that are accessible to this
agent. (identified by ACI_API_KEY)
--linked-account-owner-id TEXT the owner id of the linked account to use
for the tool calls [required]
--transport [stdio|sse] Transport type
--port INTEGER Port to listen on for SSE
--help Show this message and exit.
```