# OAuth2 White-label
Source: https://aci.dev/docs/advanced/oauth2-whitelabel
How to white-label the OAuth2 flow for OAuth2-based apps
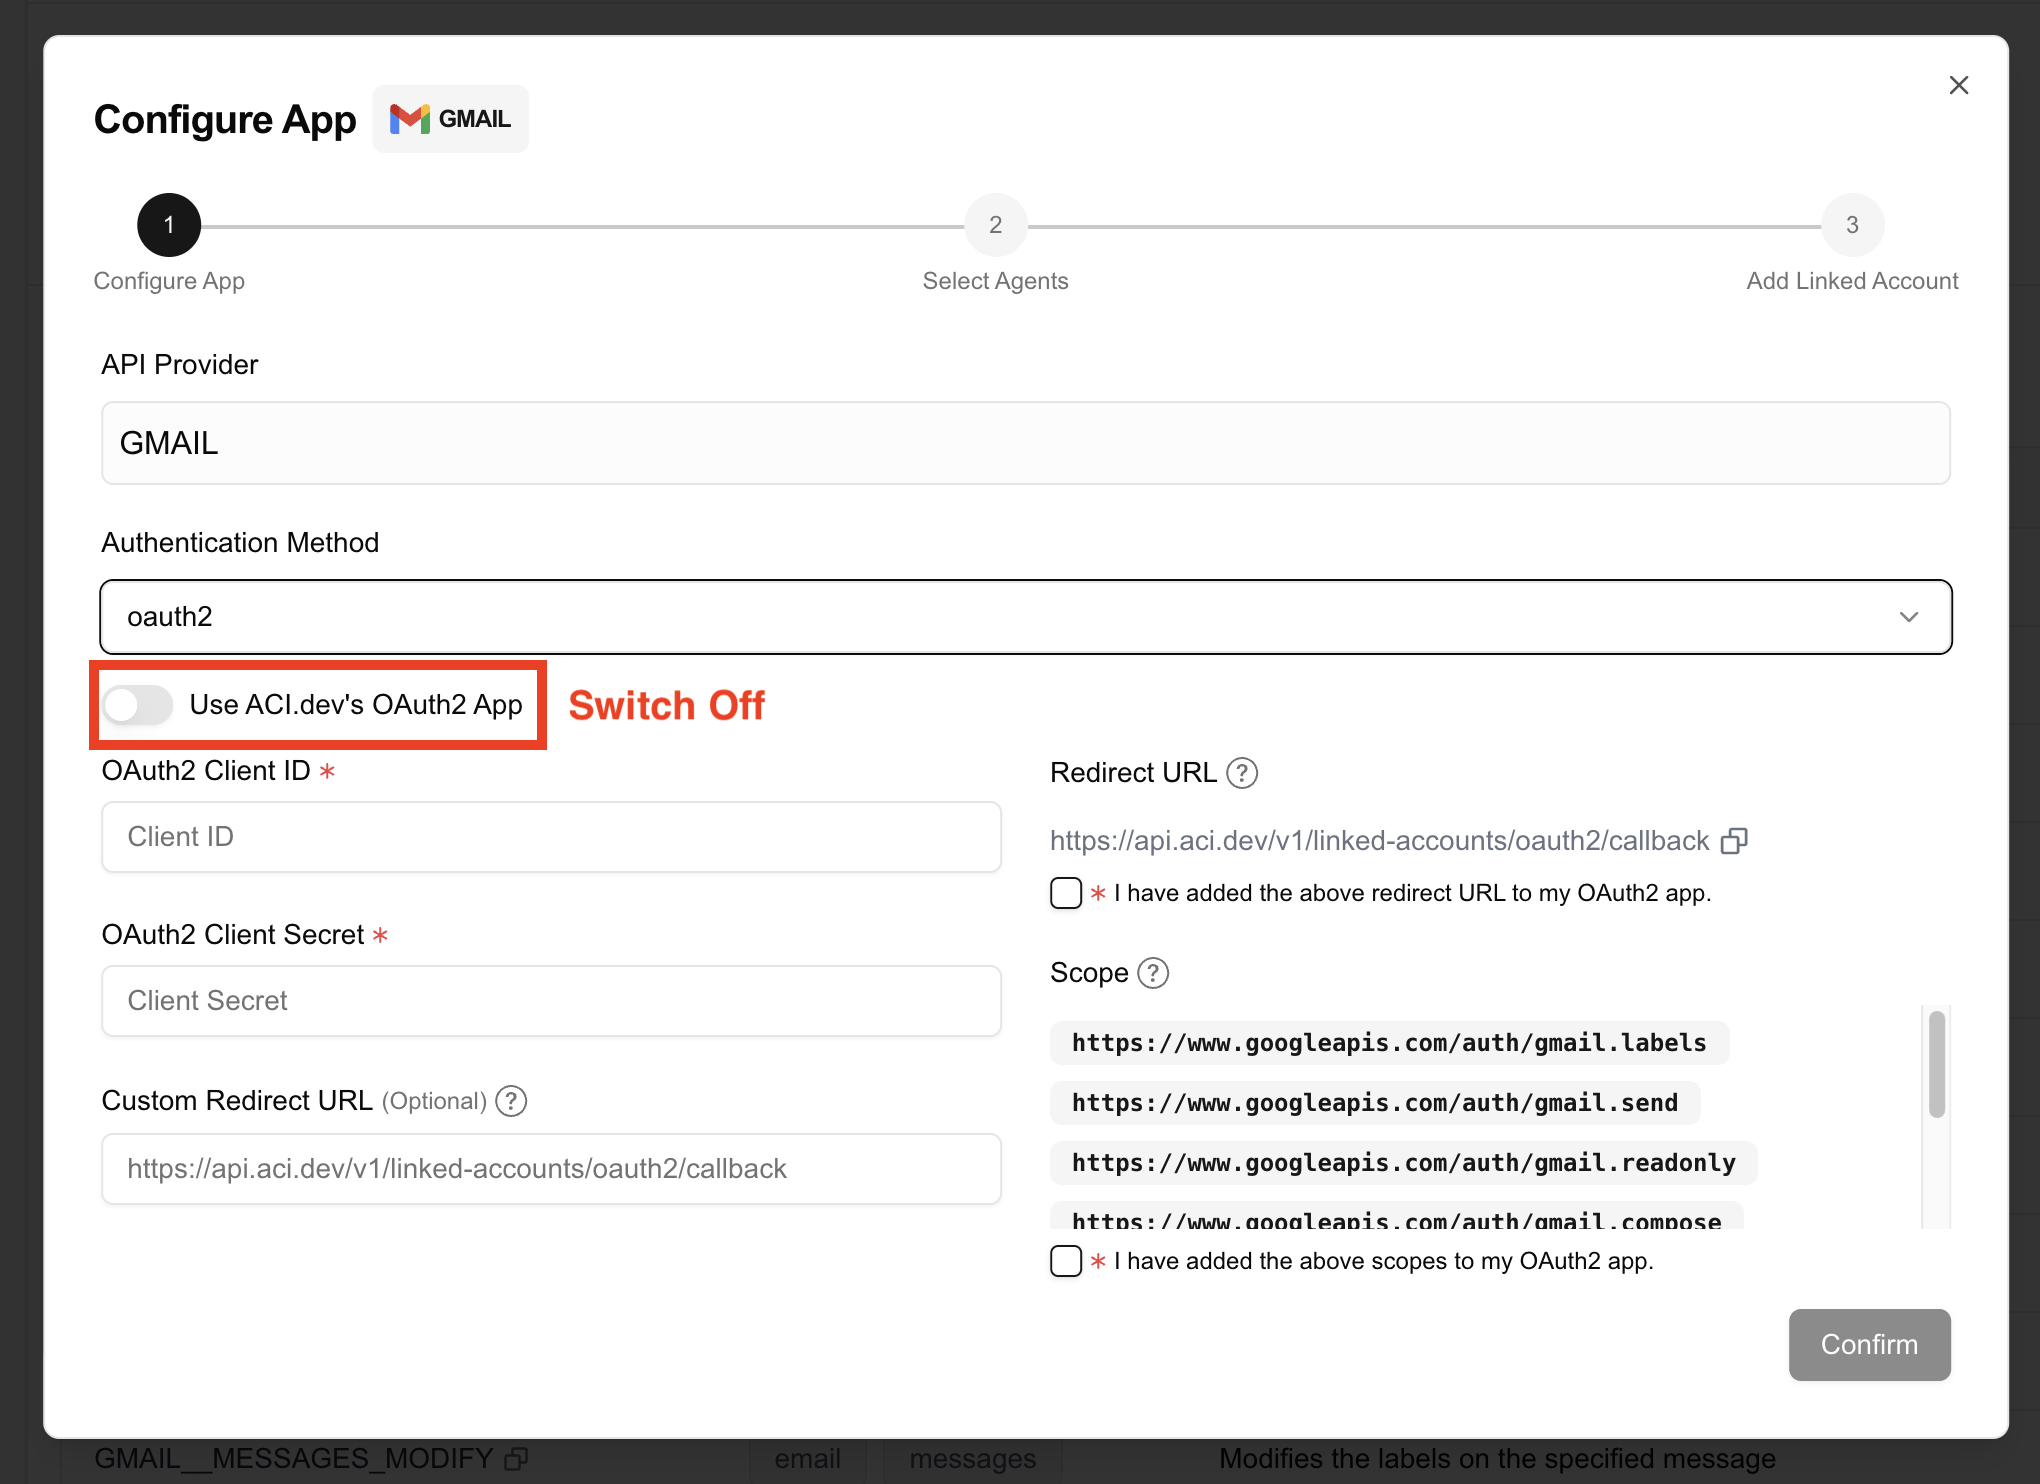
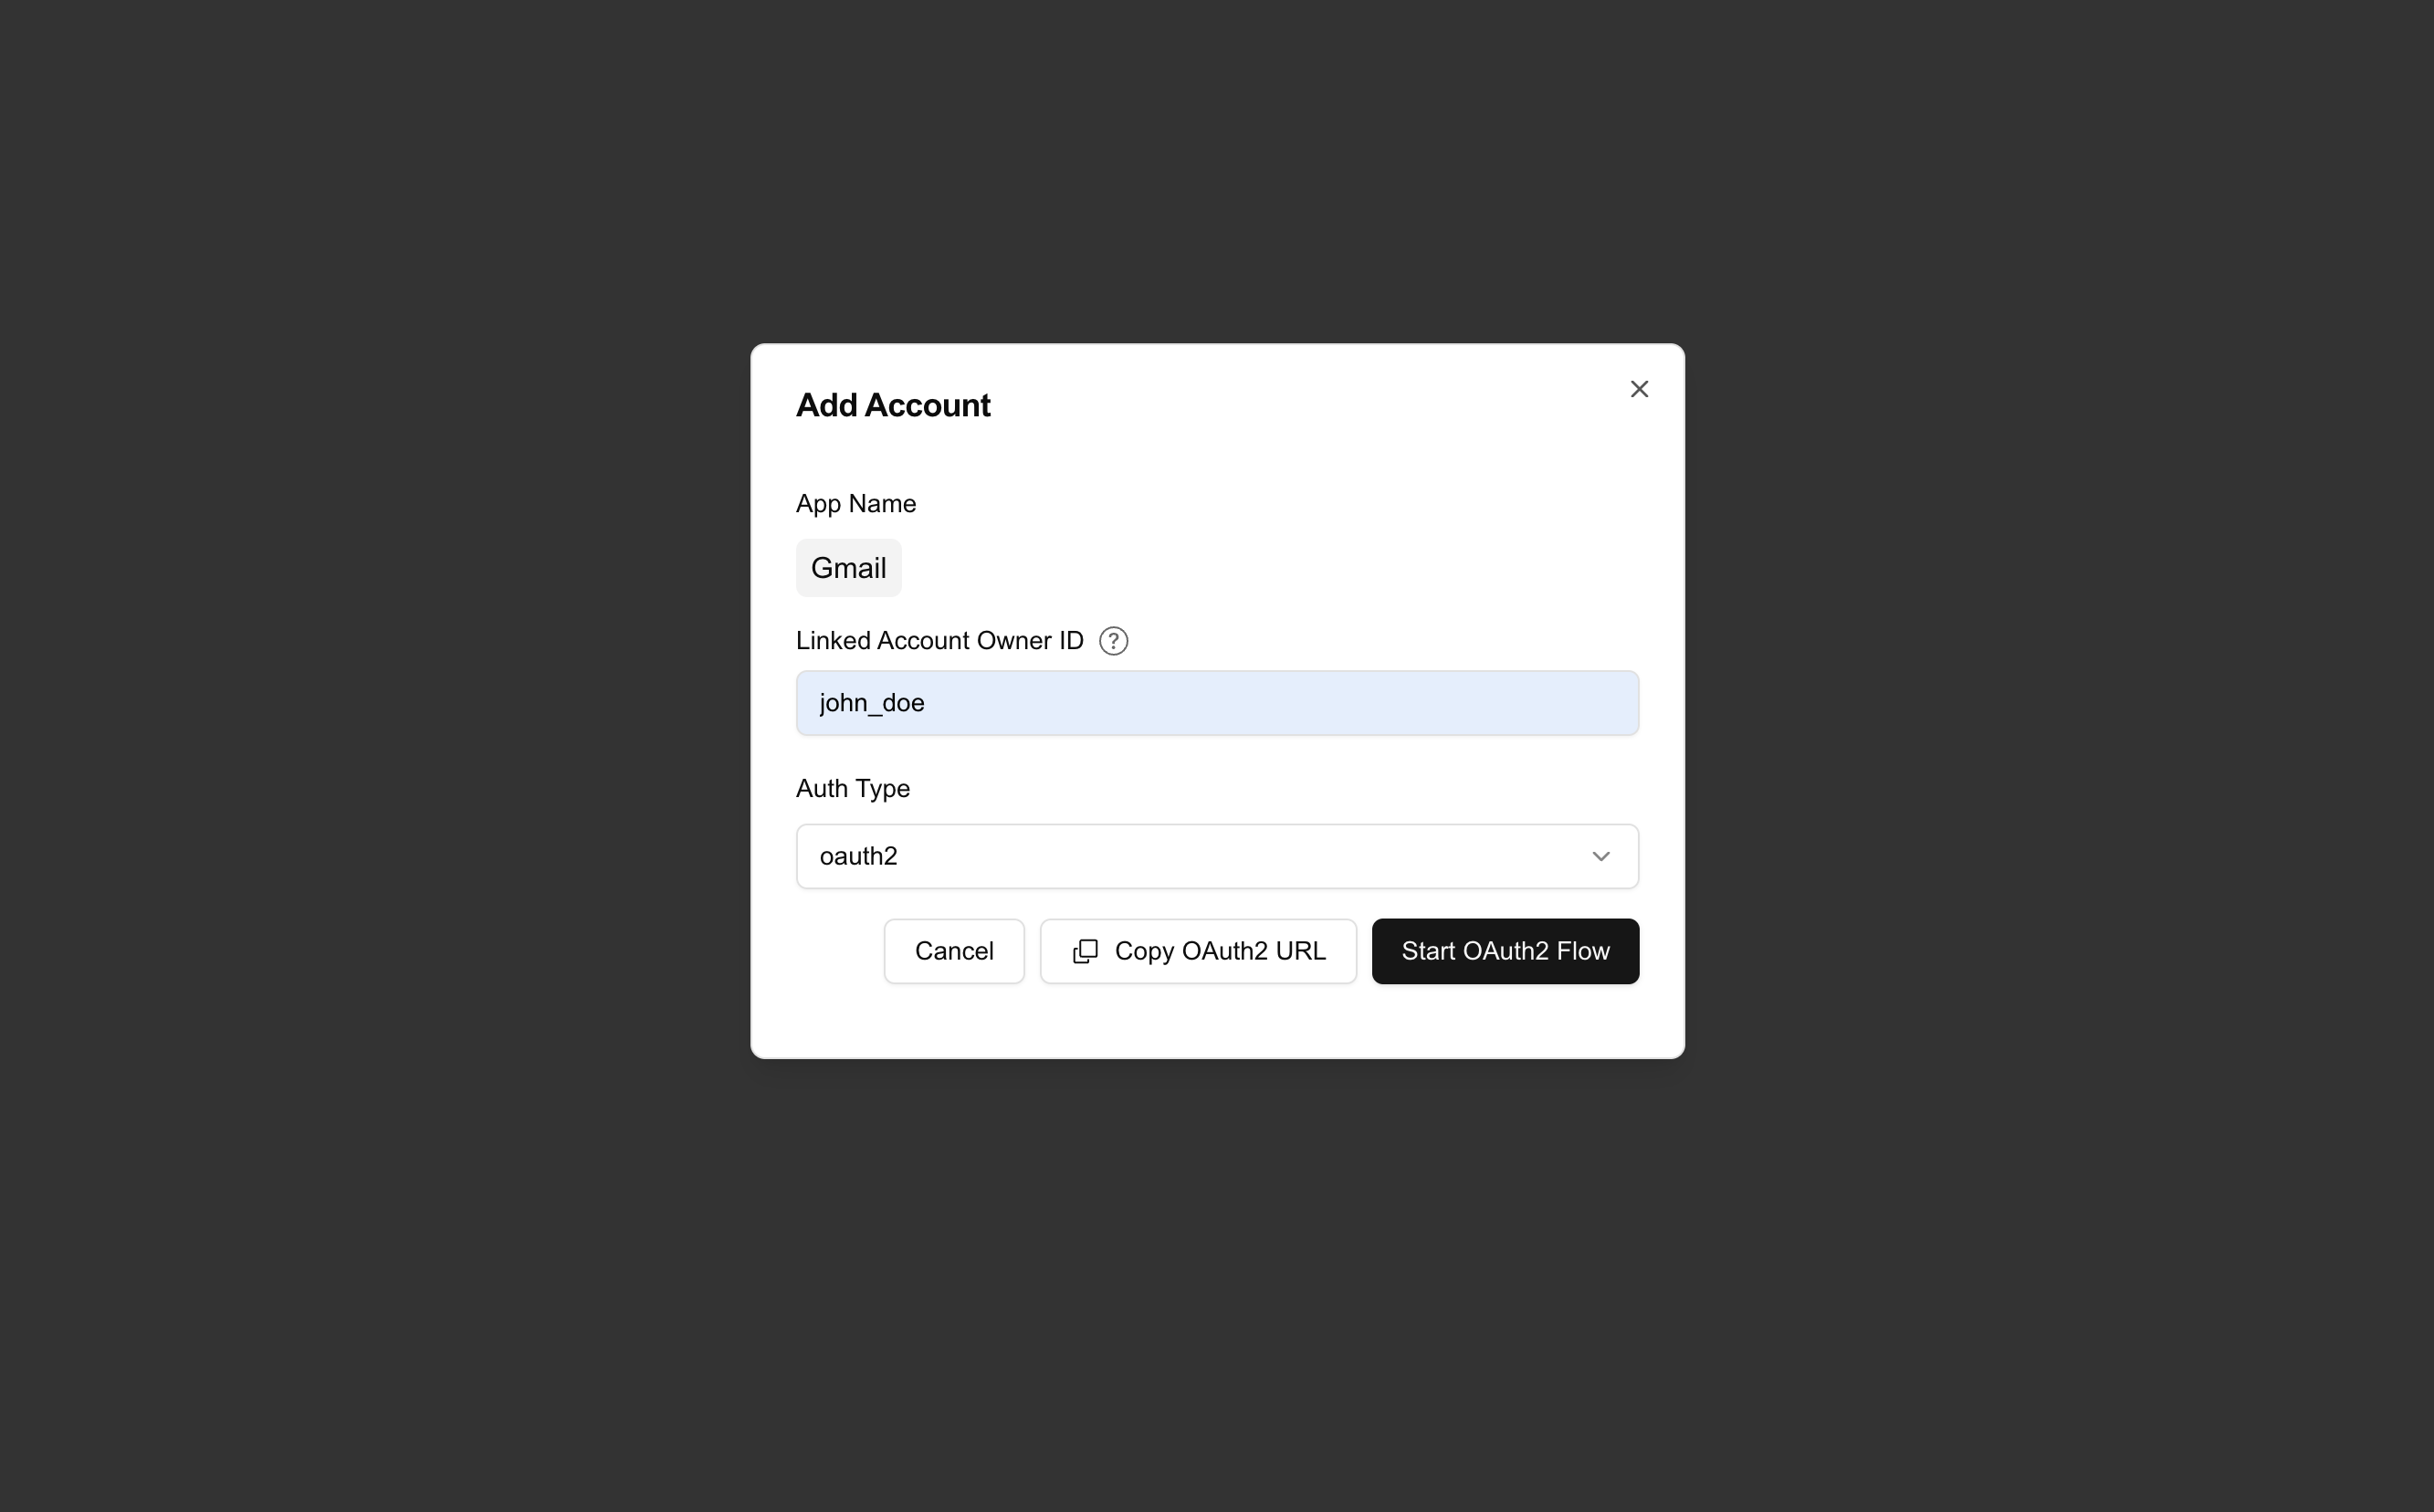
You can use your own **OAuth2 Client** instead of ACI.dev's default OAuth2 client when configuring `App` with `oauth2` authentication method.
 ## Why provide your own OAuth2 client?
**Branding & White-labeling**
* Your name and logo appear on OAuth2 consent screens
* Delivers a white-labelled experience, free from third-party branding
* Builds user trust by presenting a consistent, recognizable interface
**Control & Security**
* Full control over OAuth2 settings (token lifetimes, scopes, redirect URIs, etc.)
* Easier integration with your own internal systems or policies
## How to configure your own OAuth2 client?
For example, if you are configuring `GMAIL`, you need to create an OAuth2 client in the google cloud console.
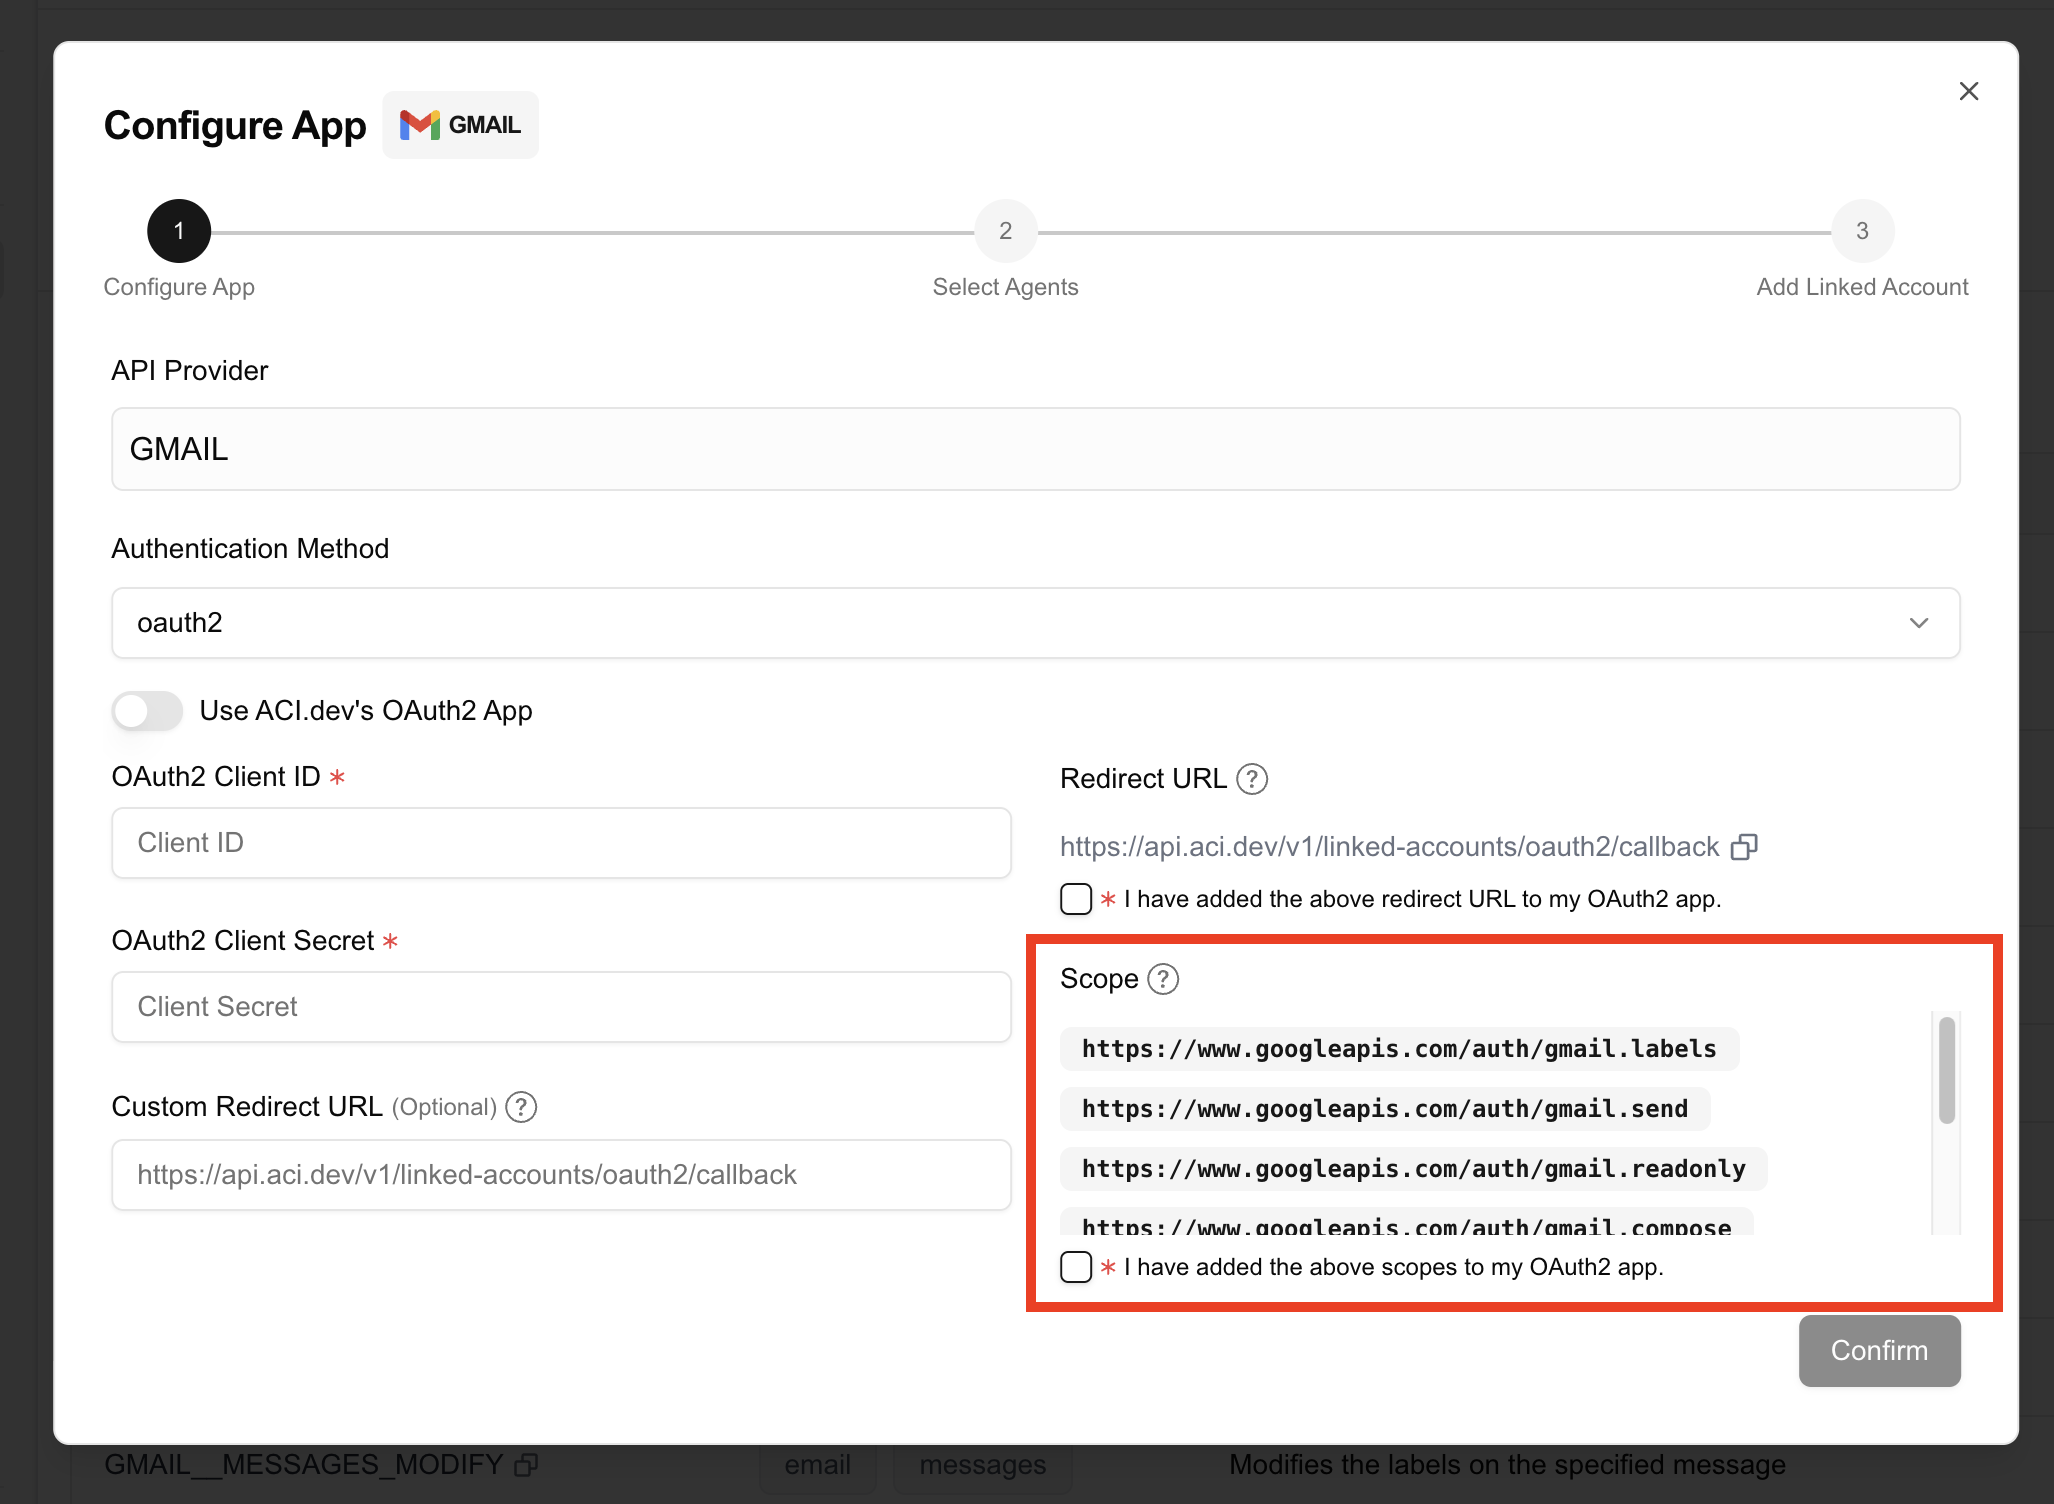
Most OAuth2 app providers have fine-grained control over the scopes of the OAuth2 client. You need to configure the scopes for your OAuth2 client to match the scopes the app requires.
Please make sure you have configured `All` listed scopes on the popup window.
## Why provide your own OAuth2 client?
**Branding & White-labeling**
* Your name and logo appear on OAuth2 consent screens
* Delivers a white-labelled experience, free from third-party branding
* Builds user trust by presenting a consistent, recognizable interface
**Control & Security**
* Full control over OAuth2 settings (token lifetimes, scopes, redirect URIs, etc.)
* Easier integration with your own internal systems or policies
## How to configure your own OAuth2 client?
For example, if you are configuring `GMAIL`, you need to create an OAuth2 client in the google cloud console.
Most OAuth2 app providers have fine-grained control over the scopes of the OAuth2 client. You need to configure the scopes for your OAuth2 client to match the scopes the app requires.
Please make sure you have configured `All` listed scopes on the popup window.
 The redirect URL is the URL that the oauth2 provider will redirect to after the user has authenticated.
You have two options for setting the redirect URL:
* (Simple) Use ACI.dev's default redirect URL
* (Advanced) Use your own redirect URL, e.g., `https://your-domain.com/oauth2/callback`
**When will you need to use the second option?**
Some OAuth2 providers—such as Google—display the domain of the redirect URL during the authorization flow. This means that if your users are redirected to our platform’s domain, it will appear in the authorization screen, potentially exposing our brand instead of yours.
To preserve your brand identity throughout the OAuth2 flow, you need to use you own redirect URL.
Then, configure your backend to forward requests from your own redirect URL to ACI.dev's redirect endpoint. This way, the domain shown to the end user during authorization remains your own, maintaining a seamless white-labeled experience
The redirect URL is the URL that the oauth2 provider will redirect to after the user has authenticated.
You have two options for setting the redirect URL:
* (Simple) Use ACI.dev's default redirect URL
* (Advanced) Use your own redirect URL, e.g., `https://your-domain.com/oauth2/callback`
**When will you need to use the second option?**
Some OAuth2 providers—such as Google—display the domain of the redirect URL during the authorization flow. This means that if your users are redirected to our platform’s domain, it will appear in the authorization screen, potentially exposing our brand instead of yours.
To preserve your brand identity throughout the OAuth2 flow, you need to use you own redirect URL.
Then, configure your backend to forward requests from your own redirect URL to ACI.dev's redirect endpoint. This way, the domain shown to the end user during authorization remains your own, maintaining a seamless white-labeled experience
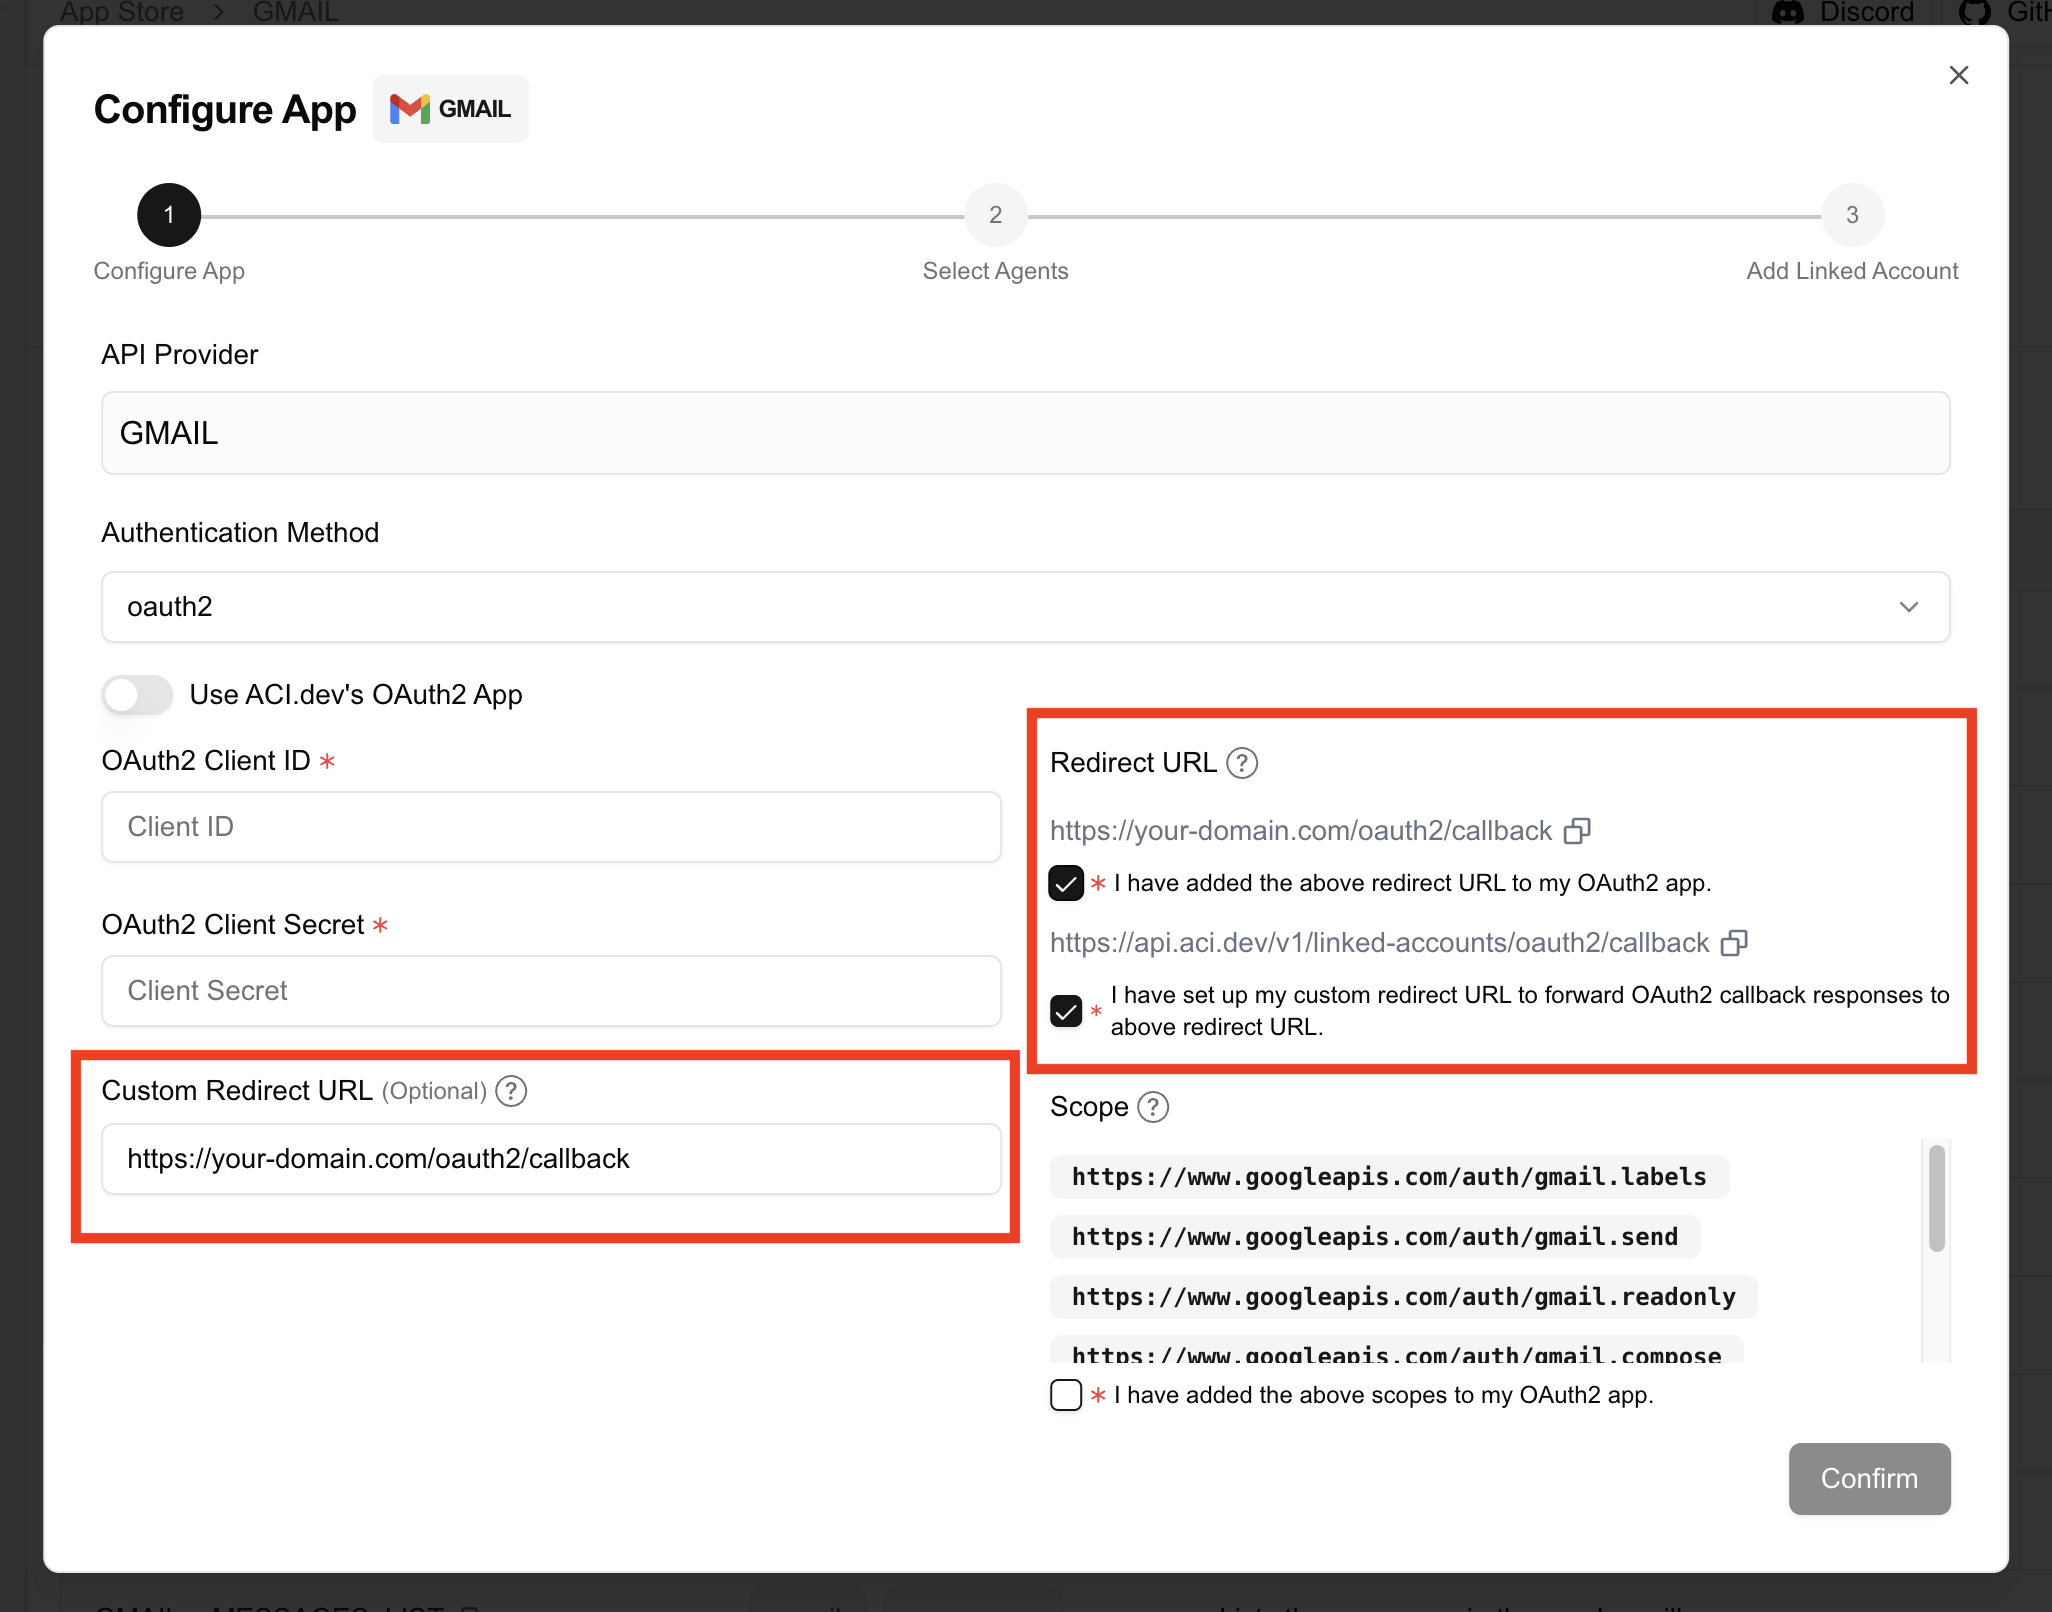 If you use your own redirect URL, make sure you have configured your backend to forward requests from your own redirect URL to ACI.dev's redirect endpoint so ACI.dev can finish the account linking process.
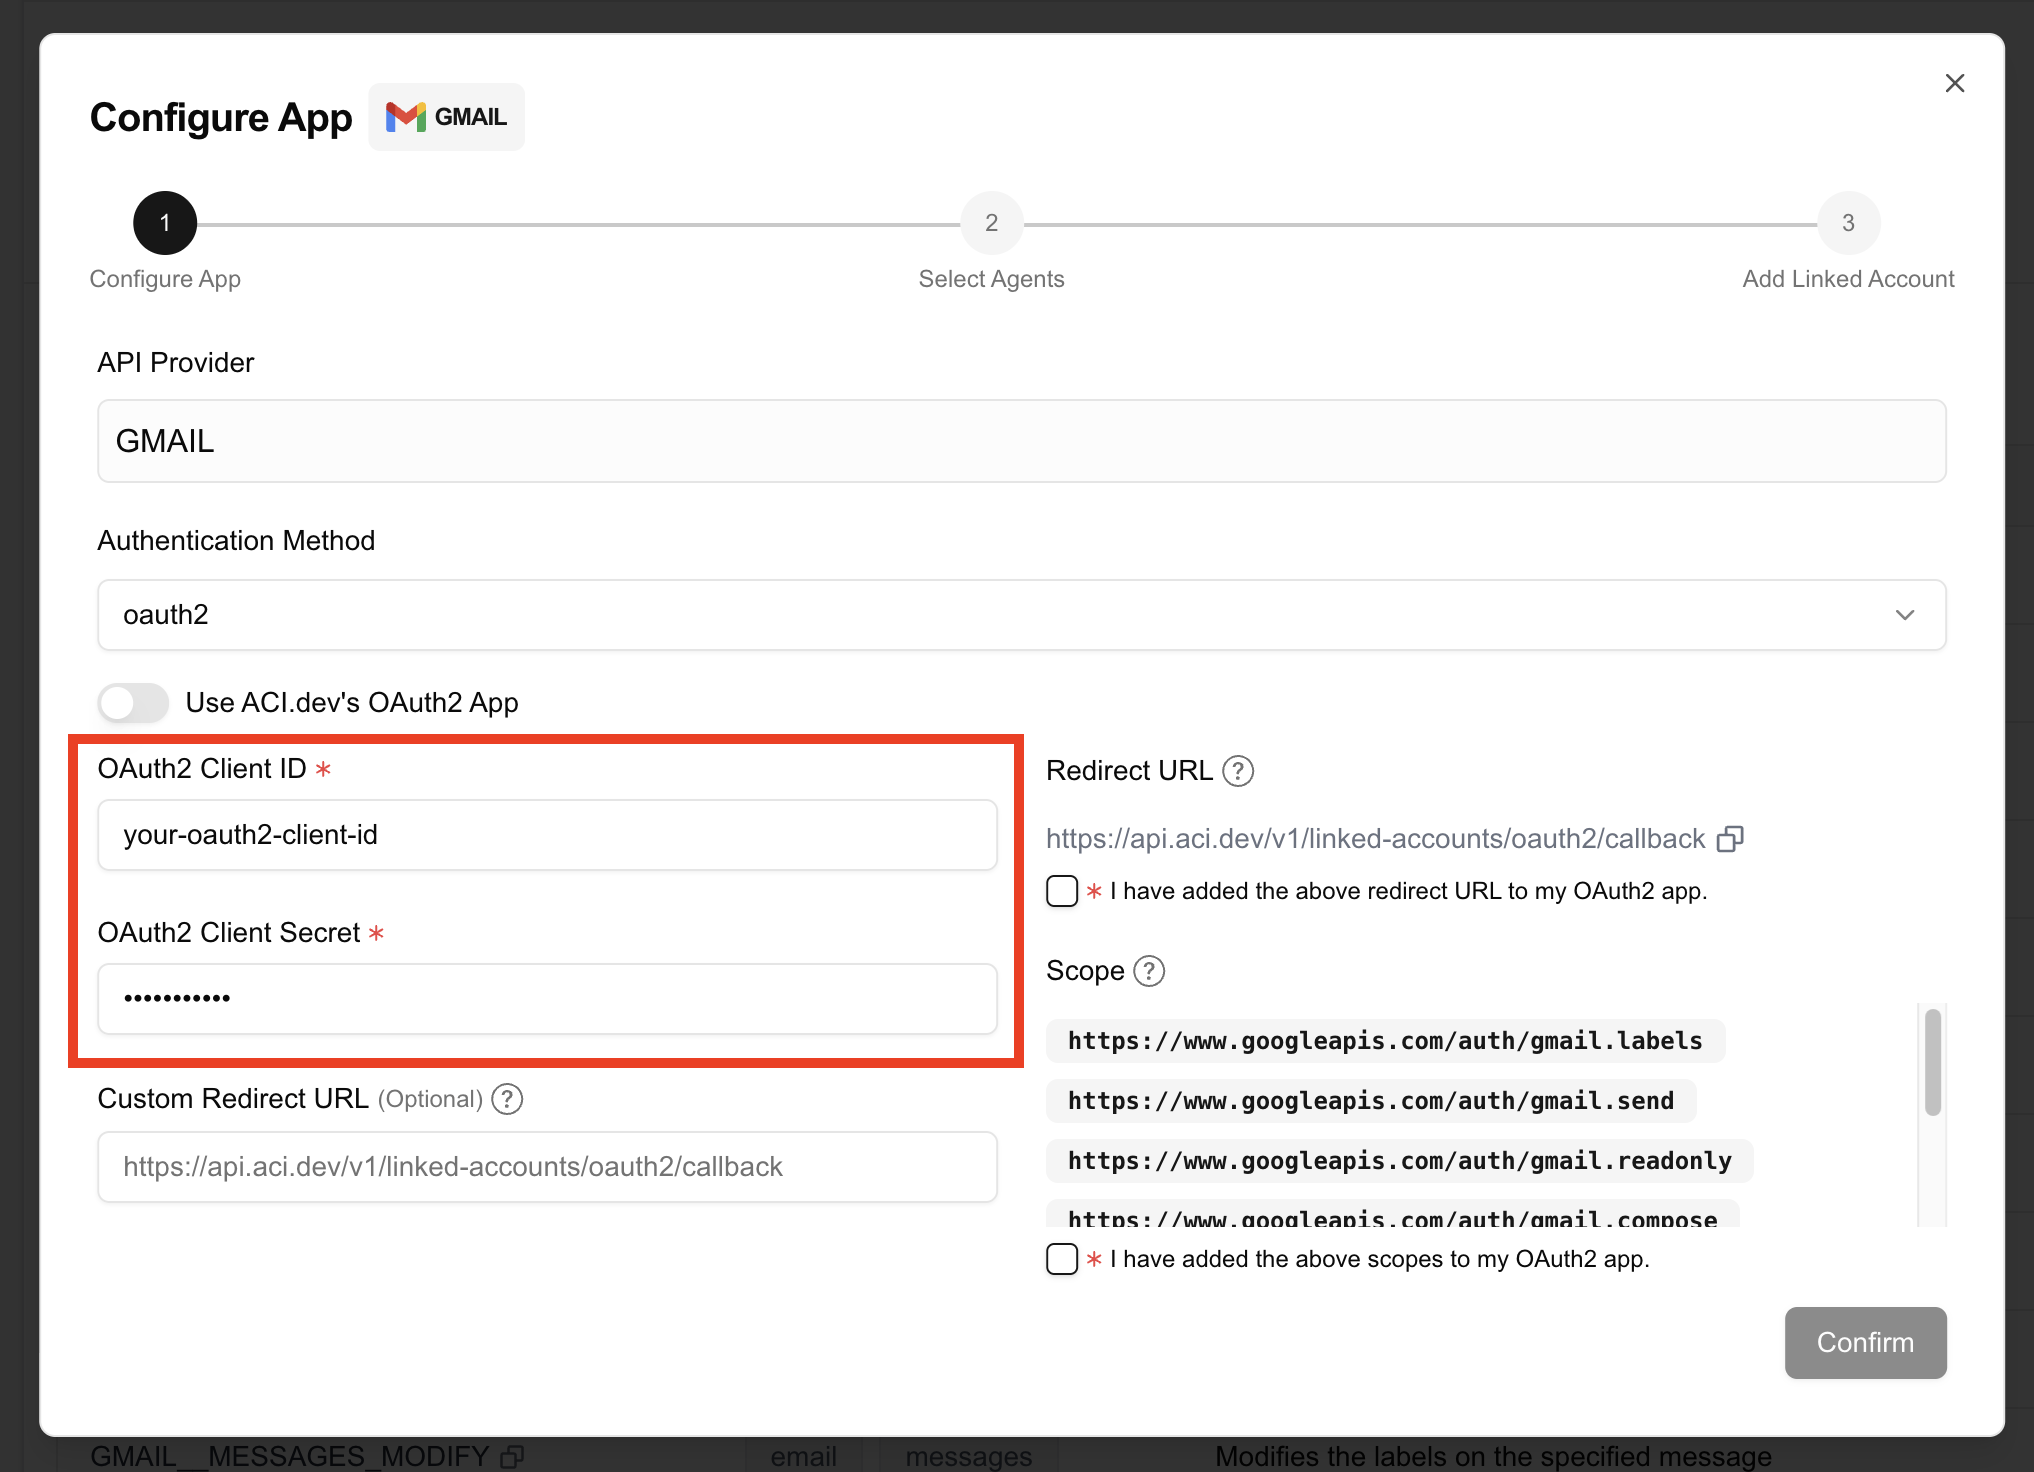
Copy & paste the OAuth2 `client id` and `client secret` from the OAuth2 client you created.
If you use your own redirect URL, make sure you have configured your backend to forward requests from your own redirect URL to ACI.dev's redirect endpoint so ACI.dev can finish the account linking process.
Copy & paste the OAuth2 `client id` and `client secret` from the OAuth2 client you created.
 **You cannot change the OAuth2 client after setup.**
If you need to update it, you must **delete and reconfigure the app** from scratch.
# Overview
Source: https://aci.dev/docs/agent-examples/overview
See examples of AI agents built with ACI.dev
Please see the [Agent Examples ](https://github.com/aipotheosis-labs/aci-agents) repo for examples of AI agents built with ACI.dev.
# Introduction
Source: https://aci.dev/docs/agent-playground/introduction
A playground to test you ACI.dev setup
Agent Playground is a beta feature and not recommended for production use. Expect limited stability and possible changes.
The Agent Playground provides a no-code environment where you can test AI agents performing tasks on behalf of users. This playground allows you to test how your agent will interact with various functions and applications without writing any code.
**You cannot change the OAuth2 client after setup.**
If you need to update it, you must **delete and reconfigure the app** from scratch.
# Overview
Source: https://aci.dev/docs/agent-examples/overview
See examples of AI agents built with ACI.dev
Please see the [Agent Examples ](https://github.com/aipotheosis-labs/aci-agents) repo for examples of AI agents built with ACI.dev.
# Introduction
Source: https://aci.dev/docs/agent-playground/introduction
A playground to test you ACI.dev setup
Agent Playground is a beta feature and not recommended for production use. Expect limited stability and possible changes.
The Agent Playground provides a no-code environment where you can test AI agents performing tasks on behalf of users. This playground allows you to test how your agent will interact with various functions and applications without writing any code.
 The agent playground operates in a stateless manner and we don't store any conversation history on the server side. Conversation history is cleared when you close the tab.
### Using the Playground
The agent playground operates in a stateless manner and we don't store any conversation history on the server side. Conversation history is cleared when you close the tab.
### Using the Playground
 To use the Agent Playground, you need to configure the following settings:
1. Select an existing Agent from the dropdown menu. (You can create and manage agents in the `Agents` tab)
2. Select `Apps` you want to test. (Only apps that have been enabled for your selected agent will appear in this list)
3. Select a Linked Account Owner ID. (The agent will only have access to linked accounts from this owner)
4. Select `Functions` you want to test. (Only functions of selected apps will show up in dropdown) This allows you to control exactly which tool are available during testing.
#### Play with the agent
Once you've configured your settings, you can interact with the agent through a chat interface:
e.g., "star github repo aipotheosis-labs/aci", "what is the top news today?"
# Create App Configuration
Source: https://aci.dev/docs/api-reference/app-configurations/create-app-configuration
post /v1/app-configurations
Create an app configuration for a project
# Delete App Configuration
Source: https://aci.dev/docs/api-reference/app-configurations/delete-app-configuration
delete /v1/app-configurations/{app_name}
Delete an app configuration by app name
Warning: This will delete the app configuration from the project,
associated linked accounts, and then the app configuration record itself.
# Get App Configuration
Source: https://aci.dev/docs/api-reference/app-configurations/get-app-configuration
get /v1/app-configurations/{app_name}
Get an app configuration by app name
# List App Configurations
Source: https://aci.dev/docs/api-reference/app-configurations/list-app-configurations
get /v1/app-configurations
List all app configurations for a project, with optionally filters
# Update App Configuration
Source: https://aci.dev/docs/api-reference/app-configurations/update-app-configuration
patch /v1/app-configurations/{app_name}
Update an app configuration by app name.
If a field is not included in the request body, it will not be changed.
# Get App Details
Source: https://aci.dev/docs/api-reference/apps/get-app-details
get /v1/apps/{app_name}
Returns an application (name, description, and functions).
# Search Apps
Source: https://aci.dev/docs/api-reference/apps/search-apps
get /v1/apps/search
Search for Apps.
Intented to be used by agents to search for apps based on natural language intent.
# Execute
Source: https://aci.dev/docs/api-reference/functions/execute
post /v1/functions/{function_name}/execute
# Get Function Definition
Source: https://aci.dev/docs/api-reference/functions/get-function-definition
get /v1/functions/{function_name}/definition
Return the function definition that can be used directly by LLM.
The actual content depends on the intended model (inference provider, e.g., OpenAI, Anthropic, etc.) and the function itself.
# Search Functions
Source: https://aci.dev/docs/api-reference/functions/search-functions
get /v1/functions/search
Returns the basic information of a list of functions.
# Delete Linked Account
Source: https://aci.dev/docs/api-reference/linked-accounts/delete-linked-account
delete /v1/linked-accounts/{linked_account_id}
Delete a linked account by its id.
# Get Linked Account
Source: https://aci.dev/docs/api-reference/linked-accounts/get-linked-account
get /v1/linked-accounts/{linked_account_id}
Get a linked account by its id.
- linked_account_id uniquely identifies a linked account across the platform.
# Link Oauth2 Account
Source: https://aci.dev/docs/api-reference/linked-accounts/link-oauth2-account
get /v1/linked-accounts/oauth2
Start an OAuth2 account linking process.
It will return a redirect url (as a string, instead of RedirectResponse) to the OAuth2 provider's authorization endpoint.
# Linked Accounts Oauth2 Callback
Source: https://aci.dev/docs/api-reference/linked-accounts/linked-accounts-oauth2-callback
get /v1/linked-accounts/oauth2/callback
Callback endpoint for OAuth2 account linking.
- A linked account (with necessary credentials from the OAuth2 provider) will be created in the database.
# List Linked Accounts
Source: https://aci.dev/docs/api-reference/linked-accounts/list-linked-accounts
get /v1/linked-accounts
List all linked accounts.
- Optionally filter by app_name and linked_account_owner_id.
- app_name + linked_account_owner_id can uniquely identify a linked account.
- This can be an alternatively way to GET /linked-accounts/{linked_account_id} for getting a specific linked account.
# Overview
Source: https://aci.dev/docs/api-reference/overview
The ACI.dev API powers the ACI.dev platform and SDK.
Most of the time, you won’t need to interact with the API directly. Instead, you should use our offerrings through either [platform](platform.aci.dev) or [SDK](https://github.com/aipotheosis-labs/aci-python-sdk).
Our [SDK](https://github.com/aipotheosis-labs/aci-python-sdk) interacts with these APIs under the hood, but provide additional agent-centric features specifically designed for LLM-based agents.
## Authentication
For programmatic access, the API supports API key-based authentication. You can generate an API key by creating an agent on [ACI.dev platform](platform.aci.dev).
You can then provide this API key to SDK environment variable or set it in `X-API-KEY` header if you are calling API directly.
# CAMEL AI
Source: https://aci.dev/docs/cookbooks/camel-ai
Using the CAMEL AI multi-agent framework with ACI tools
# CAMEL AI Cookbook: Pairing AI Agents with 600+ MCP Tools via ACI.dev
You can also check this cookbook in [Google Colab](https://colab.research.google.com/drive/1ssaxacH4ahbFcv0fz6azy7hX9yjEXYro?usp=sharing).
To use the Agent Playground, you need to configure the following settings:
1. Select an existing Agent from the dropdown menu. (You can create and manage agents in the `Agents` tab)
2. Select `Apps` you want to test. (Only apps that have been enabled for your selected agent will appear in this list)
3. Select a Linked Account Owner ID. (The agent will only have access to linked accounts from this owner)
4. Select `Functions` you want to test. (Only functions of selected apps will show up in dropdown) This allows you to control exactly which tool are available during testing.
#### Play with the agent
Once you've configured your settings, you can interact with the agent through a chat interface:
e.g., "star github repo aipotheosis-labs/aci", "what is the top news today?"
# Create App Configuration
Source: https://aci.dev/docs/api-reference/app-configurations/create-app-configuration
post /v1/app-configurations
Create an app configuration for a project
# Delete App Configuration
Source: https://aci.dev/docs/api-reference/app-configurations/delete-app-configuration
delete /v1/app-configurations/{app_name}
Delete an app configuration by app name
Warning: This will delete the app configuration from the project,
associated linked accounts, and then the app configuration record itself.
# Get App Configuration
Source: https://aci.dev/docs/api-reference/app-configurations/get-app-configuration
get /v1/app-configurations/{app_name}
Get an app configuration by app name
# List App Configurations
Source: https://aci.dev/docs/api-reference/app-configurations/list-app-configurations
get /v1/app-configurations
List all app configurations for a project, with optionally filters
# Update App Configuration
Source: https://aci.dev/docs/api-reference/app-configurations/update-app-configuration
patch /v1/app-configurations/{app_name}
Update an app configuration by app name.
If a field is not included in the request body, it will not be changed.
# Get App Details
Source: https://aci.dev/docs/api-reference/apps/get-app-details
get /v1/apps/{app_name}
Returns an application (name, description, and functions).
# Search Apps
Source: https://aci.dev/docs/api-reference/apps/search-apps
get /v1/apps/search
Search for Apps.
Intented to be used by agents to search for apps based on natural language intent.
# Execute
Source: https://aci.dev/docs/api-reference/functions/execute
post /v1/functions/{function_name}/execute
# Get Function Definition
Source: https://aci.dev/docs/api-reference/functions/get-function-definition
get /v1/functions/{function_name}/definition
Return the function definition that can be used directly by LLM.
The actual content depends on the intended model (inference provider, e.g., OpenAI, Anthropic, etc.) and the function itself.
# Search Functions
Source: https://aci.dev/docs/api-reference/functions/search-functions
get /v1/functions/search
Returns the basic information of a list of functions.
# Delete Linked Account
Source: https://aci.dev/docs/api-reference/linked-accounts/delete-linked-account
delete /v1/linked-accounts/{linked_account_id}
Delete a linked account by its id.
# Get Linked Account
Source: https://aci.dev/docs/api-reference/linked-accounts/get-linked-account
get /v1/linked-accounts/{linked_account_id}
Get a linked account by its id.
- linked_account_id uniquely identifies a linked account across the platform.
# Link Oauth2 Account
Source: https://aci.dev/docs/api-reference/linked-accounts/link-oauth2-account
get /v1/linked-accounts/oauth2
Start an OAuth2 account linking process.
It will return a redirect url (as a string, instead of RedirectResponse) to the OAuth2 provider's authorization endpoint.
# Linked Accounts Oauth2 Callback
Source: https://aci.dev/docs/api-reference/linked-accounts/linked-accounts-oauth2-callback
get /v1/linked-accounts/oauth2/callback
Callback endpoint for OAuth2 account linking.
- A linked account (with necessary credentials from the OAuth2 provider) will be created in the database.
# List Linked Accounts
Source: https://aci.dev/docs/api-reference/linked-accounts/list-linked-accounts
get /v1/linked-accounts
List all linked accounts.
- Optionally filter by app_name and linked_account_owner_id.
- app_name + linked_account_owner_id can uniquely identify a linked account.
- This can be an alternatively way to GET /linked-accounts/{linked_account_id} for getting a specific linked account.
# Overview
Source: https://aci.dev/docs/api-reference/overview
The ACI.dev API powers the ACI.dev platform and SDK.
Most of the time, you won’t need to interact with the API directly. Instead, you should use our offerrings through either [platform](platform.aci.dev) or [SDK](https://github.com/aipotheosis-labs/aci-python-sdk).
Our [SDK](https://github.com/aipotheosis-labs/aci-python-sdk) interacts with these APIs under the hood, but provide additional agent-centric features specifically designed for LLM-based agents.
## Authentication
For programmatic access, the API supports API key-based authentication. You can generate an API key by creating an agent on [ACI.dev platform](platform.aci.dev).
You can then provide this API key to SDK environment variable or set it in `X-API-KEY` header if you are calling API directly.
# CAMEL AI
Source: https://aci.dev/docs/cookbooks/camel-ai
Using the CAMEL AI multi-agent framework with ACI tools
# CAMEL AI Cookbook: Pairing AI Agents with 600+ MCP Tools via ACI.dev
You can also check this cookbook in [Google Colab](https://colab.research.google.com/drive/1ssaxacH4ahbFcv0fz6azy7hX9yjEXYro?usp=sharing).
⭐ *Visit [ACI.dev](https://aci.dev), join our [Discord](https://discord.gg/nnqFSzq2ne) or check our [Documentation](https://www.aci.dev/docs/introduction/overview)*
## What is CAMEL AI?
**CAMEL AI** (Communicative Agents for "Mind" Exploration of Large Language Model Society) is the world's first multi-agent framework designed for building autonomous, communicative agents that can collaborate to solve complex tasks.
Unlike traditional single-agent systems, CAMEL *enables multiple AI agents to work together*, *maintain stateful memory* , and *evolve through interactions with their environment*.
The framework **supports scalable systems** with **millions of agents** and focuses on minimal human intervention, making it *ideal for sophisticated automation workflows* and *research into multi-agent behaviors*.
This cookbook demonstrates how to supercharge your **CAMEL AI agents** by connecting them to 600+ MCP tools seamlessly through **ACI.dev**.
**Key Learnings:**
* Understanding the evolution from traditional tooling to MCP
* How ACI.dev enhances vanilla MCP with better tool management
* Setting up CAMEL AI agents with ACI's MCP server
* Creating practical demos like GitHub repository management
* Best practices for multi-app AI workflows
This approach focuses on using **CAMEL with ACI.dev's enhanced MCP servers** to create more powerful and flexible AI agents.
## 📦 Installation
First, install the required packages for this cookbook:
```bash
pip install "camel-ai[all]==0.2.62" python-dotenv rich uv
```
> **Note:** This method uses uv, a fast Python installer and toolchain, to run the ACI.dev MCP server directly from the command line, as defined in our configuration script.
## 🔑 Setting Up API Keys
This cookbook uses multiple services that require API keys:
1. **ACI.dev API Key**: Sign up at [ACI.dev](https://aci.dev) and get your API key from Project Settings
2. **Google Gemini API Key**: Get your API key from [Google's API Console](https://console.developers.google.com/)
3. **Linked Account Owner ID**: This is provided when you connect apps in ACI.dev
The scripts will load these from environment variables, so you'll need to create a `.env` file.
## 🤖 Introduction
LLMs have been in the AI landscape for some time now and so are the tools powering them.
On their own, LLMs can crank out essays, spark creative ideas, or break down tricky concepts which in itself is pretty impressive.
But let's be real: without the ability to connect to the world around them, *they're just fancy word machines*. What turns them into real problem-solvers, capable of grabbing fresh data or tackling tasks, is **tooling**.
## 🔧 Traditional Tooling
**Tooling** is essentially a set of directions that tells an LLM how to *kick off a specific action when you ask for it.*
Imagine it as handing your AI a bunch of tasks to do, it wasn't built for, like pulling in the latest info or automating a process. The catch? **Historically, tooling has been a walled garden**. Every provider think OpenAI, Cursor, or others, has their own implementation of tooling, which creates a mismatch of setups that don't play nice together. It's a hassle for users and vendors alike.
## 🌐 MCP: The Better Tooling
Which is what **MCP** solves. **MCP** is like a universal connector, a *straightforward protocol that lets any LLM, agent, or editor hook up with tools from any source.*
It's built on a client-server setup: the **client** (your LLM or agent) talks to the server (where the tools live). When you need something beyond the LLM's cutoff knowledge, like up-to-date docs, it doesn't flounder. It pings the MCP server, grabs the right function's details, runs it, and delivers the answer in plain English.
### MCP Architecture Example
Here's a **practical example**:
1. Imagine you're working in **Cursor (the client)** and need to implement a function using the latest React hooks from the React 18 documentation.
2. You request, "Please provide a useEffect setup for the current version."
The challenge? The LLM powering *Cursor has a knowledge cutoff, so it's limited* to, say, React 17 and unaware of recent updates.
With MCP, this isn't an issue. It connects to a search MCP server, retrieves the latest React documentation, and delivers the precise useEffect syntax directly from the source.
It's like equipping your AI with a seamless connection to the most up-to-date resources, ensuring accuracy without any detours.
*MCP's a game-changer, no question*. **But it's not perfect**. It often locks tools to single apps, requires hands-on setup for each one, and can't pick the best tool for the job on its own. **That's where ACI.dev steps in — to smooth out those rough edges and push things further.**
## 🚀 Outdoing Vanilla MCP
### Why ACI.dev Takes MCP to the Next Level
MCP lays a strong groundwork, but it's got some gaps. Let's break down where it stumbles and how ACI.dev steps up to fix it.
With standard MCP:
* **One server, one app**: You're stuck running separate servers for each tool — like one for GitHub, another for Gmail — which gets messy fast.
* **Setup takes effort**: Every tool needs its own configuration, and dealing with OAuth for a bunch of them is a headache for a normal or enterprise user
* **No smart tool picks**: MCP can't figure out the right tool for a task — you've got to spell it all out ahead of time in the prompt to let the LLM know what tool to use and execute.
With these headaches in mind, ACI.dev built something better. Our platform ties AI to third-party software through tool-calling APIs, making integration and automation a breeze.
It does this by introducing **two ways** to access MCP servers:
* The **Apps MCP Server** and the **Unified MCP Server** to give your AI a cleaner way to tap into tools and data.
This setup gives you access to 600+ MCP tools in the palm of your hand and make it easy for you to access any tool via both these methods.
### How ACI.dev Levels Up MCP
* **All Your Apps, One Server** — ACI Apps MCP Server lets you set up tools like GitHub, Vercel, Cloudflare, and Gmail in one spot. It's a single hub for your AI's toolkit, keeping things simple.
* **Tools That Find Themselves** - Forget predefining every tool. Unified MCP Server uses functions like ACI\_SEARCH\_FUNCTION and ACI\_EXECUTE\_FUNCTION to let your AI hunt down and run the perfect tool for the job.
* **Smarter Context Handling** — MCP can bog down your LLM by stuffing its context with tools you don't need. ACI.dev keeps it lean, loading only what's necessary, when it's necessary, so your LLM has enough memory for actual token prediction.
* **Smooth Cross-App Flows** — ACI.dev makes linking apps seamless without jumping between servers.
* **Easy Setup, and Authentication** - Configuring tools individually can be time-consuming, but ACI simplifies the process by centralizing everything. Manage accounts, API keys, and settings in one hub. Just add apps from the ACI App Store, enable them in Project Settings, and link them with a single linked-account-owner-id. Done.
## 🛠️ Tutorial: Two Ways to Integrate CAMEL AI with ACI
Alright, we've covered how MCP and ACI.dev make LLMs way more than just word generators. Now, let's get our hands dirty with practical demos using CAMEL AI. There are **two ways** to integrate CAMEL AI with ACI.dev:
1. **MCP Server Approach** - Using CAMEL's MCPToolkit with ACI's MCP servers
2. **Direct Toolkit Approach** - Using CAMEL's built-in ACIToolkit
We'll explore both methods with hands-on examples. Let's dive in.
### Step 1: Signing Up and Setting Up Your ACI.dev Project
First things first, head to [ACI.dev](https://aci.dev) and sign up if you don't have an account. Once you're in, create a new project or pick one you've already got. This is your control hub for managing apps and snagging your API key.
### Step 2: Adding Apps in the ACI App Store
1. Zip over to the ACI App Store.
2. Search for the GitHub app, hit "Add," and follow the prompts to link your GitHub account. During the OAuth flow, you'll set a linked-account-owner-id (usually your email or a unique ID from ACI). Jot this down—you'll need it later.
3. For these demos, GitHub is our star player. Want to level up? You can add Brave Search or arXiv apps for extra firepower, but they're optional here.
### Step 3: Enabling Apps and Grabbing Your API Key
1. Go to Project Settings and check the "Allowed Apps" section. Make sure GitHub (and any other apps you added) is toggled on. If it's not, flip that switch.
2. Copy your API key from this page and keep it safe. It's the golden ticket for connecting CAMEL AI to ACI's services.
### Step 4: Environment Variables Setup
Both methods use the same environment variables. Create a `.env` file in your project folder with these variables:
```bash
GEMINI_API_KEY="your_gemini_api_key_here"
ACI_API_KEY="your_aci_api_key_here"
LINKED_ACCOUNT_OWNER_ID="your_linked_account_owner_id_here"
```
Replace:
* `your_gemini_api_key_here` with your GEMINI API key for the Gemini model (get it from Google's API console)
* `your_aci_api_key_here` with the API key from ACI.dev's Project Settings
* `your_linked_account_owner_id_here` with the ID from the aci.dev platform
## 🔧 Method 1: Using MCP Server Approach
This method uses CAMEL's MCPToolkit to connect to ACI's MCP servers. It's ideal when you want to leverage the full MCP ecosystem and have more control over server configurations.
### Configuration Script
Here's the `create_config.py` script to set up the MCP server connection:
```python
import os
import json
from dotenv import load_dotenv
def create_config():
"""Create MCP config with proper environment variable substitution"""
load_dotenv() # load variables from the env
aci_api_key = os.getenv("ACI_API_KEY")
if not aci_api_key:
raise ValueError("ACI_API_KEY environment variable is required")
linked_account_owner_id = os.getenv("LINKED_ACCOUNT_OWNER_ID")
if not linked_account_owner_id:
raise ValueError("LINKED_ACCOUNT_OWNER_ID environment variable is required")
config = {
"mcpServers": {
"aci_apps": {
"command": "uvx",
"args": [
"aci-mcp@latest",
"apps-server",
"--apps=GITHUB",
"--linked-account-owner-id",
linked_account_owner_id,
],
"env": {"ACI_API_KEY": aci_api_key},
}
}
}
with open("config.json", "w") as f:
json.dump(config, f, indent=2)
print("✓ Config created successfully with API key")
return config
if __name__ == "__main__":
create_config()
```
### Main CAMEL AI Agent Script (MCP Approach)
Here's the `main.py` script to run the CAMEL AI agent:
```python
#!/usr/bin/env python3
import asyncio
import os
from dotenv import load_dotenv
from rich import print as rprint
from camel.agents import ChatAgent
from camel.messages import BaseMessage
from camel.models import ModelFactory
from camel.toolkits import MCPToolkit
from camel.types import ModelPlatformType
load_dotenv()
async def main():
try:
from create_config import create_config # creates config.json
rprint("[green]CAMEL AI Agent with MCP Toolkit[/green]")
# Create config for MCP server
create_config()
# Connect to MCP server
rprint("Connecting to MCP server...")
mcp_toolkit = MCPToolkit(config_path="config.json")
await mcp_toolkit.connect()
tools = mcp_toolkit.get_tools() # connects and loads the tools in server
rprint(f"Connected successfully. Found [cyan]{len(tools)}[/cyan] tools available")
# Set up Gemini model
model = ModelFactory.create(
model_platform=ModelPlatformType.GEMINI, # you can use other models here too
model_type=ModelPlatformType.GEMINI_2_5_PRO_PREVIEW,
api_key=os.getenv("GEMINI_API_KEY"),
model_config_dict={"temperature": 0.7, "max_tokens": 40000},
)
system_message = BaseMessage.make_assistant_message(
role_name="Assistant",
content="You are a helpful assistant with access to GitHub tools via ACI's MCP server.",
)
# Create CAMEL agent
agent = ChatAgent(
system_message=system_message,
model=model, # encapsulate your model tools and memory here
tools=tools,
memory=None
)
rprint("[green]Agent ready[/green]")
# Get user query
user_query = input("\nEnter your query: ")
user_message = BaseMessage.make_user_message(role_name="User", content=user_query)
rprint("\n[yellow]Processing...[/yellow]")
response = await agent.astep(user_message) # ask agent the question ( async )
# Show response
if response and hasattr(response, "msgs") and response.msgs:
rprint(f"\nFound [cyan]{len(response.msgs)}[/cyan] messages:")
for i, msg in enumerate(response.msgs):
rprint(f"Message {i+1}: {msg.content}")
elif response:
rprint(f"Response content: {response}")
else:
rprint("[red]No response received[/red]")
# Disconnect from MCP
await mcp_toolkit.disconnect()
rprint("\n[green]Done[/green]")
except Exception as e:
rprint(f"[red]Error: {e}[/red]")
import traceback
rprint(f"[dim]{traceback.format_exc()}[/dim]")
if __name__ == "__main__":
asyncio.run(main())
```
### Step 5: Running the Demo Task (MCP Method)
With everything set up, let's fire up the CAMEL AI agent and give it a job.
#### Run the Script
In your terminal, navigate to your project folder and run:
```bash
python main.py
```
This generates the config.json file, connects to the MCP server, and starts the agent. You'll see a prompt asking for your query.
#### Enter the Query
Type this into the prompt:
```
Create a new GitHub repository named 'my-ski-demo' with the description 'A demo repository for top US skiing locations' and push a README.md file with the content: '# Epic Ski Destinations\nBest spots: Aspen, Vail, Park City.'
```
The agent will use the GitHub tool via the MCP server to create the repo and add the README.md file.
## Method 2: Using Direct Toolkit Approach
This method uses CAMEL's built-in ACIToolkit, which provides a more direct integration without needing MCP server configuration. It's simpler to set up and ideal for straightforward use cases.
### ACIToolkit Implementation
Here's how to use the direct toolkit approach with the same environment setup:
```python
import os
from dotenv import load_dotenv
from rich import print as rprint
from camel.agents import ChatAgent
from camel.models import ModelFactory
from camel.toolkits import ACIToolkit
from camel.types import ModelPlatformType, ModelType
load_dotenv()
def main():
rprint("[green]CAMEL AI with ACI Toolkit[/green]")
# get the linked account from env or use default
linked_account_owner_id = os.getenv("LINKED_ACCOUNT_OWNER_ID")
if not linked_account_owner_id:
raise ValueError("LINKED_ACCOUNT_OWNER_ID environment variable is required")
rprint(f"Using account: [cyan]{linked_account_owner_id}[/cyan]")
# setup aci toolkit
aci_toolkit = ACIToolkit(linked_account_owner_id=linked_account_owner_id)
tools = aci_toolkit.get_tools()
rprint(f"Loaded [cyan]{len(tools)}[/cyan] tools")
# setup gemini model
model = ModelFactory.create(
model_platform=ModelPlatformType.GEMINI, # you can use other models here too
model_type=ModelPlatformType.GEMINI_2_5_PRO_PREVIEW,
api_key=os.getenv("GEMINI_API_KEY"),
model_config_dict={"temperature": 0.7, "max_tokens": 40000},
)
# create agent with tools
agent = ChatAgent(model=model, tools=tools)
rprint("[green]Agent ready[/green]")
# get user query
query = input("\nEnter your query: ")
rprint("\n[yellow]Processing...[/yellow]")
response = agent.step(query)
# show raw response
rprint(f"\n[dim]{response.msg}[/dim]")
rprint(f"\n[dim]Raw response type: {type(response)}[/dim]")
rprint(f"[dim]Response: {response}[/dim]")
# try to get the actual content
if hasattr(response, 'msgs') and response.msgs:
rprint(f"\nFound [cyan]{len(response.msgs)}[/cyan] messages:")
for i, msg in enumerate(response.msgs):
rprint(f"Message {i + 1}: {msg.content}")
rprint("\n[green]Done[/green]")
if __name__ == "__main__":
main()
```
### Running the ACIToolkit Method
1. Save the above script as `main_toolkit.py`
2. Make sure your `.env` file has the required variables (same as MCP method)
3. Run the script:
```bash
python main_toolkit.py
```
4. Enter your query when prompted, for example:
```
"Create a GitHub repository named 'my-aci-toolkit-demo' and add a README.md file with the content '# ACI Toolkit Demo'."
```
## 📊 Comparing Both Methods
| Feature | MCP Approach | ACIToolkit Approach |
| -------------------- | ----------------------------------------------- | ----------------------- |
| **Setup Complexity** | More complex (requires config files) | Simpler (direct import) |
| **Flexibility** | High (full MCP ecosystem) | Moderate (ACI-focused) |
| **Performance** | Slightly more overhead | More direct, faster |
| **Use Case** | Complex multi-server setups | Quick integrations |
| **Dependencies** | Requires `uv` and MCP config | Just CAMEL and ACI |
| **Async Support** | Full async with `astep()` (sync also supported) | Sync with `step()` |
**Choose MCP Approach when:**
* You need to integrate multiple MCP servers
* You want fine-grained control over server configuration
* You're building complex multi-agent systems
* You need async processing capabilities
**Choose ACIToolkit Approach when:**
* You want quick and simple ACI integration
* You're prototyping or building straightforward workflows
* You prefer minimal configuration overhead
* You need synchronous processing
## ✅ Checking the Results (Both Methods)
Once either agent finishes processing, head to your GitHub account to verify the results:
1. Look for the newly created repository in your GitHub account
2. Open the repo and verify that any files were created as requested
3. Check the repository description and other metadata
## 🔧 Troubleshooting and Tips (Both Methods)
* **No Repo Created?** Double-check that your GitHub app is linked in ACI.dev and that your `.env` file has the correct `ACI_API_KEY` and `LINKED_ACCOUNT_OWNER_ID`.
* **Event Loop Errors? (MCP Method)** If you hit a "RuntimeError: Event loop is already running," try adding `import nest_asyncio; nest_asyncio.apply()` at the top of `main_mcp.py` to handle async conflicts.
* **Import Errors? (ACIToolkit Method)** Make sure you have the latest version of CAMEL AI installed with `pip install --upgrade "camel-ai[all]"`
* **Tool Loading Issues?** Both methods automatically discover available tools from your ACI account. Ensure your apps are properly enabled in ACI.dev Project Settings.
* **API Rate Limits?** If you hit rate limits, the agents will typically handle retries automatically, but you may need to wait a moment between requests.
## Example Queries
You can modify the user query to ask different questions, such as:
* "Create a new repository and add multiple files with different content"
* "Search for recent articles about AI agents and create a summary document"
* "List my existing repositories and their descriptions"
* "Create an issue in my repository with a bug report"
## 🎯 Conclusion
The world of AI agents and tooling is buzzing with potential, and MCP is a solid step toward making LLMs more than just clever chatbots.
In this cookbook, you've learned how to:
* Understand the evolution from traditional tooling to MCP
* Set up ACI.dev's enhanced MCP servers with CAMEL AI
* Create practical AI agents that can interact with multiple services
* Handle authentication and configuration seamlessly
* Build workflows that span multiple applications
As new ideas and implementations pop up in the agentic space, it's worth staying curious and watching for what's next. The future's wide open, and tools like these are just the start.
**Happy coding!**
***
That's everything! Got questions about ACI.dev? Join us on [Discord](https://discord.gg/nnqFSzq2ne)! Whether you want to share feedback, explore the latest in AI agent tooling, get support, or connect with others on exciting projects, we'd love to have you in the community! 🤝
Check out our documentation:
* 📚 [ACI.dev Documentation](https://www.aci.dev/docs/introduction/overview)
* 🚀 [Getting Started Guide](https://www.aci.dev/docs/introduction/overview)
* 🐪 [CAMEL-AI Org](https://www.camel-ai.org/)
* 🌵[CAMEL-AI Docs](https://docs.camel-ai.org)
Thanks from everyone at ACI.dev
⭐ *Visit [ACI.dev](https://aci.dev), join our [Discord](https://discord.gg/nnqFSzq2ne) or check our [Documentation](https://www.aci.dev/docs/introduction/overview)*
# Agent
Source: https://aci.dev/docs/core-concepts/agent
An Agent is a logical actor within a project that accesses the platform
 * Represents a specific context or purpose for accessing the platform
* Has its own API key for authentication
* Can be restricted to use only specific `Apps` (select from the list of `Configured Apps`) within the `Project`
* Can have `Custom Instructions` for how to (and how not to) use `Functions`
* Allows for a natural multi-agent architecture within a single `Project`
Agents are designed to support multi-agent systems. Each agent can have its own set of allowed `Apps` and `Custom Instructions`, enabling specialized behaviors. For simple use cases, you can use the default agent created for your `Project`.
## Agent Level Access Control
For each `App` you configured, you can specify if you want to allow the agent to access that `App`.
* Represents a specific context or purpose for accessing the platform
* Has its own API key for authentication
* Can be restricted to use only specific `Apps` (select from the list of `Configured Apps`) within the `Project`
* Can have `Custom Instructions` for how to (and how not to) use `Functions`
* Allows for a natural multi-agent architecture within a single `Project`
Agents are designed to support multi-agent systems. Each agent can have its own set of allowed `Apps` and `Custom Instructions`, enabling specialized behaviors. For simple use cases, you can use the default agent created for your `Project`.
## Agent Level Access Control
For each `App` you configured, you can specify if you want to allow the agent to access that `App`.
 ## Custom Instructions
You can specify a `Custom Instruction` per `Function` for the `Agents` to follow. e.g.,:
* `GMAIL__SEND_EMAIL`: "Don't send emails to people outside my organization"
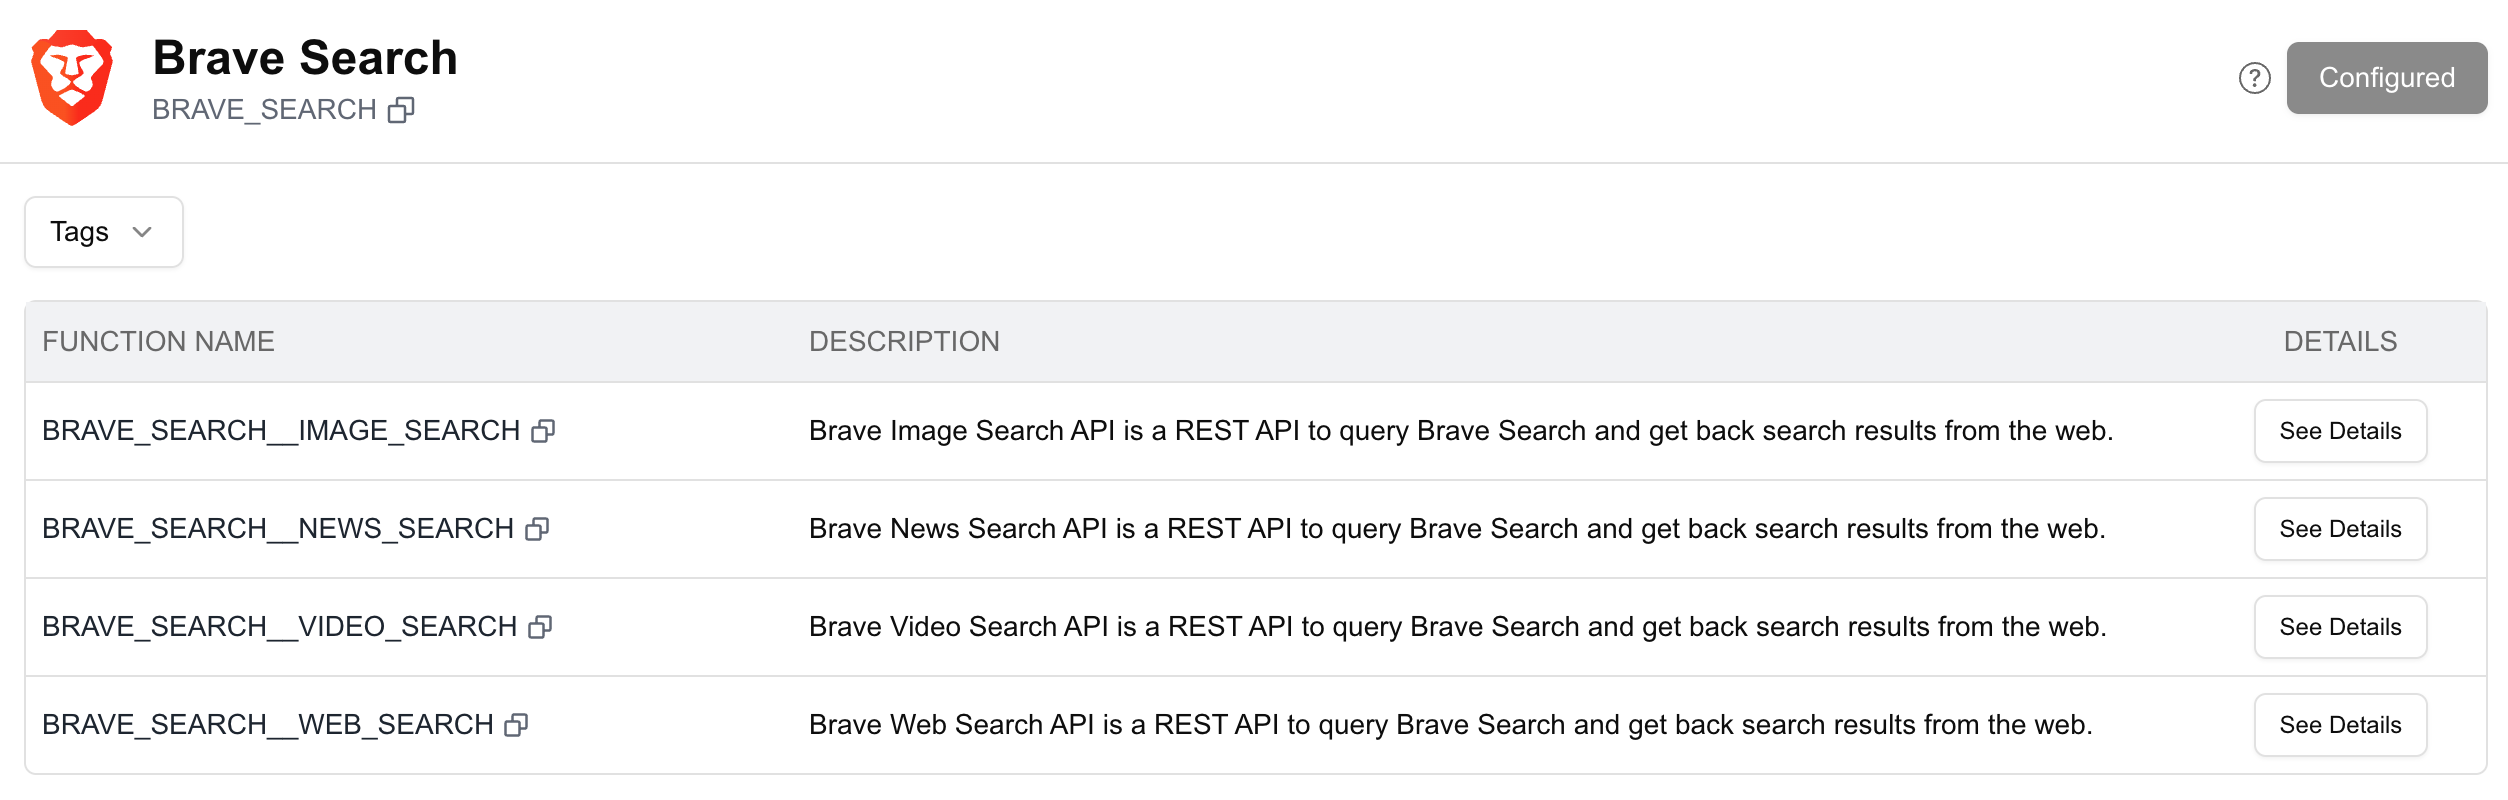
* `BRAVE_SEARCH__WEB_SEARCH`: "Only allowed to search the web for the following topics: \[...]"
* `GITHUB__STAR_REPOSITORY`: "Don't star repositories that are not related to AI"
## Custom Instructions
You can specify a `Custom Instruction` per `Function` for the `Agents` to follow. e.g.,:
* `GMAIL__SEND_EMAIL`: "Don't send emails to people outside my organization"
* `BRAVE_SEARCH__WEB_SEARCH`: "Only allowed to search the web for the following topics: \[...]"
* `GITHUB__STAR_REPOSITORY`: "Don't star repositories that are not related to AI"
 # App
Source: https://aci.dev/docs/core-concepts/app
An App represents an integration with an external service or platform (like GitHub, Google, Slack, etc.) that exposes a set of functions for AI agents to use.
# App
Source: https://aci.dev/docs/core-concepts/app
An App represents an integration with an external service or platform (like GitHub, Google, Slack, etc.) that exposes a set of functions for AI agents to use.
 ## Each App:
* Has a unique name across the platform (e.g., `GITHUB`, `SLACK`, `BRAVE_SEARCH`)
* Contains a collection of related functions usable by AI agents that interact with the external service
* Supports one or more security schemes (OAuth2, API Key, etc.) for authentication
* Has metadata including description, logo, version, provider information, and categories
# App Configuration
Source: https://aci.dev/docs/core-concepts/app-configuration
You need to create an App Configuration before your AI agents can use an App.
An `App Configuration` is created when you configure an `App` under a `Project`. It is a project-specific integration setting for a third-party service (an App) in the ACI platform. It represents:
## Each App:
* Has a unique name across the platform (e.g., `GITHUB`, `SLACK`, `BRAVE_SEARCH`)
* Contains a collection of related functions usable by AI agents that interact with the external service
* Supports one or more security schemes (OAuth2, API Key, etc.) for authentication
* Has metadata including description, logo, version, provider information, and categories
# App Configuration
Source: https://aci.dev/docs/core-concepts/app-configuration
You need to create an App Configuration before your AI agents can use an App.
An `App Configuration` is created when you configure an `App` under a `Project`. It is a project-specific integration setting for a third-party service (an App) in the ACI platform. It represents:
 * **Integration Record**: The formal relationship between your Project and a specific App (like GitHub, Google Calendar, etc.)
* **Authentication Strategy**: The selected security scheme (`OAuth2`, `API Key`, `No Auth`) used for authenticating with the App
* **Security Overrides**: Custom authentication parameters that override default App settings (e.g., client IDs, secrets)
* **Function Access Control**: Which specific functions from the App are enabled for use in your Project
* **Linked Accounts Management**: Serves as the parent configuration for all individual user accounts connected to this App
You **MUST** create an `App Configuration` before your AI agents can use an `App`. Each `Project` can have one configuration per `App`, allowing you to control which `Apps` and `Functions` are accessible within that `Project`.
Each Project can configure multiple Apps, but only one configuration per App is allowed to maintain simplicity. App Configurations are prerequisites for using any third-party service with your AI agents and are managed through the ACI Developer Portal.
## Authentication Types
Each App may support one or more authentication types. You need to select one that works for your use case when creating an `App Configuration`.
All the `Linked Accounts` under the `App Configuration` will use the same authentication type.
* **OAuth2**: The most common authentication type for third-party services, e.g.: Gmail
For OAuth2-based apps, you can use your own OAuth2 client instead of ACI.dev's default OAuth2 client. Please refer to [OAuth2 White-label](/advanced/oauth2-whitelabel) for more details.
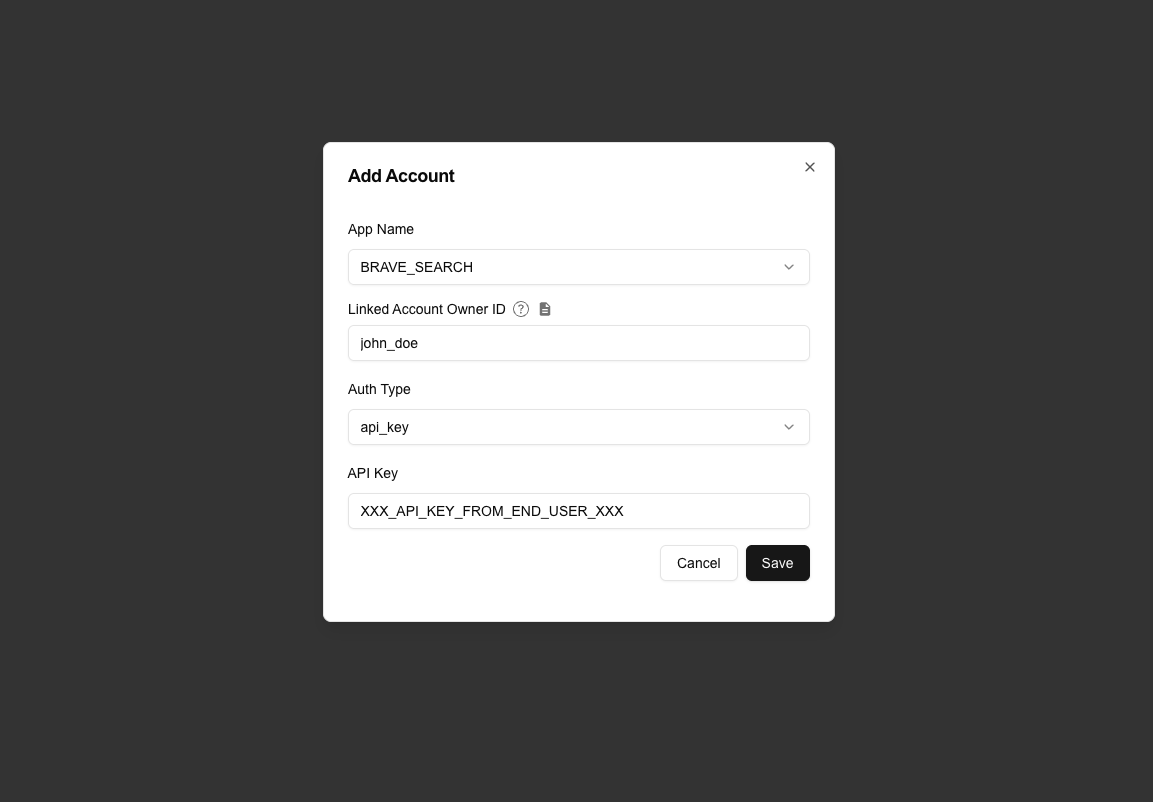
* **API Key**: A simple authentication method that uses an API key to authenticate requests, e.g.: Brave Search
* **No Auth**: Some apps do not require additional authentication, e.g.: Arxiv, Hackernews
# Function (Tool)
Source: https://aci.dev/docs/core-concepts/function
A Function is a callable operation that belongs to an App
Function in our platform is equivalent to the concept of `Function` or `Tool` in function/tool calling.
Functions are logically grouped by the App they belong to.
* **Integration Record**: The formal relationship between your Project and a specific App (like GitHub, Google Calendar, etc.)
* **Authentication Strategy**: The selected security scheme (`OAuth2`, `API Key`, `No Auth`) used for authenticating with the App
* **Security Overrides**: Custom authentication parameters that override default App settings (e.g., client IDs, secrets)
* **Function Access Control**: Which specific functions from the App are enabled for use in your Project
* **Linked Accounts Management**: Serves as the parent configuration for all individual user accounts connected to this App
You **MUST** create an `App Configuration` before your AI agents can use an `App`. Each `Project` can have one configuration per `App`, allowing you to control which `Apps` and `Functions` are accessible within that `Project`.
Each Project can configure multiple Apps, but only one configuration per App is allowed to maintain simplicity. App Configurations are prerequisites for using any third-party service with your AI agents and are managed through the ACI Developer Portal.
## Authentication Types
Each App may support one or more authentication types. You need to select one that works for your use case when creating an `App Configuration`.
All the `Linked Accounts` under the `App Configuration` will use the same authentication type.
* **OAuth2**: The most common authentication type for third-party services, e.g.: Gmail
For OAuth2-based apps, you can use your own OAuth2 client instead of ACI.dev's default OAuth2 client. Please refer to [OAuth2 White-label](/advanced/oauth2-whitelabel) for more details.
* **API Key**: A simple authentication method that uses an API key to authenticate requests, e.g.: Brave Search
* **No Auth**: Some apps do not require additional authentication, e.g.: Arxiv, Hackernews
# Function (Tool)
Source: https://aci.dev/docs/core-concepts/function
A Function is a callable operation that belongs to an App
Function in our platform is equivalent to the concept of `Function` or `Tool` in function/tool calling.
Functions are logically grouped by the App they belong to.
 ## Each Function:
* Have a unique name across the platform, typically in the format `APP_NAME__FUNCTION_NAME` (e.g., "GITHUB\_\_STAR\_REPOSITORY")
* Is compatible with function calling schema of OpenAI, Anthropic etc
* Define the parameters they accept and the response they return
* Handle the communication with external services
* Inherit the authentication configuration from the App
Functions are the building blocks that AI agents use to interact with external services. Each function has a specific purpose, such as creating a GitHub repository or sending a Slack message.
# Linked Account
Source: https://aci.dev/docs/core-concepts/linked-account
A Linked Account represents a connection to an external service (App) for a specific end-user
* Associates authentication credentials with a specific `App` in your `Project`
* Stores security credentials (OAuth tokens, API keys, etc.) securely
* Enables your agents to perform actions on behalf of specific end-users
* Can be enabled, disabled, or deleted as needed
* Is identified by a unique combination of `Project`, `App`, and `Linked Account Owner ID`
When you link an account (like connecting to GitHub via OAuth2, or Brave Search via API Key), the platform securely stores the credentials needed to access that service. Your agents can then use these credentials to perform actions on behalf of that end-user.
## Each Function:
* Have a unique name across the platform, typically in the format `APP_NAME__FUNCTION_NAME` (e.g., "GITHUB\_\_STAR\_REPOSITORY")
* Is compatible with function calling schema of OpenAI, Anthropic etc
* Define the parameters they accept and the response they return
* Handle the communication with external services
* Inherit the authentication configuration from the App
Functions are the building blocks that AI agents use to interact with external services. Each function has a specific purpose, such as creating a GitHub repository or sending a Slack message.
# Linked Account
Source: https://aci.dev/docs/core-concepts/linked-account
A Linked Account represents a connection to an external service (App) for a specific end-user
* Associates authentication credentials with a specific `App` in your `Project`
* Stores security credentials (OAuth tokens, API keys, etc.) securely
* Enables your agents to perform actions on behalf of specific end-users
* Can be enabled, disabled, or deleted as needed
* Is identified by a unique combination of `Project`, `App`, and `Linked Account Owner ID`
When you link an account (like connecting to GitHub via OAuth2, or Brave Search via API Key), the platform securely stores the credentials needed to access that service. Your agents can then use these credentials to perform actions on behalf of that end-user.
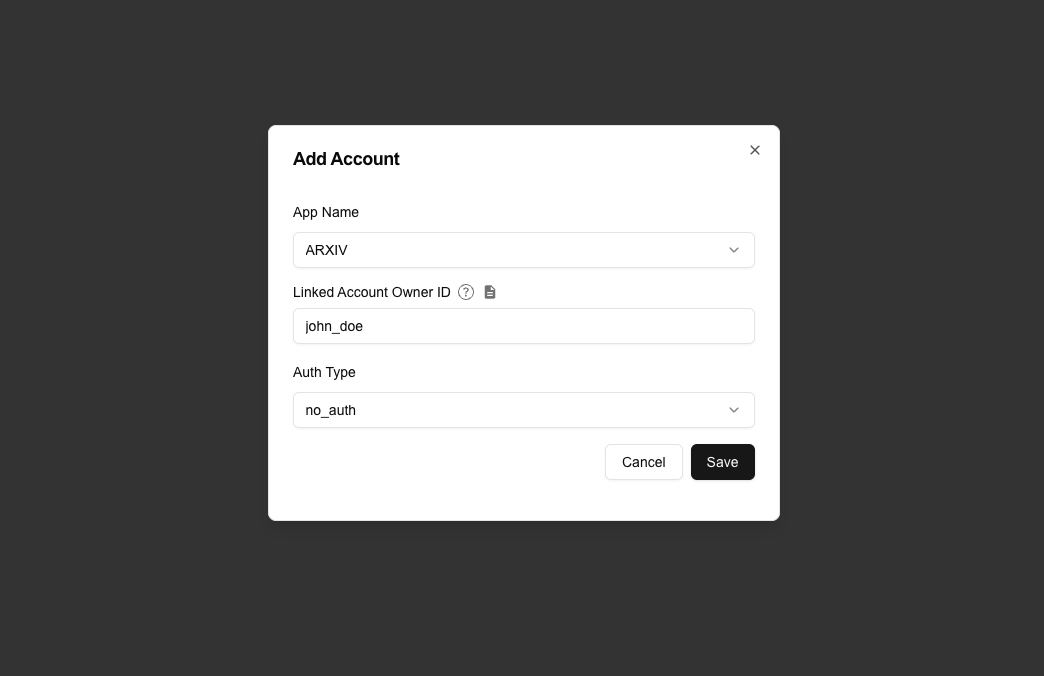
 ## What is Linked Account Owner ID?
* The `Linked Account Owner ID` is a unique identifier for the end-user that is used to link the `Linked Account` to the end-user.
* You determine the `Linked Account Owner ID` value. It can be a user ID from your system, an email address, or any other identifier that helps you track which end-user the linked account belongs to.
* When executing functions, you must provide this ID so the platform knows which credentials to use. It enables your agents to act on behalf of specific users when executing functions.
Note that the `Linked Account Owner ID` itself can NOT uniquely identify a `Linked Account`.
A single `Linked Account Owner ID` can be associated with multiple `Linked Accounts`, for example, one account for `GITHUB` and one account for `GMAIL`, both linked to the same end-user.
However, within a single `App`, the `Linked Account Owner ID` must be unique.
* If your agentic application have multiple end-users, you can create a `Linked Account` for each end-user per `App` (configured).
* Each `Linked Account` then represents a specific end-user's connection/authentication to a specific `App`.
* Ideally, you'll need to create a `Linked Account` for each end-user per `App`. (And use the same `Linked Account Owner ID` for the same end-user.)
If your agentic application have a single end-user, or you are building the agent for your own use, you probably only need a single `Linked Account` per `App`, and in that case, you can use any value for the `Linked Account Owner ID`.
## Tutorials
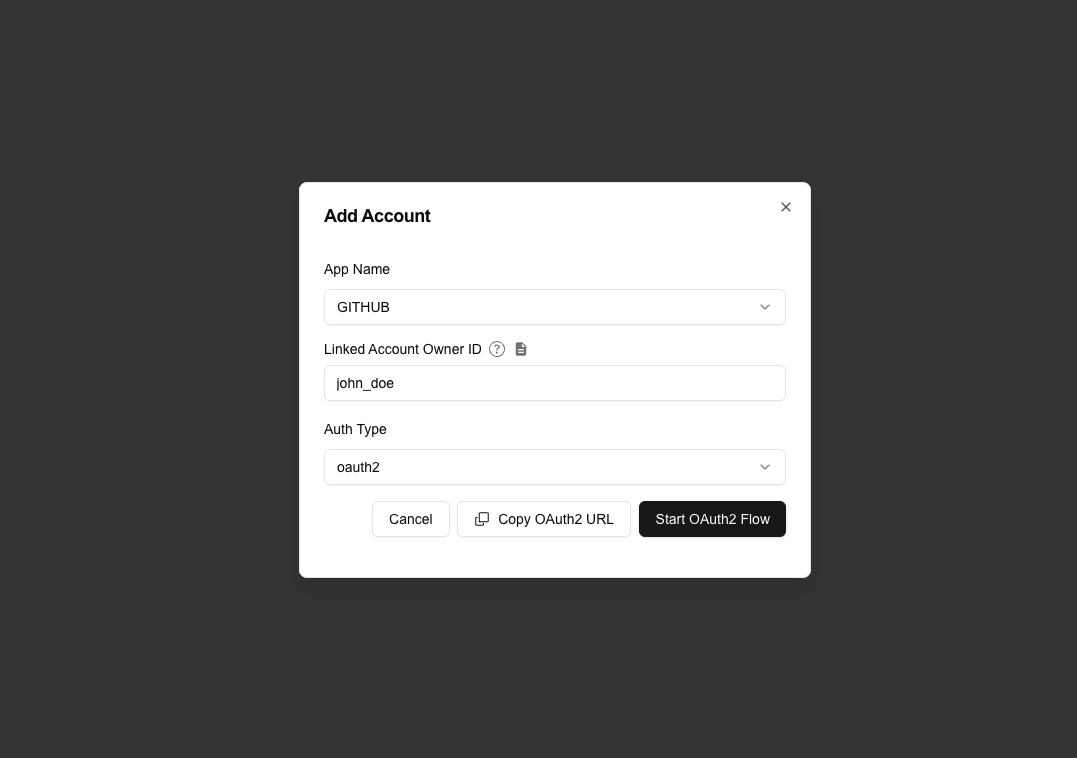
* If you are linking an OAuth2 account for yourself, you can just click `Start OAuth2 Flow` button, and follow the authorization flow to link your account.
* If you don't have access to the account, you can click `Copy OAuth2 URL` button, and send the URL to the end-user to complete the authorization flow.
* A `Linked Account` under this `App` and `Owner ID` will be created after authorization is complete.
## What is Linked Account Owner ID?
* The `Linked Account Owner ID` is a unique identifier for the end-user that is used to link the `Linked Account` to the end-user.
* You determine the `Linked Account Owner ID` value. It can be a user ID from your system, an email address, or any other identifier that helps you track which end-user the linked account belongs to.
* When executing functions, you must provide this ID so the platform knows which credentials to use. It enables your agents to act on behalf of specific users when executing functions.
Note that the `Linked Account Owner ID` itself can NOT uniquely identify a `Linked Account`.
A single `Linked Account Owner ID` can be associated with multiple `Linked Accounts`, for example, one account for `GITHUB` and one account for `GMAIL`, both linked to the same end-user.
However, within a single `App`, the `Linked Account Owner ID` must be unique.
* If your agentic application have multiple end-users, you can create a `Linked Account` for each end-user per `App` (configured).
* Each `Linked Account` then represents a specific end-user's connection/authentication to a specific `App`.
* Ideally, you'll need to create a `Linked Account` for each end-user per `App`. (And use the same `Linked Account Owner ID` for the same end-user.)
If your agentic application have a single end-user, or you are building the agent for your own use, you probably only need a single `Linked Account` per `App`, and in that case, you can use any value for the `Linked Account Owner ID`.
## Tutorials
* If you are linking an OAuth2 account for yourself, you can just click `Start OAuth2 Flow` button, and follow the authorization flow to link your account.
* If you don't have access to the account, you can click `Copy OAuth2 URL` button, and send the URL to the end-user to complete the authorization flow.
* A `Linked Account` under this `App` and `Owner ID` will be created after authorization is complete.
 * The API key is specific to the `App`, for example, if you are linking an account for `BRAVE_SEARCH`, a brave search API key will be needed.
* Depending on your product, you can either provide the API key yourself or collect it from the end-user.
* The API key is specific to the `App`, for example, if you are linking an account for `BRAVE_SEARCH`, a brave search API key will be needed.
* Depending on your product, you can either provide the API key yourself or collect it from the end-user.
 * Some apps don't require authentication, for example, web scraping apps such as `HACKERNEWS`, `ARXIV`, or Apps provided by ACI.dev (`AGENT_SECRETS_MANAGER`)
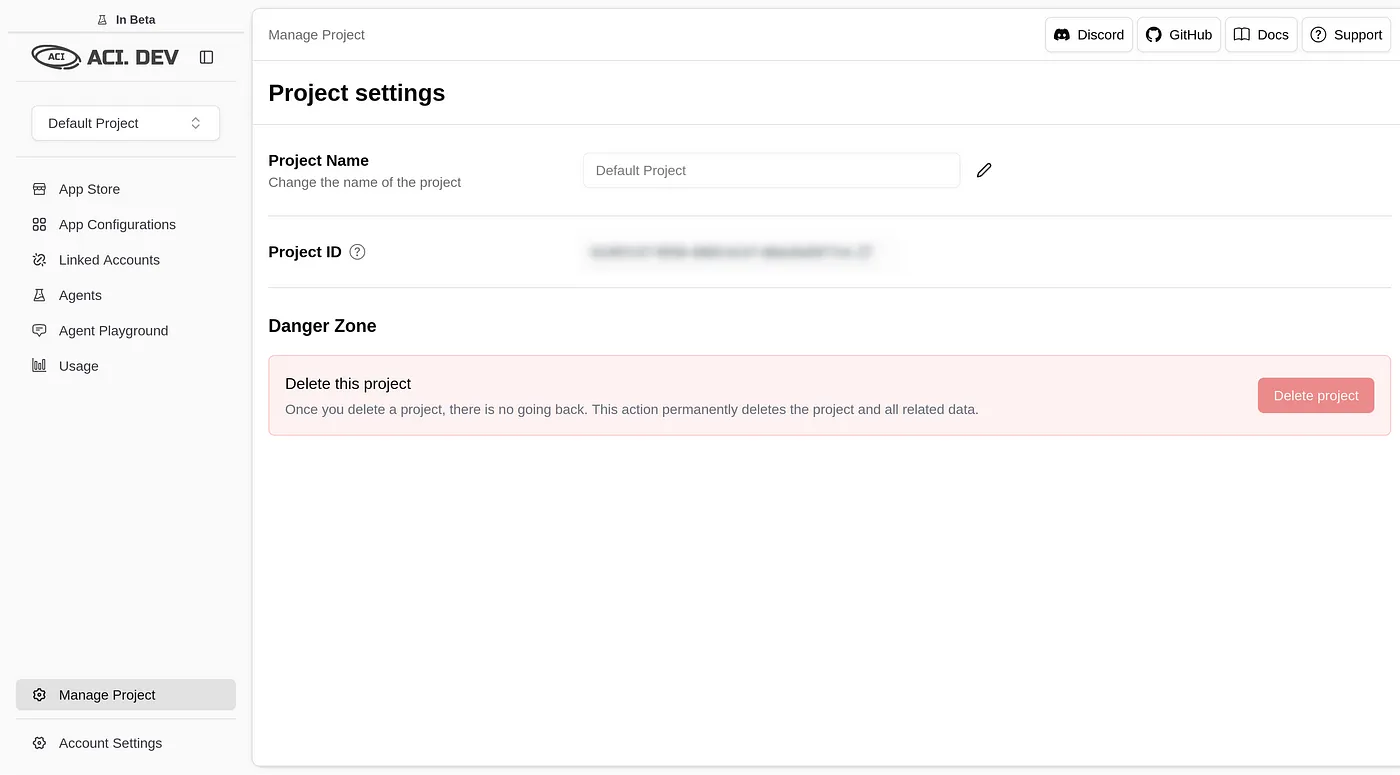
 # Project
Source: https://aci.dev/docs/core-concepts/project
A Project is a logical container for isolating and managing resources.
# Project
Source: https://aci.dev/docs/core-concepts/project
A Project is a logical container for isolating and managing resources.
 * Owned by either a user or an organization
* Contains **configured** `Apps`, `Agents` (and their API Keys), and `Linked Accounts`
* Serves as a boundary for resource management and permissions
A `Project` is your workspace within the platform. It's where you configure `Apps`, create and manage `Agents` (and their API Keys), and manage `Linked Accounts`. Each `Project` has its own resources and settings, allowing you to create isolated environments for different use cases or clients.
# Overview
Source: https://aci.dev/docs/introduction/overview
Welcome to the ACI.dev developer documentation
* Owned by either a user or an organization
* Contains **configured** `Apps`, `Agents` (and their API Keys), and `Linked Accounts`
* Serves as a boundary for resource management and permissions
A `Project` is your workspace within the platform. It's where you configure `Apps`, create and manage `Agents` (and their API Keys), and manage `Linked Accounts`. Each `Project` has its own resources and settings, allowing you to create isolated environments for different use cases or clients.
# Overview
Source: https://aci.dev/docs/introduction/overview
Welcome to the ACI.dev developer documentation

 ## What is ACI.dev?
ACI.dev is an embedded tool-calling and unified MCP server platform created by Aipolabs that helps developers connect AI agents to applications like Zendesk, Slack, Gmail, or their own internal tools, manage AI agent actions, and discover workflows.
## What can you do with ACI.dev?
Add a host of B2B SaaS tools easily to your agentic worker through our pre-built integrations. Immediately ready to use with our built-in authenticated tool-calling.
Allow your users to securely connect to their own accounts with services like Gmail and Slack for agentic workers to perform actions on their behalf.
Improve agentic worker reliability by using natural language to set flexible filters that block API execution if an agent is making an API request beyond its intended purposes.
Allow agents to dynamically discover applications and APIs to use for its tasks to improve agent tool-calling performance without clogging your context window.
## Develop AI Agent Workers in Minutes
Try ACI.dev now and simplify the hardest parts of developing AI agents.
Start building your agentic worker with ACI.dev immediately.
View API references and documentation.
Check out our Python SDK directly.
Manage your agentic worker integrations through our developer portal.
# Quickstart
Source: https://aci.dev/docs/introduction/quickstart
Power Your First AI Agent with ACI.dev
This guide walk you through building an AI agent with function calling capability with ACI.dev
# Sign up to the Platform
* [platform.aci.dev ](https://platform.aci.dev) .
* We'll create a default `project` and default `agent` for you when you first log in to the platform.
# Configure Your First App for Your AI Agent to Use
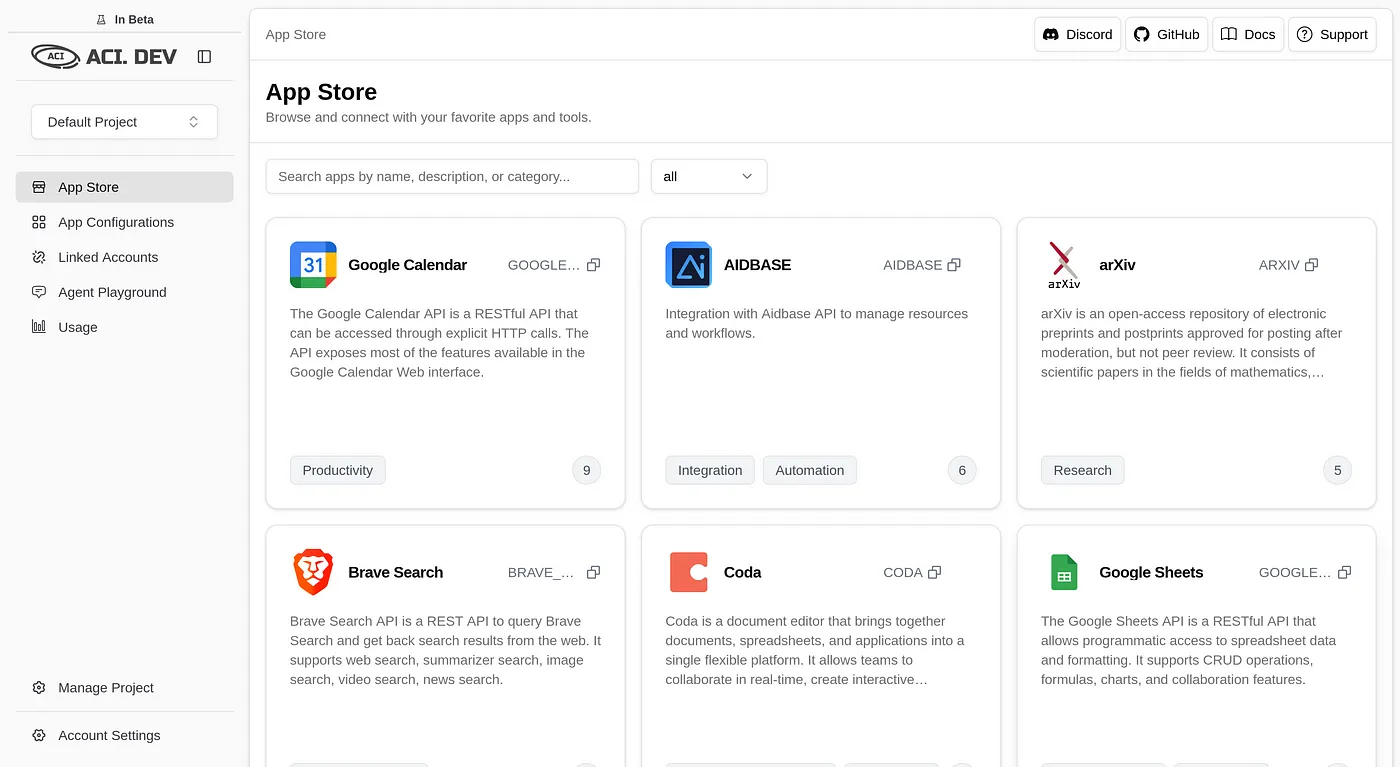
Navigate to `App Store` and find [GITHUB ](https://platform.aci.dev/apps/GITHUB).
Then click on `Configure App` button to set up the app for your project.
## What is ACI.dev?
ACI.dev is an embedded tool-calling and unified MCP server platform created by Aipolabs that helps developers connect AI agents to applications like Zendesk, Slack, Gmail, or their own internal tools, manage AI agent actions, and discover workflows.
## What can you do with ACI.dev?
Add a host of B2B SaaS tools easily to your agentic worker through our pre-built integrations. Immediately ready to use with our built-in authenticated tool-calling.
Allow your users to securely connect to their own accounts with services like Gmail and Slack for agentic workers to perform actions on their behalf.
Improve agentic worker reliability by using natural language to set flexible filters that block API execution if an agent is making an API request beyond its intended purposes.
Allow agents to dynamically discover applications and APIs to use for its tasks to improve agent tool-calling performance without clogging your context window.
## Develop AI Agent Workers in Minutes
Try ACI.dev now and simplify the hardest parts of developing AI agents.
Start building your agentic worker with ACI.dev immediately.
View API references and documentation.
Check out our Python SDK directly.
Manage your agentic worker integrations through our developer portal.
# Quickstart
Source: https://aci.dev/docs/introduction/quickstart
Power Your First AI Agent with ACI.dev
This guide walk you through building an AI agent with function calling capability with ACI.dev
# Sign up to the Platform
* [platform.aci.dev ](https://platform.aci.dev) .
* We'll create a default `project` and default `agent` for you when you first log in to the platform.
# Configure Your First App for Your AI Agent to Use
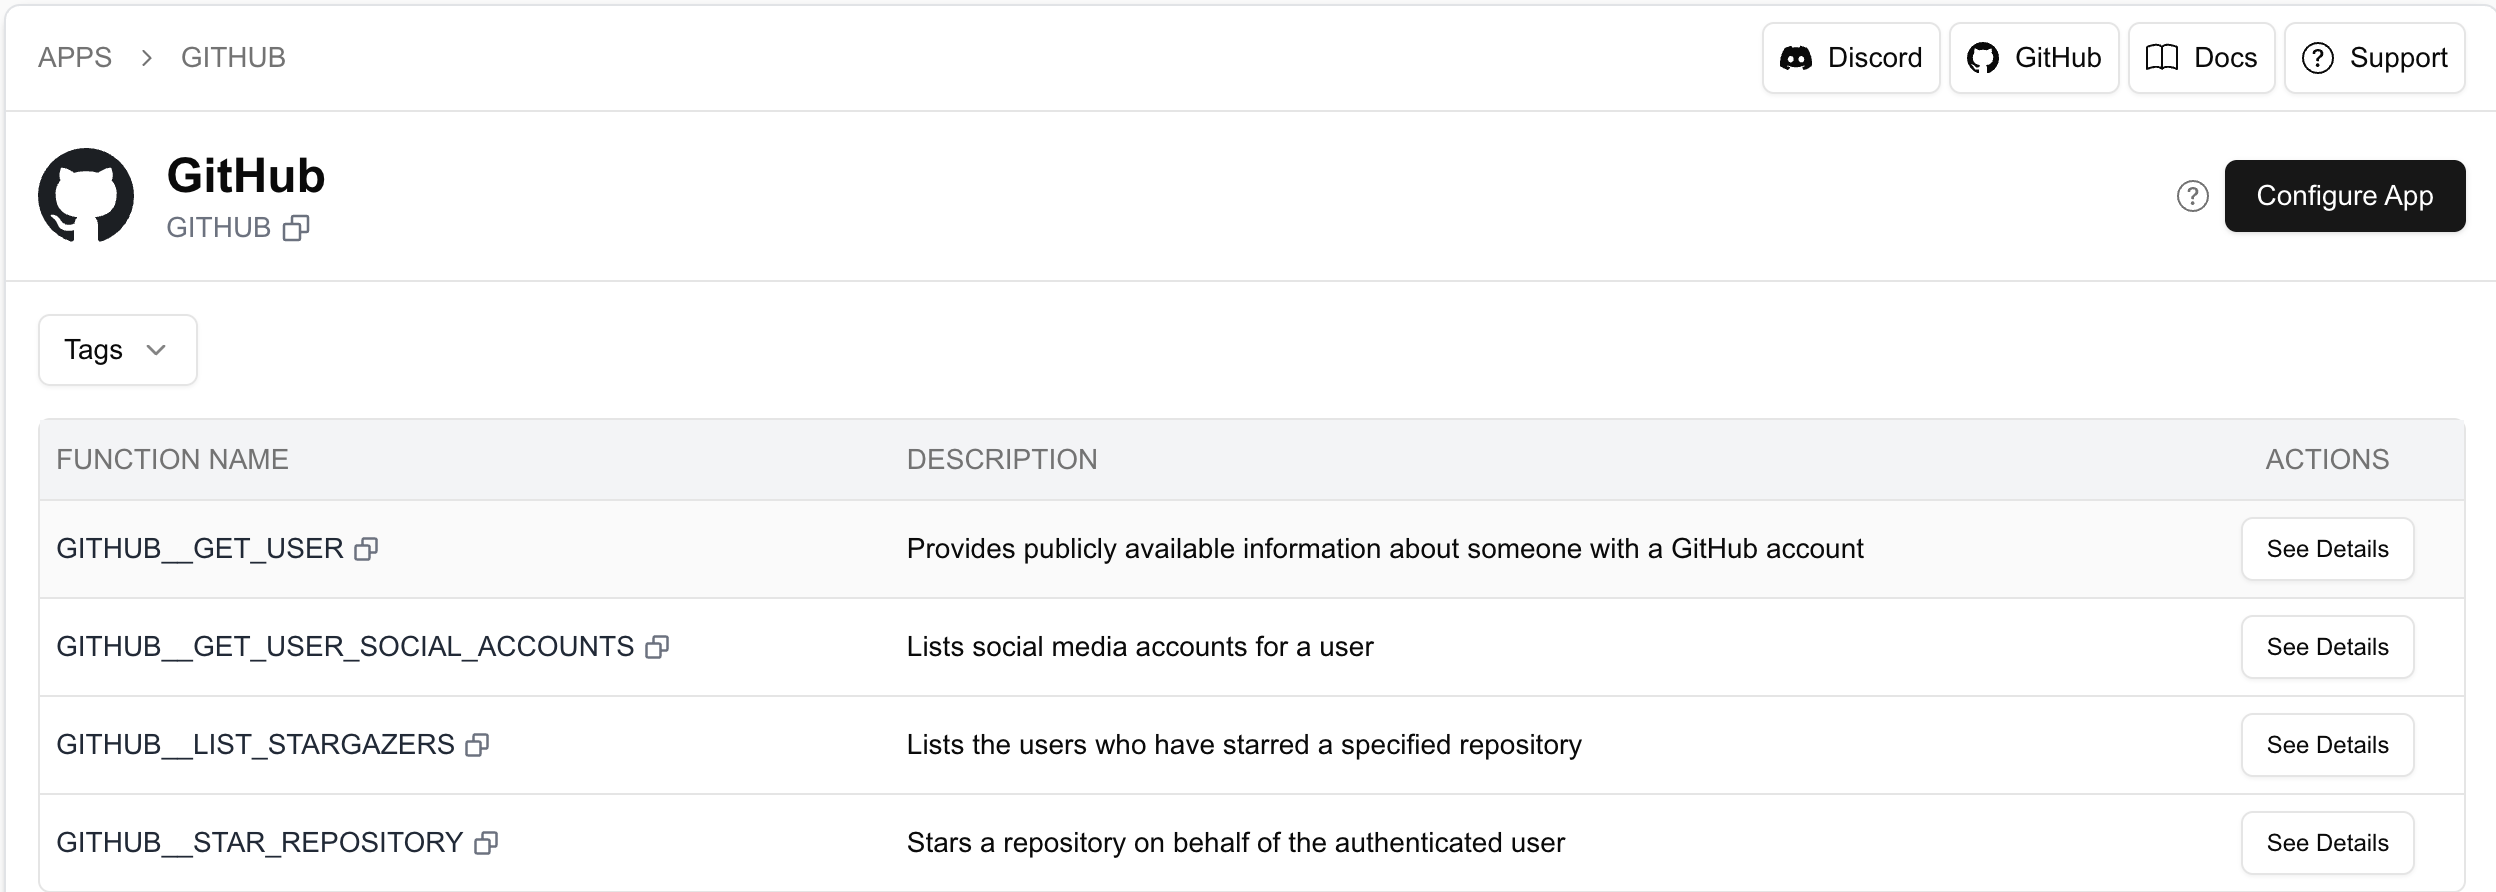
Navigate to `App Store` and find [GITHUB ](https://platform.aci.dev/apps/GITHUB).
Then click on `Configure App` button to set up the app for your project.
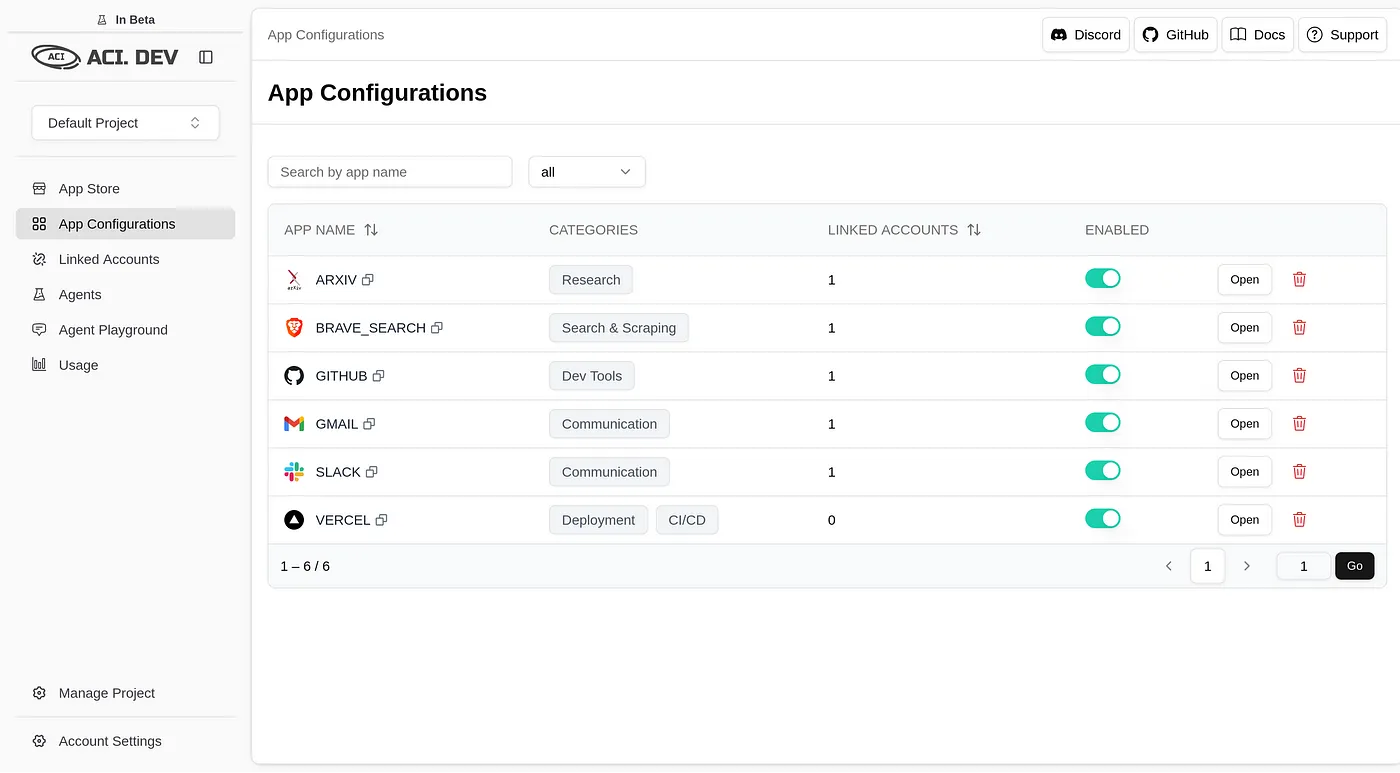
 * Navigate to `App Configurations` and find [GITHUB App Configuration ](https://platform.aci.dev/appconfig/GITHUB). Then click on `Add Account` button to link your Github account.
`linked account owner id` is the ID of the owner of the linked account. It's up to you to decide which ID to use—it can be the unique end-user ID from your system. Or If you're building an agent for yourself, you can choose any name you prefer. Later, you'll need to provide this `linked account owner id` in your code to execute functions on behalf of the user.
* Navigate to `App Configurations` and find [GITHUB App Configuration ](https://platform.aci.dev/appconfig/GITHUB). Then click on `Add Account` button to link your Github account.
`linked account owner id` is the ID of the owner of the linked account. It's up to you to decide which ID to use—it can be the unique end-user ID from your system. Or If you're building an agent for yourself, you can choose any name you prefer. Later, you'll need to provide this `linked account owner id` in your code to execute functions on behalf of the user.
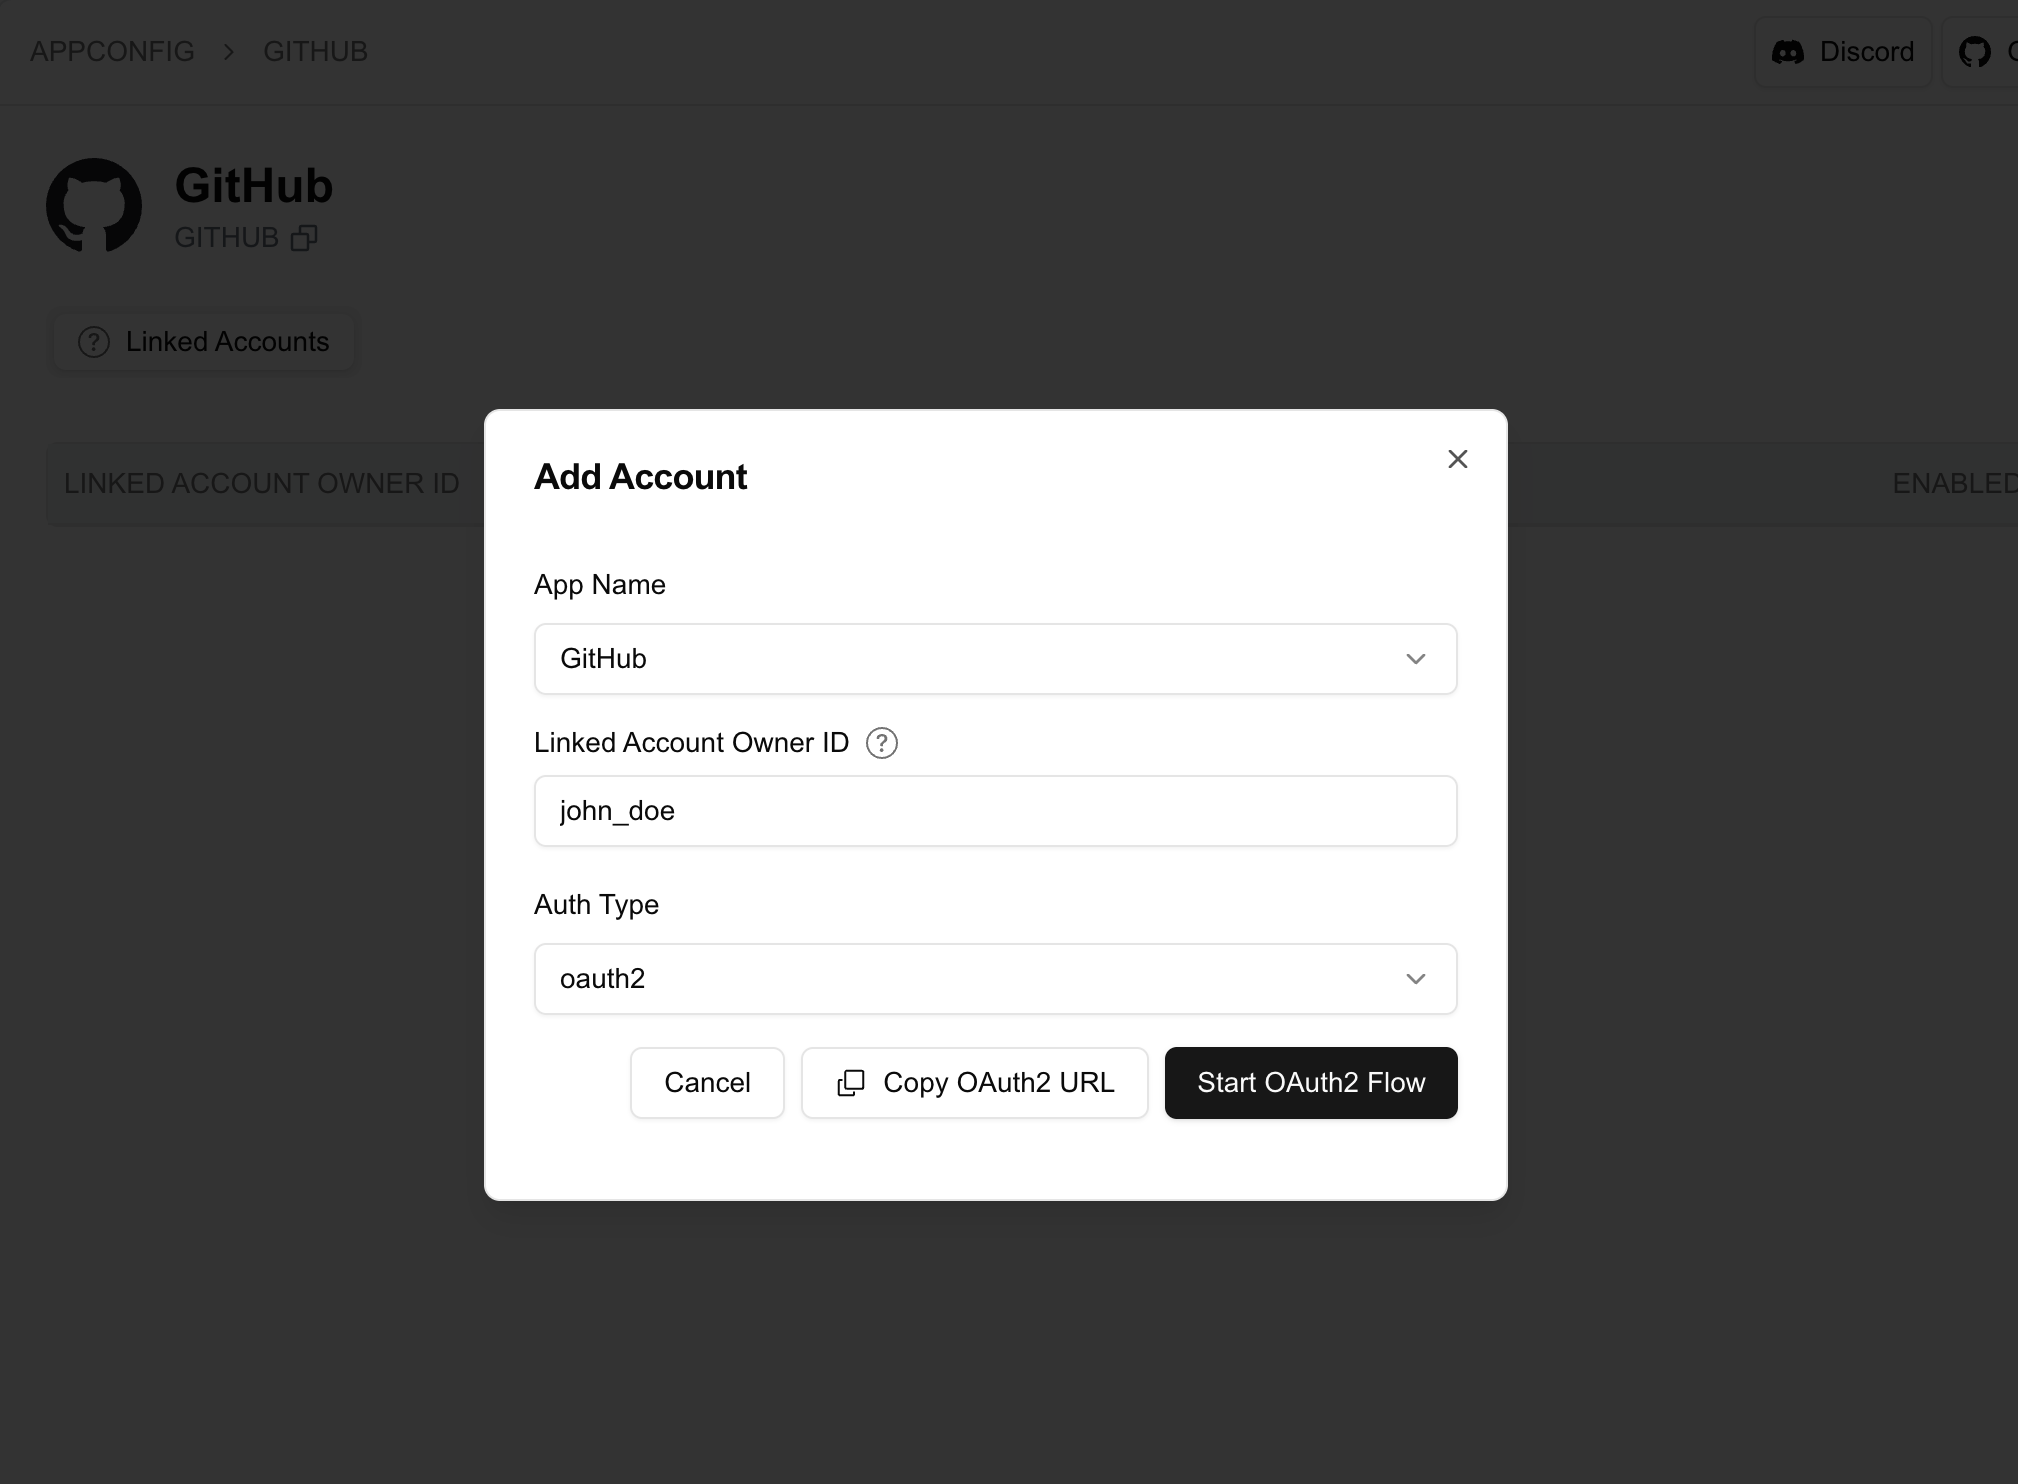 * Click `Start OAuth2 Flow` button to start the OAuth2 flow and link your Github account under the project.
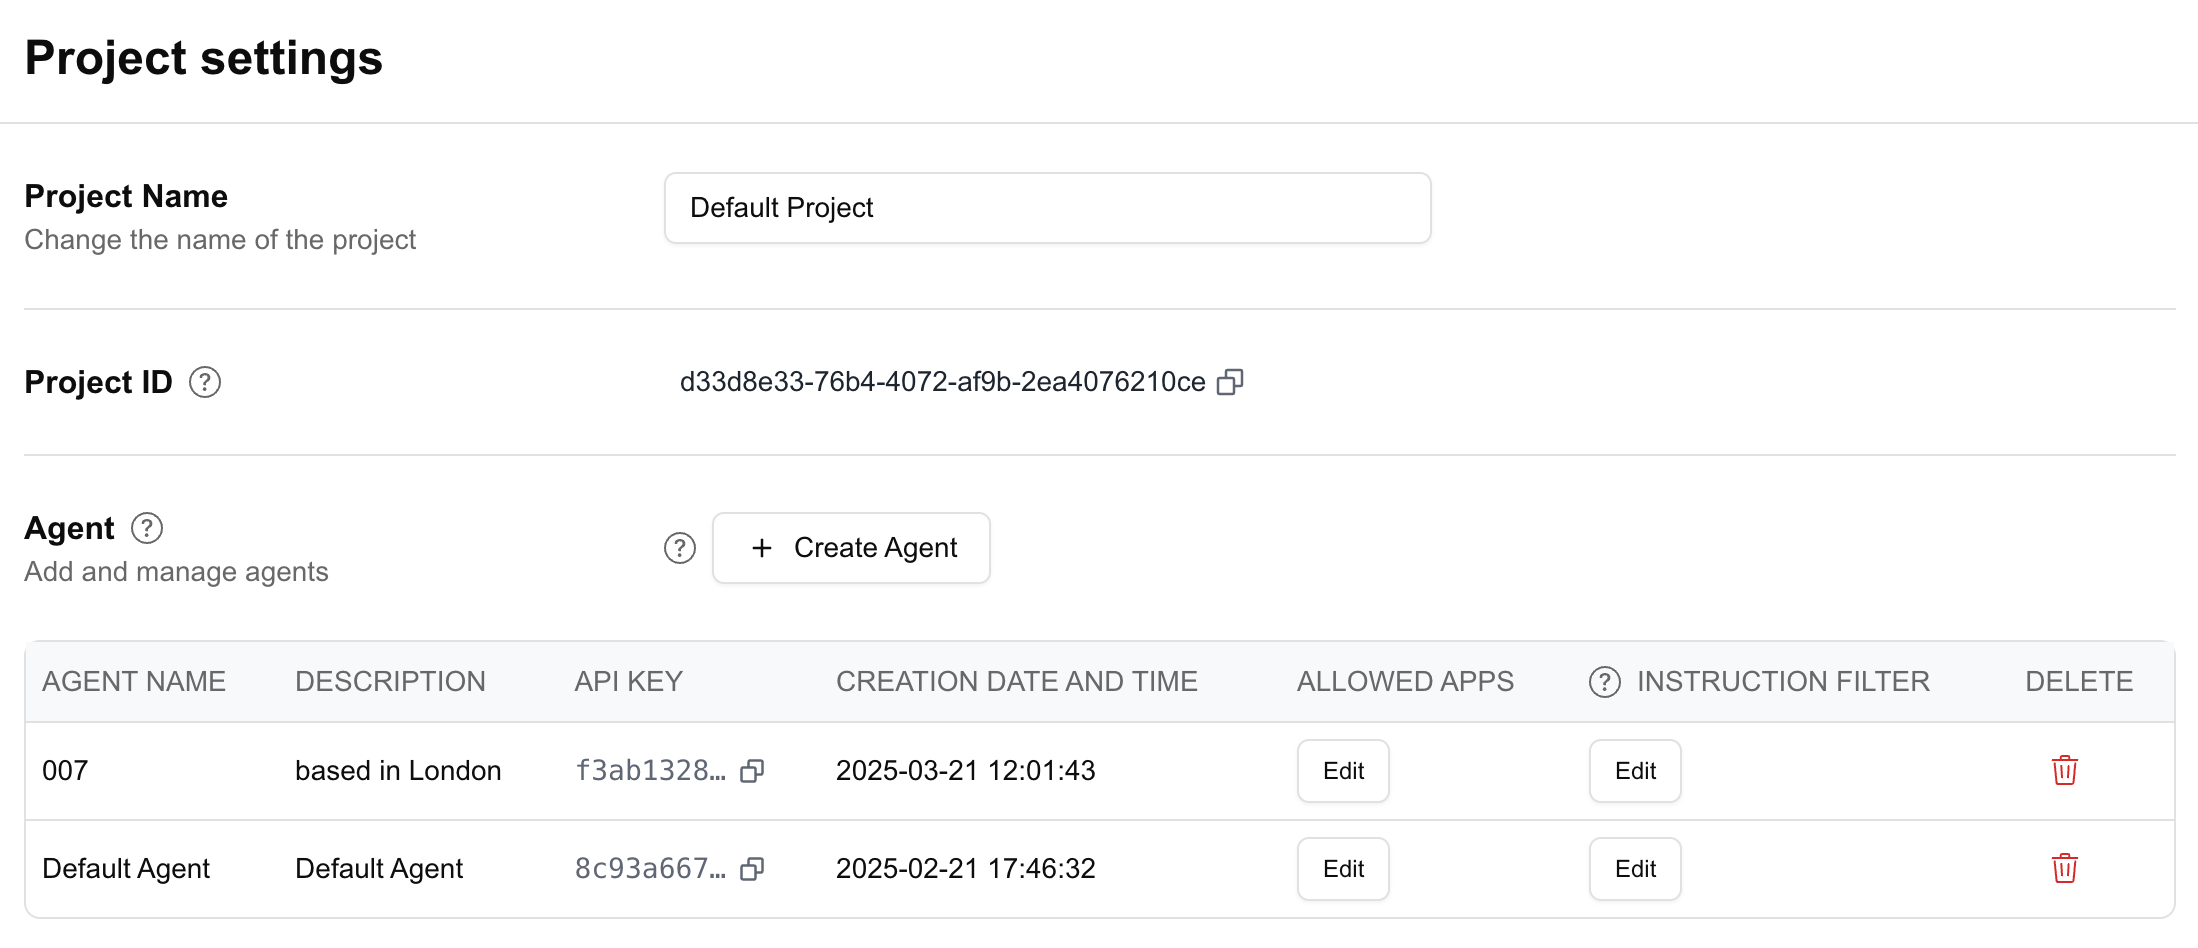
* We took an opinionated approach to acommodate a multi-agent architecture. You can create multiple agents within the project, and each agent has its own API key and apps that they are allowed to use.
* We created a default agent for you when you first log in to the platform.
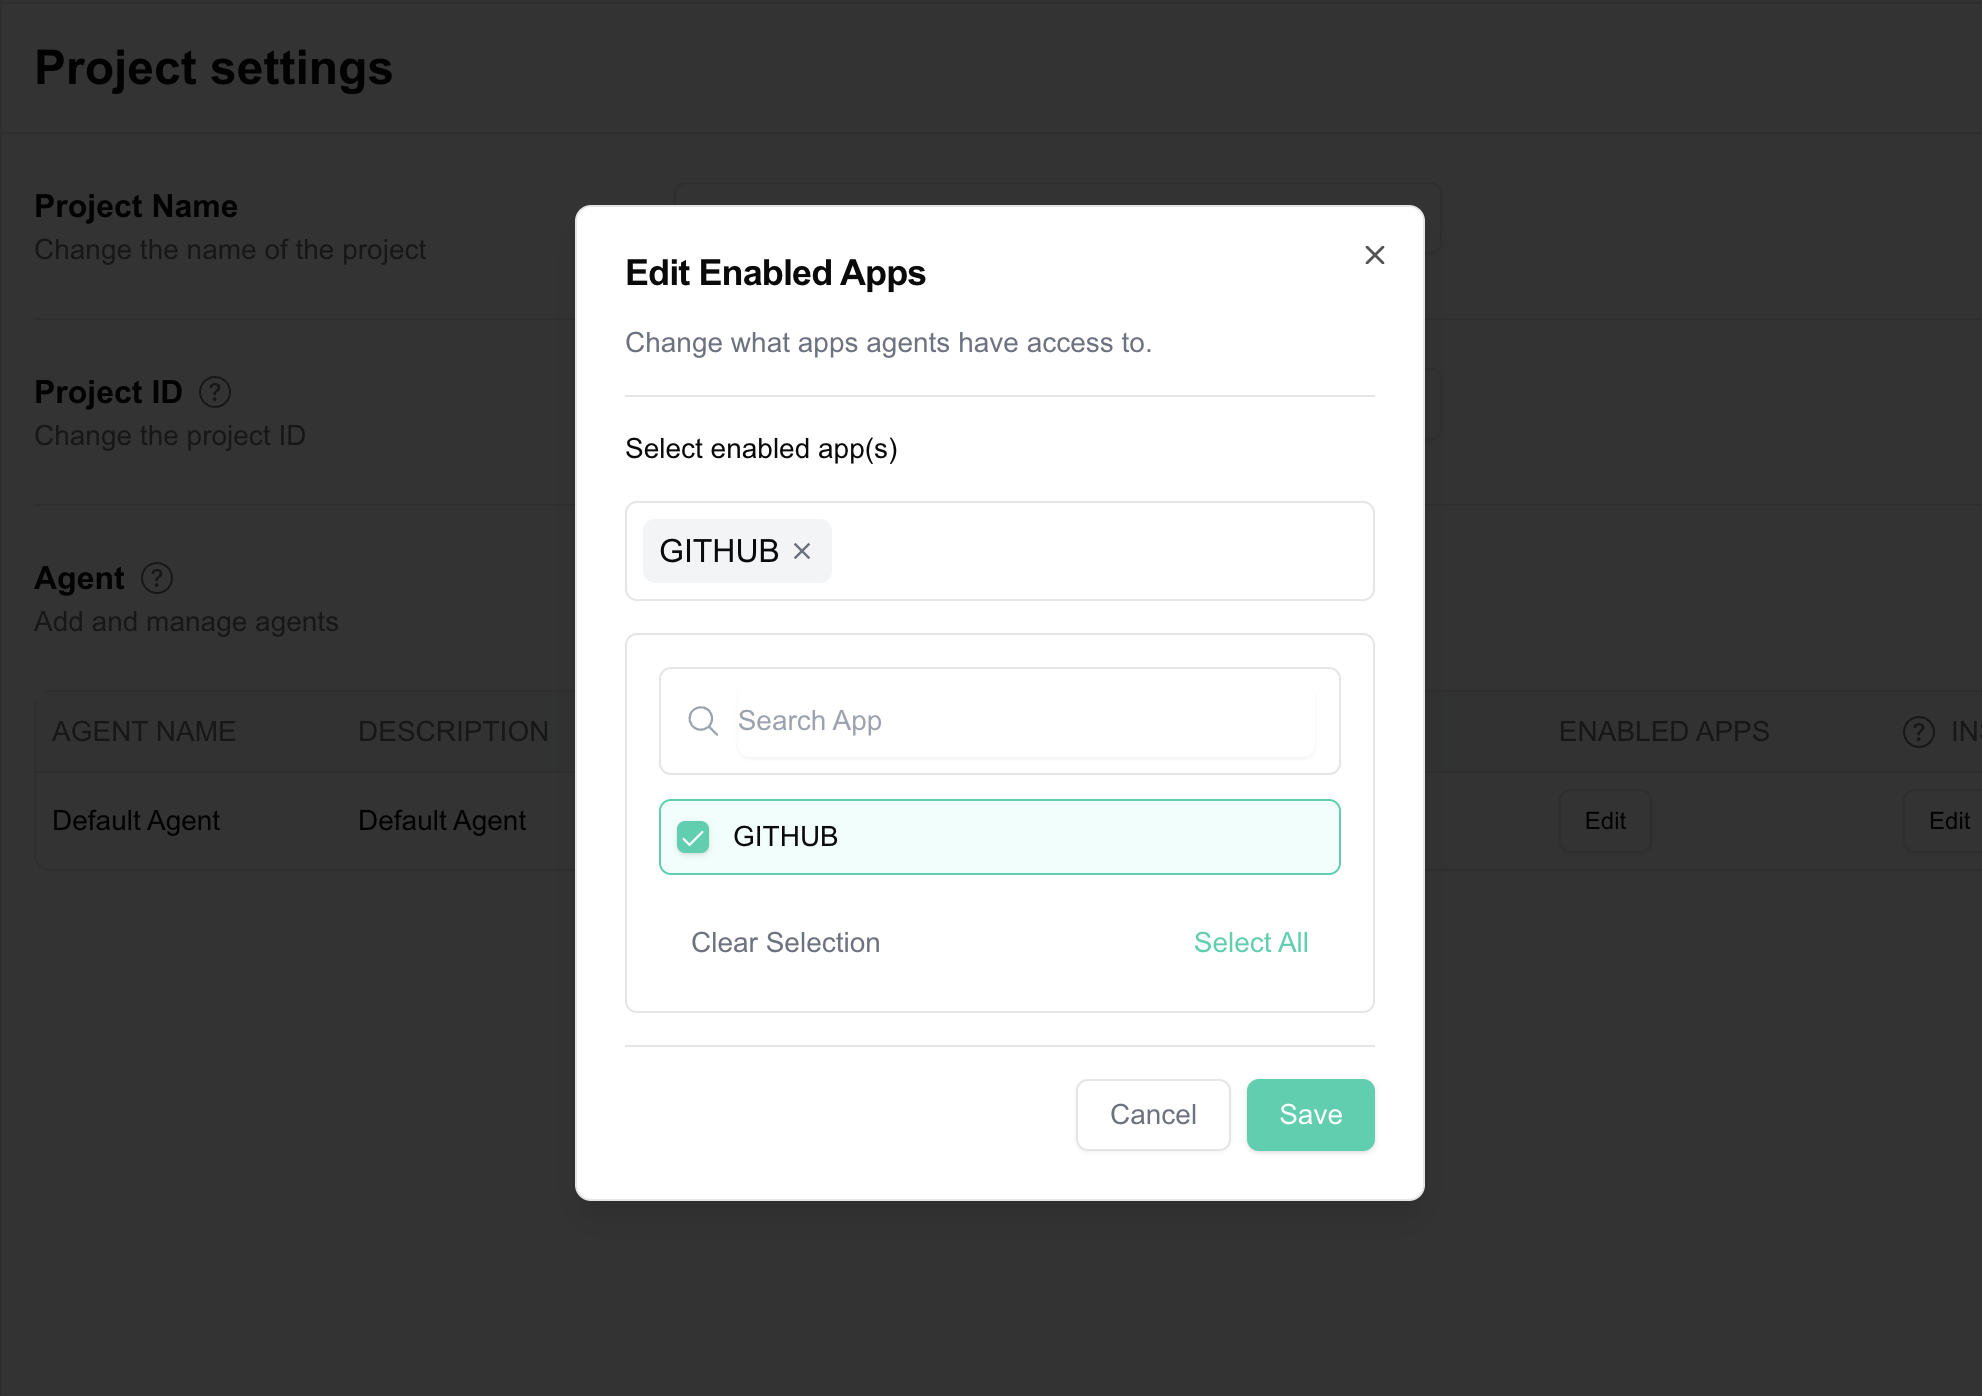
Navigate to the project setting page: [Manage Project ](https://platform.aci.dev/project-setting). Then click the `Edit` button under `ALLOWED APPS` column of the agent to allow access to the `GITHUB` app.
* Click `Start OAuth2 Flow` button to start the OAuth2 flow and link your Github account under the project.
* We took an opinionated approach to acommodate a multi-agent architecture. You can create multiple agents within the project, and each agent has its own API key and apps that they are allowed to use.
* We created a default agent for you when you first log in to the platform.
Navigate to the project setting page: [Manage Project ](https://platform.aci.dev/project-setting). Then click the `Edit` button under `ALLOWED APPS` column of the agent to allow access to the `GITHUB` app.
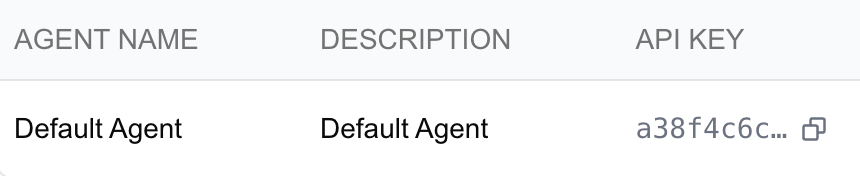
 Each `Agent` is assigned an API key, which you can use to send requests to our platform—either via raw HTTP requests or our SDK. Later, you'll need to include this API key in your code.
 # Code Example
The ACI Python SDK requires Python 3.10+.
The example below uses `uv` for package installation, but you can use `pip` or any other package manager of your choice.
The full example code is available at the end of this guide.
```bash bash
uv init
```
* Install the ACI Python SDK
```bash bash
uv add aci-sdk
```
* To run the example, you'll also need to install other required packages.
```bash bash
uv add openai python-dotenv
```
You'll need both the ACI API key and the OpenAI API key to run the example in this section. Create a .env file in the root of your project and add the following:
```bash .env
ACI_API_KEY=your_aci_api_key
OPENAI_API_KEY=your_openai_api_key
```
```python python 3.10+
from dotenv import load_dotenv
from aci import ACI
from openai import OpenAI
load_dotenv()
aci = ACI()
openai = OpenAI()
```
```python python 3.10+
github_star_repo_function = aci.functions.get_definition("GITHUB__STAR_REPOSITORY")
```
```python python 3.10+
response = openai.chat.completions.create(
model="gpt-4o-2024-08-06",
messages=[
{
"role": "system",
"content": "You are a helpful assistant with access to a variety of tools.",
},
{
"role": "user",
"content": "Star the aipotheosis-labs/aci githubrepository for me",
},
],
tools=[github_star_repo_function],
tool_choice="required", # force the model to generate a tool call for demo purposes
)
```
Replace `` with the `linked account owner id` you used when linking your Github account.
```python python 3.10+ {11}
tool_call = (
response.choices[0].message.tool_calls[0]
if response.choices[0].message.tool_calls
else None
)
if tool_call:
result = aci.handle_function_call(
tool_call.function.name,
json.loads(tool_call.function.arguments),
linked_account_owner_id=
)
```
Here is the complete runnable code for the example above, you can copy and paste it into a file and run it.
* Remember to provide api keys in the `.env` file.
* Replace `` with the `linked account owner id` you used when linking your Github account.
```python python 3.10+ {42}
import json
from dotenv import load_dotenv
from openai import OpenAI
from aci import ACI
load_dotenv()
openai = OpenAI()
aci = ACI()
def main() -> None:
# For a list of all supported apps and functions, please go to the platform.aci.dev
print("Getting function definition for GITHUB__STAR_REPOSITORY")
github_star_repo_function = aci.functions.get_definition("GITHUB__STAR_REPOSITORY")
print("Sending request to OpenAI")
response = openai.chat.completions.create(
model="gpt-4o-2024-08-06",
messages=[
{
"role": "system",
"content": "You are a helpful assistant with access to a variety of tools.",
},
{
"role": "user",
"content": "Star the aipotheosis-labs/aci github repository for me",
},
],
tools=[github_star_repo_function],
tool_choice="required", # force the model to generate a tool call for demo purposes
)
tool_call = (
response.choices[0].message.tool_calls[0]
if response.choices[0].message.tool_calls
else None
)
if tool_call:
print("Handling function call")
result = aci.handle_function_call(
tool_call.function.name,
json.loads(tool_call.function.arguments),
linked_account_owner_id=,
)
print(result)
if __name__ == "__main__":
main()
```
# Advanced Usage
For more advanced usage, please refer to the examples in our [ACI Agents Repository ](https://github.com/aipotheosis-labs/aci-agents/tree/main).
# Apps MCP Server
Source: https://aci.dev/docs/mcp-servers/apps-server
Expose functions from specific apps that you pre-select
## Overview
The `Apps MCP Server` provides direct access to functions (tools) from specific app(s) you select. Unlike most MCP servers that are bound to a single app, this server allows you to combine multiple apps in one server.
## Benefits
* **Multi-App Support** - Include functions from multiple apps in a single MCP server
* **Direct Function Access** - Functions appear directly in the LLM's tool list without discovery steps (Which usually have better performance if your usecase is very specific)
* **Selective Inclusion** - Only include the Apps whose functions you want to expose
* **Reduced Server Management** - No need to run multiple MCP servers for different apps
* **Familiar Pattern** - Similar to traditional MCP server concept but with multi-app capability
## How It Works
The Apps MCP Server directly exposes the functions (tools) from the apps you specify with the `--apps` parameter. When an MCP client interacts with this server, all functions from the specified apps will be available in its tool list.
This approach differs from the `Unified MCP Server` in that there's no dynamic discovery process - all function (tool) definitions are directly available to MCP clients.
Unlike most MCP servers that are limited to a single app, the `Apps MCP Server` allows you to combine functions from multiple apps in a single server, reducing the number of servers you need to manage.
## Prerequisites
Before using the `Apps MCP Server`, you need to complete several setup steps on the ACI.dev platform.
You'll need an API key from one of your ACI.dev agents. Find this in your [project setting ](https://platform.aci.dev/project-setting)
Navigate to the [App Store ](https://platform.aci.dev/apps) to configure the apps you want to use with your MCP servers.
For more details on what is an app and how to configure it, please refer to the [App](../core-concepts/app) section.
In your [Project Setting ](https://platform.aci.dev/project-setting), enable the apps you want your agent to access by adding them to the `Allowed Apps` list.
For more details on how and why to set allowed apps, please refer to the [Agent](../core-concepts/agent) section.
For each app you want to use, you'll need to link end-user (or your own) accounts. During account linking, you'll specify a `linked-account-owner-id` which you'll later provide when starting the MCP servers.
For more details on how to link accounts and what `linked-account-owner-id` is, please refer to the [Linked Accounts](../core-concepts/linked-account) section.
```bash
# Install uv if you don't have it already
curl -sSf https://install.pypa.io/get-pip.py | python3 -
pip install uv
```
## Integration with MCP Clients
* Replace the `` and `` below with the `linked-account-owner-id` of your linked accounts and your ACI.dev API key respectively.
* Replace `,,...` with the apps you set as allowed for your agent in the [Project Setting ](https://platform.aci.dev/project-setting).
Make sure you hit the refresh button on the MCP settings page after entering your own API key and Owner ID.
# Code Example
The ACI Python SDK requires Python 3.10+.
The example below uses `uv` for package installation, but you can use `pip` or any other package manager of your choice.
The full example code is available at the end of this guide.
```bash bash
uv init
```
* Install the ACI Python SDK
```bash bash
uv add aci-sdk
```
* To run the example, you'll also need to install other required packages.
```bash bash
uv add openai python-dotenv
```
You'll need both the ACI API key and the OpenAI API key to run the example in this section. Create a .env file in the root of your project and add the following:
```bash .env
ACI_API_KEY=your_aci_api_key
OPENAI_API_KEY=your_openai_api_key
```
```python python 3.10+
from dotenv import load_dotenv
from aci import ACI
from openai import OpenAI
load_dotenv()
aci = ACI()
openai = OpenAI()
```
```python python 3.10+
github_star_repo_function = aci.functions.get_definition("GITHUB__STAR_REPOSITORY")
```
```python python 3.10+
response = openai.chat.completions.create(
model="gpt-4o-2024-08-06",
messages=[
{
"role": "system",
"content": "You are a helpful assistant with access to a variety of tools.",
},
{
"role": "user",
"content": "Star the aipotheosis-labs/aci githubrepository for me",
},
],
tools=[github_star_repo_function],
tool_choice="required", # force the model to generate a tool call for demo purposes
)
```
Replace `` with the `linked account owner id` you used when linking your Github account.
```python python 3.10+ {11}
tool_call = (
response.choices[0].message.tool_calls[0]
if response.choices[0].message.tool_calls
else None
)
if tool_call:
result = aci.handle_function_call(
tool_call.function.name,
json.loads(tool_call.function.arguments),
linked_account_owner_id=
)
```
Here is the complete runnable code for the example above, you can copy and paste it into a file and run it.
* Remember to provide api keys in the `.env` file.
* Replace `` with the `linked account owner id` you used when linking your Github account.
```python python 3.10+ {42}
import json
from dotenv import load_dotenv
from openai import OpenAI
from aci import ACI
load_dotenv()
openai = OpenAI()
aci = ACI()
def main() -> None:
# For a list of all supported apps and functions, please go to the platform.aci.dev
print("Getting function definition for GITHUB__STAR_REPOSITORY")
github_star_repo_function = aci.functions.get_definition("GITHUB__STAR_REPOSITORY")
print("Sending request to OpenAI")
response = openai.chat.completions.create(
model="gpt-4o-2024-08-06",
messages=[
{
"role": "system",
"content": "You are a helpful assistant with access to a variety of tools.",
},
{
"role": "user",
"content": "Star the aipotheosis-labs/aci github repository for me",
},
],
tools=[github_star_repo_function],
tool_choice="required", # force the model to generate a tool call for demo purposes
)
tool_call = (
response.choices[0].message.tool_calls[0]
if response.choices[0].message.tool_calls
else None
)
if tool_call:
print("Handling function call")
result = aci.handle_function_call(
tool_call.function.name,
json.loads(tool_call.function.arguments),
linked_account_owner_id=,
)
print(result)
if __name__ == "__main__":
main()
```
# Advanced Usage
For more advanced usage, please refer to the examples in our [ACI Agents Repository ](https://github.com/aipotheosis-labs/aci-agents/tree/main).
# Apps MCP Server
Source: https://aci.dev/docs/mcp-servers/apps-server
Expose functions from specific apps that you pre-select
## Overview
The `Apps MCP Server` provides direct access to functions (tools) from specific app(s) you select. Unlike most MCP servers that are bound to a single app, this server allows you to combine multiple apps in one server.
## Benefits
* **Multi-App Support** - Include functions from multiple apps in a single MCP server
* **Direct Function Access** - Functions appear directly in the LLM's tool list without discovery steps (Which usually have better performance if your usecase is very specific)
* **Selective Inclusion** - Only include the Apps whose functions you want to expose
* **Reduced Server Management** - No need to run multiple MCP servers for different apps
* **Familiar Pattern** - Similar to traditional MCP server concept but with multi-app capability
## How It Works
The Apps MCP Server directly exposes the functions (tools) from the apps you specify with the `--apps` parameter. When an MCP client interacts with this server, all functions from the specified apps will be available in its tool list.
This approach differs from the `Unified MCP Server` in that there's no dynamic discovery process - all function (tool) definitions are directly available to MCP clients.
Unlike most MCP servers that are limited to a single app, the `Apps MCP Server` allows you to combine functions from multiple apps in a single server, reducing the number of servers you need to manage.
## Prerequisites
Before using the `Apps MCP Server`, you need to complete several setup steps on the ACI.dev platform.
You'll need an API key from one of your ACI.dev agents. Find this in your [project setting ](https://platform.aci.dev/project-setting)
Navigate to the [App Store ](https://platform.aci.dev/apps) to configure the apps you want to use with your MCP servers.
For more details on what is an app and how to configure it, please refer to the [App](../core-concepts/app) section.
In your [Project Setting ](https://platform.aci.dev/project-setting), enable the apps you want your agent to access by adding them to the `Allowed Apps` list.
For more details on how and why to set allowed apps, please refer to the [Agent](../core-concepts/agent) section.
For each app you want to use, you'll need to link end-user (or your own) accounts. During account linking, you'll specify a `linked-account-owner-id` which you'll later provide when starting the MCP servers.
For more details on how to link accounts and what `linked-account-owner-id` is, please refer to the [Linked Accounts](../core-concepts/linked-account) section.
```bash
# Install uv if you don't have it already
curl -sSf https://install.pypa.io/get-pip.py | python3 -
pip install uv
```
## Integration with MCP Clients
* Replace the `` and `` below with the `linked-account-owner-id` of your linked accounts and your ACI.dev API key respectively.
* Replace `,,...` with the apps you set as allowed for your agent in the [Project Setting ](https://platform.aci.dev/project-setting).
Make sure you hit the refresh button on the MCP settings page after entering your own API key and Owner ID.
 ```json mcp.json
{
"mcpServers": {
"aci-mcp-apps": {
"command": "uvx",
"args": ["aci-mcp@latest", "apps-server", "--apps", ",,...", "--linked-account-owner-id", ""],
"env": {
"ACI_API_KEY": ""
}
}
}
}
```
Make sure to restart the Claude Desktop app after adding the MCP server configuration.
```json claude_desktop_config.json
{
"mcpServers": {
"aci-mcp-unified": {
"command": "bash",
"args": [
"-c",
"ACI_API_KEY= uvx aci-mcp@latest apps-server --apps ,,... --linked-account-owner-id "
]
}
}
}
```
```bash terminal
# Set API key
export ACI_API_KEY=
# Option 1: Run in stdio mode (default)
uvx aci-mcp@latest apps-server --apps ",,..." --linked-account-owner-id
# Option 2: Run in sse mode
uvx aci-mcp@latest apps-server --apps ",,..." --linked-account-owner-id --transport sse --port 8000
```
## Commandline Arguments
The `apps` argument is used to specify the apps you want to use with your MCP server. E.g., `--apps GMAIL,BRAVE,GITHUB` means that the MCP server will only access and expose the functions (tools) from `GMAIL`, `BRAVE` and `GITHUB` apps.
The apps must be configured and enabled first.
The `linked-account-owner-id` is the owner ID of the linked accounts you want to use for the function execution. E.g., `--linked-account-owner-id johndoe` means that the function execution (e.g, `GMAIL__SEND_EMAIL`) will be done on behalf of the linked account of `GMAIL` app with owner ID `johndoe`.
The `transport` argument is used to specify the transport protocol to use for the MCP server.
The default transport is `stdio`.
The `port` argument is used to specify the port to listen on for the MCP server if the `--transport` is set to `sse`.
The default port is `8000`.
```bash help
$ uvx aci-mcp@latest apps-server --help
Usage: aci-mcp apps-server [OPTIONS]
Start the apps-specific MCP server to access tools under specific apps.
Options:
--apps TEXT comma separated list of apps of which to use
the functions [required]
--linked-account-owner-id TEXT the owner id of the linked accounts to use
for the tool calls. You'll need to create
the linked accounts on platform.aci.dev
[required]
--transport [stdio|sse] Transport type
--port INTEGER Port to listen on for SSE
--help Show this message and exit.
```
# Introduction
Source: https://aci.dev/docs/mcp-servers/introduction
Introduction to ACI.dev MCP Servers
## Overview
Apart from using ACI.dev's Apps/Functions (tools) directly via LLM function (tool) calls, we also provide two types of Model Context Protocol (MCP) servers that allow your MCP clients to access all Apps/Functions (tools) available on ACI.dev platform.
The codebase is open source and can be found here: [aci-mcp ](https://github.com/aipotheosis-labs/aci-mcp).
## Two Types of MCP Servers
* **Apps MCP Server**: This server is similar to most of the existing MCP servers out there, where it exposes a set of functions from a specific app (e.g., Gmail, Github, etc.). However, our `Apps MCP Server` allows you to include multiple apps in a single server.
```json mcp.json
{
"mcpServers": {
"aci-mcp-apps": {
"command": "uvx",
"args": ["aci-mcp@latest", "apps-server", "--apps", ",,...", "--linked-account-owner-id", ""],
"env": {
"ACI_API_KEY": ""
}
}
}
}
```
Make sure to restart the Claude Desktop app after adding the MCP server configuration.
```json claude_desktop_config.json
{
"mcpServers": {
"aci-mcp-unified": {
"command": "bash",
"args": [
"-c",
"ACI_API_KEY= uvx aci-mcp@latest apps-server --apps ,,... --linked-account-owner-id "
]
}
}
}
```
```bash terminal
# Set API key
export ACI_API_KEY=
# Option 1: Run in stdio mode (default)
uvx aci-mcp@latest apps-server --apps ",,..." --linked-account-owner-id
# Option 2: Run in sse mode
uvx aci-mcp@latest apps-server --apps ",,..." --linked-account-owner-id --transport sse --port 8000
```
## Commandline Arguments
The `apps` argument is used to specify the apps you want to use with your MCP server. E.g., `--apps GMAIL,BRAVE,GITHUB` means that the MCP server will only access and expose the functions (tools) from `GMAIL`, `BRAVE` and `GITHUB` apps.
The apps must be configured and enabled first.
The `linked-account-owner-id` is the owner ID of the linked accounts you want to use for the function execution. E.g., `--linked-account-owner-id johndoe` means that the function execution (e.g, `GMAIL__SEND_EMAIL`) will be done on behalf of the linked account of `GMAIL` app with owner ID `johndoe`.
The `transport` argument is used to specify the transport protocol to use for the MCP server.
The default transport is `stdio`.
The `port` argument is used to specify the port to listen on for the MCP server if the `--transport` is set to `sse`.
The default port is `8000`.
```bash help
$ uvx aci-mcp@latest apps-server --help
Usage: aci-mcp apps-server [OPTIONS]
Start the apps-specific MCP server to access tools under specific apps.
Options:
--apps TEXT comma separated list of apps of which to use
the functions [required]
--linked-account-owner-id TEXT the owner id of the linked accounts to use
for the tool calls. You'll need to create
the linked accounts on platform.aci.dev
[required]
--transport [stdio|sse] Transport type
--port INTEGER Port to listen on for SSE
--help Show this message and exit.
```
# Introduction
Source: https://aci.dev/docs/mcp-servers/introduction
Introduction to ACI.dev MCP Servers
## Overview
Apart from using ACI.dev's Apps/Functions (tools) directly via LLM function (tool) calls, we also provide two types of Model Context Protocol (MCP) servers that allow your MCP clients to access all Apps/Functions (tools) available on ACI.dev platform.
The codebase is open source and can be found here: [aci-mcp ](https://github.com/aipotheosis-labs/aci-mcp).
## Two Types of MCP Servers
* **Apps MCP Server**: This server is similar to most of the existing MCP servers out there, where it exposes a set of functions from a specific app (e.g., Gmail, Github, etc.). However, our `Apps MCP Server` allows you to include multiple apps in a single server.
 * **Unified MCP Server**: This server is a dynamic server that provides two **meta** functions (tools) - `ACI_SEARCH_FUNCTIONS` and `ACI_EXECUTE_FUNCTION` to dynamically discover and execute **ANY** functions (tools) available on ACI.dev platform.
 ## Comparison
* **When to use the Apps MCP Server?**
* When you know exactly what apps the LLM/Agent needs in advance.
* When the number of apps, and therefore the associated functions, needed is relatively small.
There is no definitive answer to `what number of functions (tools) is too many?`, but the more functions (tools) you add to the model's context window, the lower the performance of the LLM function calling.
* **When to use the Unified MCP Server?**
* When you don't know exactly what apps the LLM/Agent needs in advance.
* When the number of apps and therefore the associated functions needed is large.
* When you want all future apps added to ACI.dev to be discoverable by your LLM/Agent without having to update the MCP command.
## Next Steps
Choose the MCP server that best fits your needs and follow the instructions in the respective sections to set it up.
A unified, dynamic MCP server that provides two meta functions (tools) to discover and execute ANY functions (tools) available on ACI.dev platform.
A traditional MCP server that directly exposes functions from specific apps that you pre-select, allowing multiple apps to be included in a single server.
# Unified MCP Server
Source: https://aci.dev/docs/mcp-servers/unified-server
Unified, Dynamic Function (Tool) Discovery and Execution
## Overview
The Unified MCP Server provides a smart, scalable approach to function calling by exposing just two meta functions (tools) that can:
1. Dynamically discover the right functions (tools) based on user intent
2. Execute any function on the ACI.dev platform retrieved from the search results
## How It Works
The `Unified MCP Server` exposes two meta-functions:
1. `ACI_SEARCH_FUNCTIONS` - Discovers functions based on your intent/needs
2. `ACI_EXECUTE_FUNCTION` - Executes any function discovered by the search
## Comparison
* **When to use the Apps MCP Server?**
* When you know exactly what apps the LLM/Agent needs in advance.
* When the number of apps, and therefore the associated functions, needed is relatively small.
There is no definitive answer to `what number of functions (tools) is too many?`, but the more functions (tools) you add to the model's context window, the lower the performance of the LLM function calling.
* **When to use the Unified MCP Server?**
* When you don't know exactly what apps the LLM/Agent needs in advance.
* When the number of apps and therefore the associated functions needed is large.
* When you want all future apps added to ACI.dev to be discoverable by your LLM/Agent without having to update the MCP command.
## Next Steps
Choose the MCP server that best fits your needs and follow the instructions in the respective sections to set it up.
A unified, dynamic MCP server that provides two meta functions (tools) to discover and execute ANY functions (tools) available on ACI.dev platform.
A traditional MCP server that directly exposes functions from specific apps that you pre-select, allowing multiple apps to be included in a single server.
# Unified MCP Server
Source: https://aci.dev/docs/mcp-servers/unified-server
Unified, Dynamic Function (Tool) Discovery and Execution
## Overview
The Unified MCP Server provides a smart, scalable approach to function calling by exposing just two meta functions (tools) that can:
1. Dynamically discover the right functions (tools) based on user intent
2. Execute any function on the ACI.dev platform retrieved from the search results
## How It Works
The `Unified MCP Server` exposes two meta-functions:
1. `ACI_SEARCH_FUNCTIONS` - Discovers functions based on your intent/needs
2. `ACI_EXECUTE_FUNCTION` - Executes any function discovered by the search
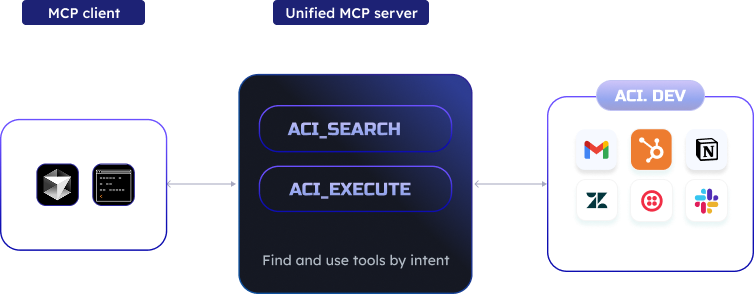 This approach allows LLMs to first search for the right tool based on the user's needs and then execute it, without needing to list all available functions upfront.
## Benefits
* **Reduced Context Window Usage** - Instead of loading hundreds of function definitions into your LLM's context window, the unified server keeps it minimal with just two functions (tools)
* **Dynamic Discovery** - The server intelligently finds the most relevant tools for your specific task
* **Complete Function Coverage** - Access to ALL functions on the ACI.dev platform without configuration changes
* **Simplified Integration** - No need to manage multiple MCP servers for different apps or groups of functions (tools)
## Prerequisites
Before using the `Unified MCP Server`, you need to complete several setup steps on the ACI.dev platform.
You'll need an API key from one of your ACI.dev agents. Find this in your [project setting ](https://platform.aci.dev/project-setting)
Navigate to the [App Store ](https://platform.aci.dev/apps) to configure the apps you want to use with your MCP servers.
For more details on what is an app and how to configure it, please refer to the [App](../core-concepts/app) section.
In your [Project Setting ](https://platform.aci.dev/project-setting), enable the apps you want your agent to access by adding them to the `Allowed Apps` list.
For more details on how and why to set allowed apps, please refer to the [Agent](../core-concepts/agent) section.
For each app you want to use, you'll need to link end-user (or your own) accounts. During account linking, you'll specify a `linked-account-owner-id` which you'll later provide when starting the MCP servers.
For more details on how to link accounts and what `linked-account-owner-id` is, please refer to the [Linked Accounts](../core-concepts/linked-account) section.
```bash
# Install uv if you don't have it already
curl -sSf https://install.pypa.io/get-pip.py | python3 -
pip install uv
```
## Integration with MCP Clients
For a more reliable experience when using the **Unified MCP Server**, we recommend using the prompt below at the start of your conversation (feel free to modify it to your liking):
```json prompt
You are a helpful assistant with access to a unlimited number of tools via two meta functions:
- ACI_SEARCH_FUNCTIONS
- ACI_EXECUTE_FUNCTION
You can use ACI_SEARCH_FUNCTIONS to find relevant, executable functionss that can help you with your task.
Once you have identified the function you need to use, you can use ACI_EXECUTE_FUNCTION to execute the function provided you have the correct input arguments.
```
Replace the `` and `` below with the `linked-account-owner-id` of your linked accounts and your ACI.dev API key respectively.
Make sure you hit the refresh button on the MCP settings page after entering your own API key and Owner ID.
```json mcp.json
{
"mcpServers": {
"aci-mcp-unified": {
"command": "uvx",
"args": ["aci-mcp@latest", "unified-server", "--linked-account-owner-id", "", "--allowed-apps-only"],
"env": {
"ACI_API_KEY": ""
}
}
}
}
```
Make sure to restart the Claude Desktop app after adding the MCP server configuration.
```json claude_desktop_config.json
{
"mcpServers": {
"aci-mcp-unified": {
"command": "bash",
"args": [
"-c",
"ACI_API_KEY= uvx aci-mcp@latest unified-server --linked-account-owner-id --allowed-apps-only"
]
}
}
}
```
```bash terminal
# Set API key
export ACI_API_KEY=
# Option 1: Run in stdio mode (default)
uvx aci-mcp@latest unified-server --linked-account-owner-id --allowed-apps-only
# Option 2: Run in sse mode
uvx aci-mcp@latest unified-server --linked-account-owner-id --allowed-apps-only --transport sse --port 8000
```
## Commandline Arguments
The `allowed-apps-only` flag is used to limit the apps/functions (tools) search (via `ACI_SEARCH_FUNCTIONS`) to only the allowed apps that are accessible to this agent (which is identified by the `ACI_API_KEY`). If not provided, the `ACI_SEARCH_FUNCTIONS` will be conducted on all apps/functions available on the ACI.dev platform.
The `linked-account-owner-id` is the owner ID of the linked accounts you want to use for the function execution. E.g., `--linked-account-owner-id johndoe` means that the function execution (e.g, `GMAIL__SEND_EMAIL`) will be done on behalf of the linked account of `GMAIL` app with owner ID `johndoe`.
The `transport` argument is used to specify the transport protocol to use for the MCP server.
The default transport is `stdio`.
The `port` argument is used to specify the port to listen on for the MCP server if the `--transport` is set to `sse`.
The default port is `8000`.
```bash help
$ uvx aci-mcp@latest unified-server --help
Usage: aci-mcp unified-server [OPTIONS]
Start the unified MCP server with unlimited tool access.
Options:
--allowed-apps-only Limit the functions (tools) search to only
the allowed apps that are accessible to this
agent. (identified by ACI_API_KEY)
--linked-account-owner-id TEXT the owner id of the linked account to use
for the tool calls [required]
--transport [stdio|sse] Transport type
--port INTEGER Port to listen on for SSE
--help Show this message and exit.
```
# Custom Functions (Tools)
Source: https://aci.dev/docs/sdk/custom-functions
You can use your local functions for function (tool) calling along with the functions (tools) provided by ACI.dev
The [ACI SDK ](https://github.com/aipotheosis-labs/aci-python-sdk) provides a utility function to convert your local functions to the format required by different LLM providers. (e.g. OpenAI, Anthropic, etc.)
For details, please refer to the [Custom Functions ](https://github.com/aipotheosis-labs/aci-python-sdk?tab=readme-ov-file#to_json_schema)
# Introduction
Source: https://aci.dev/docs/sdk/intro
The [ACI Python SDK ](https://github.com/aipotheosis-labs/aci-python-sdk) offers a convenient way to access the ACI REST API from any Python 3.10+ application.
In most cases, you should use the SDK to interact with our system programmatically unless you have a specific reason to call the API directly.
Both the SDK and API are currently in beta, so breaking changes may occur.
SDKs for additional languages are coming soon. If you're interested in contributing to our open-source SDKs, please [reach out ](mailto:support@aipolabs.xyz)!
## Usage
**ACI.dev** is built with **agent-first** principles. Although you can call each of the APIs and use the SDK any way you prefer in your application, we strongly recommend trying the [Agent-centric ](https://github.com/aipotheosis-labs/aci-python-sdk?tab=readme-ov-file#agent-centric-features) features and taking a look at the [agent examples ](https://github.com/aipotheosis-labs/aci-agents/tree/main) to get the most out of the platform and to enable the full potential and vision of future agentic applications.
For complete and up-to-date documentation, please check out the [SDK repository ](https://github.com/aipotheosis-labs/aci-python-sdk).
# Meta Functions (Tools)
Source: https://aci.dev/docs/sdk/metafunctions
Designed with an LLM-centric approach
Beyond the standard wrapper around the ACI.dev APIs,, the SDK provides a suite of features and helper functions to make it easier and more seamless to use functions in LLM powered agentic applications. This is our vision and the recommended way of trying out the SDK in agentic applications.
One key feature is the set of meta function schemas we provide.
Essentially, they are just the json schema version of some of the backend APIs of ACI.dev. They are provided so that your LLM/Agent can utlize some of the features of ACI.dev directly via [function (tool) calling ](https://platform.openai.com/docs/guides/function-calling).
```python
from aci.meta_functions import ACISearchFunctions, ACIExecuteFunction
```
These meta functions differ from the direct function (tool) calls you might typically execute—such as **GITHUB\_\_LIST\_STARGAZERS** — in that they are specifically tailored for use by large language models (LLMs) to interact with ACI.dev backend APIs.
Technically, you can also write your own meta functions around the ACI.dev backend APIs. After getting the input arguments generated by the LLM for the meta functions, you can use the SDK to send the request to the backend APIs with the input arguments.
## ACI\_SEARCH\_FUNCTIONS
* It's the json schema version of the `/v1/functions` endpoint and `aci.functions.search` function in SDK.
* It's used to search for available functions (e.g. `GITHUB__STAR_REPOSITORY`, `GMAIL__SEND_EMAIL`, `BRAVE_SEARCH__WEB_SEARCH`) in ACI.dev.
## ACI\_EXECUTE\_FUNCTION
* It's the json schema version of the `/v1/functions/{function_name}/execute` endpoint and `aci.functions.execute` function in SDK.
* It's used to execute a function (e.g. `GITHUB__STAR_REPOSITORY`, `GMAIL__SEND_EMAIL`, `BRAVE_SEARCH__WEB_SEARCH`) in ACI.dev.
## Schemas
```python ACI_SEARCH_FUNCTIONS
from aci.meta_functions import ACISearchFunctions
from aci.enums import FunctionDefinitionFormat
# OpenAI (The Chat Completion API)
print(ACISearchFunctions.to_json_schema(format=FunctionDefinitionFormat.OPENAI))
"""
{
"type": "function",
"function": {
"name": "ACI_SEARCH_FUNCTIONS",
"description": "This function allows you to find relevant executable functions and their schemas that can help complete your tasks.",
"parameters": {
"type": "object",
"properties": {
"intent": {
"type": "string",
"description": "Use this to find relevant functions you might need. Returned results of this function will be sorted by relevance to the intent."
},
"limit": {
"type": "integer",
"default": 100,
"description": "The maximum number of functions to return from the search per response.",
"minimum": 1
},
"offset": {
"type": "integer",
"default": 0,
"minimum": 0,
"description": "Pagination offset."
}
},
"required": [],
"additionalProperties": false
}
}
}
"""
```
```python ACI_EXECUTE_FUNCTION
from aci.meta_functions import ACIExecuteFunction
from aci.enums import FunctionDefinitionFormat
# OpenAI (The Chat Completion API)
print(ACIExecuteFunction.to_json_schema(format=FunctionDefinitionFormat.OPENAI))
"""
{
"type": "function",
"function": {
"name": "ACI_EXECUTE_FUNCTION",
"description": "Execute a specific retrieved function. Provide the executable function name, and the required function parameters for that function based on function definition retrieved.",
"parameters": {
"type": "object",
"properties": {
"function_name": {
"type": "string",
"description": "The name of the function to execute"
},
"function_arguments": {
"type": "object",
"description": "A dictionary containing key-value pairs of input parameters required by the specified function. The parameter names and types must match those defined in the function definition previously retrieved. If the function requires no parameters, provide an empty object.",
"additionalProperties": true
}
},
"required": ["function_name", "function_arguments"],
"additionalProperties": false
}
}
}
"""
```
Together with our **Unified Function Calling Handler**, it offer a powerful, self-discovery mechanism for LLM-driven applications, enabling them to autonomously select, interpret, and execute functions based on the context of a given task or conversation.
```
# unified function calling handler
result = client.handle_function_call(
tool_call.function.name,
json.loads(tool_call.function.arguments),
linked_account_owner_id="john_doe",
allowed_apps_only=True,
format=FunctionDefinitionFormat.OPENAI
)
```
For examples of how to use the meta functions, please refer to the [SDK repository ](https://github.com/aipotheosis-labs/aci-python-sdk/tree/main?tab=readme-ov-file#agent-centric-features).
# Function (Tool) Use Patterns
Source: https://aci.dev/docs/sdk/tool-use-patterns
Different ways to use the ACI.dev SDK
You can give your AI agent different levels of tool-use autonomy through the meta functions:
* **Pattern 1: Pre-planned Tools**
* Provide the specific functions (tools) to be used by an LLM.
* **Pattern 2: Dynamic Tool Discovery and Execution**
* **2.1: Tool List Expansion**
* Use `ACI_SEARCH_FUNCTIONS` meta function (tool):
* Search for relevant functions across all apps
* Add discovered tools directly to the LLM's tool list
* Allow the LLM to invoke these discovered tools directly by name
* **2.2: Tool Definition as Text Context Approach**
* Use `ACI_SEARCH_FUNCTIONS` and `ACI_EXECUTE_FUNCTION` meta functions (tools)
* Use `ACI_SEARCH_FUNCTIONS` to retrieve tool definitions
* Present those definitions to the LLM as **text content** instead of adding them to the LLM's tool list
* The LLM uses `ACI_EXECUTE_FUNCTION` to execute these tools **indirectly**
## Pre-planned
This is the most straright forward use case. You can directly find the functions you want to use on the developer portal, retrieve the function definitions, and append them to your LLM API call. This way your agents will only use the tools you have selected and provided, it would not attempt to find and use other tools.
```python
brave_search_function_definition = aci.functions.get_definition("BRAVE_SEARCH__WEB_SEARCH")
response = openai.chat.completions.create(
model="gpt-4o-mini",
messages=[
{
"role": "system",
"content": "You are a helpful assistant with access to a variety of tools.",
},
{
"role": "user",
"content": "What is ACI.dev by Aipolabs?",
},
],
tools=[brave_search_function_definition],
)
tool_call = (
response.choices[0].message.tool_calls[0]
if response.choices[0].message.tool_calls
else None
)
if tool_call:
result = aci.functions.execute(
tool_call.function.name,
json.loads(tool_call.function.arguments),
linked_account_owner_id=LINKED_ACCOUNT_OWNER_ID,
)
```
## Dynamic Tool Discovery and Execution With Tool List Expansion
In this use case, the tools list provided to LLM API calls changes according to the function definitions retrieved by the agent from the ACI.dev using the provided meta functions (tools).
The retrieved function definitions are appended to the available tools list for LLMs to decide when and how to use it in subsequent LLM calls. This leverages the ability of many LLMs to enforce adherence of function-call outputs as much as possible to the provided definition, while still offering the flexibility to essentially access as many different tools as needed by the LLM-powered agent.
The trade-off here is that the developer has to manage tool-list and know when to append or remove tools when making the LLM call.
**Example starting tools lists provided to the LLM**
```python
tools_meta = [
ACISearchFunctions.to_json_schema(FunctionDefinitionFormat.OPENAI),
]
tools_retrieved = []
```
**Adding retrieved function definitions to the tools\_retrieved list**
```python
if tool_call.function.name == ACISearchFunctions.get_name():
tools_retrieved.extend(result)
```
**Subsequent tool-calling**
```python
response = openai.chat.completions.create(
model="gpt-4o",
messages=[
{
"role": "system",
"content": prompt,
},
{
"role": "user",
"content": "Can you search online for some information about ACI.dev? Use whichever search tool you find most suitable for the task via the ACI meta functions.",
},
]
+ chat_history,
tools=tools_meta + tools_retrieved,
parallel_tool_calls=False,
)
if tool_call:
print(
f"{create_headline(f'Function Call: {tool_call.function.name}')} \n arguments: {tool_call.function.arguments}"
)
result = aci.handle_function_call(
tool_call.function.name,
json.loads(tool_call.function.arguments),
linked_account_owner_id=LINKED_ACCOUNT_OWNER_ID,
allowed_apps_only=True,
format=FunctionDefinitionFormat.OPENAI,
)
```
For a full example, [see here ](https://github.com/aipotheosis-labs/aci-agents/blob/main/examples/openai/agent_with_dynamic_tool_discovery_pattern_1.py).
## Dynamic Tool Discovery and Execution With Tool Definition as Text Content
In this use case, the tools list provided to the LLM is static, which are just the two meta functions `ACI_SEARCH_FUNCTIONS` and `ACI_EXECUTE_FUNCTION`.
The difference between this and the previous pattern is that retrieved function definitions are provided to the LLM directly as text content instead of being added to the tools list.
The LLM then has to decide whether to call the `ACI_EXECUTE_FUNCTION` to actually execute an API call.
By using the meta functions (tools) this way, the developer does not have to manage the tools list, but the accuracy of tool use can decrease.
**Example tools list provided to LLM**
```python
tools_meta = [
ACISearchFunctions.to_json_schema(FunctionDefinitionFormat.OPENAI),
ACIExecuteFunction.to_json_schema(FunctionDefinitionFormat.OPENAI),
]
```
**Tool-calling through LLM**
```python
response = openai.chat.completions.create(
model="gpt-4o",
messages=[
{
"role": "system",
"content": prompt,
},
{
"role": "user",
"content": "Can you search online for some information about ACI.dev? Use whichever search tool you find most suitable for the task via the ACI meta functions.",
},
]
+ chat_history,
tools=tools_meta,
parallel_tool_calls=False,
)
tool_call = (
response.choices[0].message.tool_calls[0]
if response.choices[0].message.tool_calls
else None
)
if tool_call:
result = aci.handle_function_call(
tool_call.function.name,
json.loads(tool_call.function.arguments),
linked_account_owner_id=LINKED_ACCOUNT_OWNER_ID,
allowed_apps_only=True,
format=FunctionDefinitionFormat.OPENAI,
)
```
For a full example, [see here ](https://github.com/aipotheosis-labs/aci-agents/blob/main/examples/openai/agent_with_dynamic_tool_discovery_pattern_2.py).
This approach allows LLMs to first search for the right tool based on the user's needs and then execute it, without needing to list all available functions upfront.
## Benefits
* **Reduced Context Window Usage** - Instead of loading hundreds of function definitions into your LLM's context window, the unified server keeps it minimal with just two functions (tools)
* **Dynamic Discovery** - The server intelligently finds the most relevant tools for your specific task
* **Complete Function Coverage** - Access to ALL functions on the ACI.dev platform without configuration changes
* **Simplified Integration** - No need to manage multiple MCP servers for different apps or groups of functions (tools)
## Prerequisites
Before using the `Unified MCP Server`, you need to complete several setup steps on the ACI.dev platform.
You'll need an API key from one of your ACI.dev agents. Find this in your [project setting ](https://platform.aci.dev/project-setting)
Navigate to the [App Store ](https://platform.aci.dev/apps) to configure the apps you want to use with your MCP servers.
For more details on what is an app and how to configure it, please refer to the [App](../core-concepts/app) section.
In your [Project Setting ](https://platform.aci.dev/project-setting), enable the apps you want your agent to access by adding them to the `Allowed Apps` list.
For more details on how and why to set allowed apps, please refer to the [Agent](../core-concepts/agent) section.
For each app you want to use, you'll need to link end-user (or your own) accounts. During account linking, you'll specify a `linked-account-owner-id` which you'll later provide when starting the MCP servers.
For more details on how to link accounts and what `linked-account-owner-id` is, please refer to the [Linked Accounts](../core-concepts/linked-account) section.
```bash
# Install uv if you don't have it already
curl -sSf https://install.pypa.io/get-pip.py | python3 -
pip install uv
```
## Integration with MCP Clients
For a more reliable experience when using the **Unified MCP Server**, we recommend using the prompt below at the start of your conversation (feel free to modify it to your liking):
```json prompt
You are a helpful assistant with access to a unlimited number of tools via two meta functions:
- ACI_SEARCH_FUNCTIONS
- ACI_EXECUTE_FUNCTION
You can use ACI_SEARCH_FUNCTIONS to find relevant, executable functionss that can help you with your task.
Once you have identified the function you need to use, you can use ACI_EXECUTE_FUNCTION to execute the function provided you have the correct input arguments.
```
Replace the `` and `` below with the `linked-account-owner-id` of your linked accounts and your ACI.dev API key respectively.
Make sure you hit the refresh button on the MCP settings page after entering your own API key and Owner ID.
```json mcp.json
{
"mcpServers": {
"aci-mcp-unified": {
"command": "uvx",
"args": ["aci-mcp@latest", "unified-server", "--linked-account-owner-id", "", "--allowed-apps-only"],
"env": {
"ACI_API_KEY": ""
}
}
}
}
```
Make sure to restart the Claude Desktop app after adding the MCP server configuration.
```json claude_desktop_config.json
{
"mcpServers": {
"aci-mcp-unified": {
"command": "bash",
"args": [
"-c",
"ACI_API_KEY= uvx aci-mcp@latest unified-server --linked-account-owner-id --allowed-apps-only"
]
}
}
}
```
```bash terminal
# Set API key
export ACI_API_KEY=
# Option 1: Run in stdio mode (default)
uvx aci-mcp@latest unified-server --linked-account-owner-id --allowed-apps-only
# Option 2: Run in sse mode
uvx aci-mcp@latest unified-server --linked-account-owner-id --allowed-apps-only --transport sse --port 8000
```
## Commandline Arguments
The `allowed-apps-only` flag is used to limit the apps/functions (tools) search (via `ACI_SEARCH_FUNCTIONS`) to only the allowed apps that are accessible to this agent (which is identified by the `ACI_API_KEY`). If not provided, the `ACI_SEARCH_FUNCTIONS` will be conducted on all apps/functions available on the ACI.dev platform.
The `linked-account-owner-id` is the owner ID of the linked accounts you want to use for the function execution. E.g., `--linked-account-owner-id johndoe` means that the function execution (e.g, `GMAIL__SEND_EMAIL`) will be done on behalf of the linked account of `GMAIL` app with owner ID `johndoe`.
The `transport` argument is used to specify the transport protocol to use for the MCP server.
The default transport is `stdio`.
The `port` argument is used to specify the port to listen on for the MCP server if the `--transport` is set to `sse`.
The default port is `8000`.
```bash help
$ uvx aci-mcp@latest unified-server --help
Usage: aci-mcp unified-server [OPTIONS]
Start the unified MCP server with unlimited tool access.
Options:
--allowed-apps-only Limit the functions (tools) search to only
the allowed apps that are accessible to this
agent. (identified by ACI_API_KEY)
--linked-account-owner-id TEXT the owner id of the linked account to use
for the tool calls [required]
--transport [stdio|sse] Transport type
--port INTEGER Port to listen on for SSE
--help Show this message and exit.
```
# Custom Functions (Tools)
Source: https://aci.dev/docs/sdk/custom-functions
You can use your local functions for function (tool) calling along with the functions (tools) provided by ACI.dev
The [ACI SDK ](https://github.com/aipotheosis-labs/aci-python-sdk) provides a utility function to convert your local functions to the format required by different LLM providers. (e.g. OpenAI, Anthropic, etc.)
For details, please refer to the [Custom Functions ](https://github.com/aipotheosis-labs/aci-python-sdk?tab=readme-ov-file#to_json_schema)
# Introduction
Source: https://aci.dev/docs/sdk/intro
The [ACI Python SDK ](https://github.com/aipotheosis-labs/aci-python-sdk) offers a convenient way to access the ACI REST API from any Python 3.10+ application.
In most cases, you should use the SDK to interact with our system programmatically unless you have a specific reason to call the API directly.
Both the SDK and API are currently in beta, so breaking changes may occur.
SDKs for additional languages are coming soon. If you're interested in contributing to our open-source SDKs, please [reach out ](mailto:support@aipolabs.xyz)!
## Usage
**ACI.dev** is built with **agent-first** principles. Although you can call each of the APIs and use the SDK any way you prefer in your application, we strongly recommend trying the [Agent-centric ](https://github.com/aipotheosis-labs/aci-python-sdk?tab=readme-ov-file#agent-centric-features) features and taking a look at the [agent examples ](https://github.com/aipotheosis-labs/aci-agents/tree/main) to get the most out of the platform and to enable the full potential and vision of future agentic applications.
For complete and up-to-date documentation, please check out the [SDK repository ](https://github.com/aipotheosis-labs/aci-python-sdk).
# Meta Functions (Tools)
Source: https://aci.dev/docs/sdk/metafunctions
Designed with an LLM-centric approach
Beyond the standard wrapper around the ACI.dev APIs,, the SDK provides a suite of features and helper functions to make it easier and more seamless to use functions in LLM powered agentic applications. This is our vision and the recommended way of trying out the SDK in agentic applications.
One key feature is the set of meta function schemas we provide.
Essentially, they are just the json schema version of some of the backend APIs of ACI.dev. They are provided so that your LLM/Agent can utlize some of the features of ACI.dev directly via [function (tool) calling ](https://platform.openai.com/docs/guides/function-calling).
```python
from aci.meta_functions import ACISearchFunctions, ACIExecuteFunction
```
These meta functions differ from the direct function (tool) calls you might typically execute—such as **GITHUB\_\_LIST\_STARGAZERS** — in that they are specifically tailored for use by large language models (LLMs) to interact with ACI.dev backend APIs.
Technically, you can also write your own meta functions around the ACI.dev backend APIs. After getting the input arguments generated by the LLM for the meta functions, you can use the SDK to send the request to the backend APIs with the input arguments.
## ACI\_SEARCH\_FUNCTIONS
* It's the json schema version of the `/v1/functions` endpoint and `aci.functions.search` function in SDK.
* It's used to search for available functions (e.g. `GITHUB__STAR_REPOSITORY`, `GMAIL__SEND_EMAIL`, `BRAVE_SEARCH__WEB_SEARCH`) in ACI.dev.
## ACI\_EXECUTE\_FUNCTION
* It's the json schema version of the `/v1/functions/{function_name}/execute` endpoint and `aci.functions.execute` function in SDK.
* It's used to execute a function (e.g. `GITHUB__STAR_REPOSITORY`, `GMAIL__SEND_EMAIL`, `BRAVE_SEARCH__WEB_SEARCH`) in ACI.dev.
## Schemas
```python ACI_SEARCH_FUNCTIONS
from aci.meta_functions import ACISearchFunctions
from aci.enums import FunctionDefinitionFormat
# OpenAI (The Chat Completion API)
print(ACISearchFunctions.to_json_schema(format=FunctionDefinitionFormat.OPENAI))
"""
{
"type": "function",
"function": {
"name": "ACI_SEARCH_FUNCTIONS",
"description": "This function allows you to find relevant executable functions and their schemas that can help complete your tasks.",
"parameters": {
"type": "object",
"properties": {
"intent": {
"type": "string",
"description": "Use this to find relevant functions you might need. Returned results of this function will be sorted by relevance to the intent."
},
"limit": {
"type": "integer",
"default": 100,
"description": "The maximum number of functions to return from the search per response.",
"minimum": 1
},
"offset": {
"type": "integer",
"default": 0,
"minimum": 0,
"description": "Pagination offset."
}
},
"required": [],
"additionalProperties": false
}
}
}
"""
```
```python ACI_EXECUTE_FUNCTION
from aci.meta_functions import ACIExecuteFunction
from aci.enums import FunctionDefinitionFormat
# OpenAI (The Chat Completion API)
print(ACIExecuteFunction.to_json_schema(format=FunctionDefinitionFormat.OPENAI))
"""
{
"type": "function",
"function": {
"name": "ACI_EXECUTE_FUNCTION",
"description": "Execute a specific retrieved function. Provide the executable function name, and the required function parameters for that function based on function definition retrieved.",
"parameters": {
"type": "object",
"properties": {
"function_name": {
"type": "string",
"description": "The name of the function to execute"
},
"function_arguments": {
"type": "object",
"description": "A dictionary containing key-value pairs of input parameters required by the specified function. The parameter names and types must match those defined in the function definition previously retrieved. If the function requires no parameters, provide an empty object.",
"additionalProperties": true
}
},
"required": ["function_name", "function_arguments"],
"additionalProperties": false
}
}
}
"""
```
Together with our **Unified Function Calling Handler**, it offer a powerful, self-discovery mechanism for LLM-driven applications, enabling them to autonomously select, interpret, and execute functions based on the context of a given task or conversation.
```
# unified function calling handler
result = client.handle_function_call(
tool_call.function.name,
json.loads(tool_call.function.arguments),
linked_account_owner_id="john_doe",
allowed_apps_only=True,
format=FunctionDefinitionFormat.OPENAI
)
```
For examples of how to use the meta functions, please refer to the [SDK repository ](https://github.com/aipotheosis-labs/aci-python-sdk/tree/main?tab=readme-ov-file#agent-centric-features).
# Function (Tool) Use Patterns
Source: https://aci.dev/docs/sdk/tool-use-patterns
Different ways to use the ACI.dev SDK
You can give your AI agent different levels of tool-use autonomy through the meta functions:
* **Pattern 1: Pre-planned Tools**
* Provide the specific functions (tools) to be used by an LLM.
* **Pattern 2: Dynamic Tool Discovery and Execution**
* **2.1: Tool List Expansion**
* Use `ACI_SEARCH_FUNCTIONS` meta function (tool):
* Search for relevant functions across all apps
* Add discovered tools directly to the LLM's tool list
* Allow the LLM to invoke these discovered tools directly by name
* **2.2: Tool Definition as Text Context Approach**
* Use `ACI_SEARCH_FUNCTIONS` and `ACI_EXECUTE_FUNCTION` meta functions (tools)
* Use `ACI_SEARCH_FUNCTIONS` to retrieve tool definitions
* Present those definitions to the LLM as **text content** instead of adding them to the LLM's tool list
* The LLM uses `ACI_EXECUTE_FUNCTION` to execute these tools **indirectly**
## Pre-planned
This is the most straright forward use case. You can directly find the functions you want to use on the developer portal, retrieve the function definitions, and append them to your LLM API call. This way your agents will only use the tools you have selected and provided, it would not attempt to find and use other tools.
```python
brave_search_function_definition = aci.functions.get_definition("BRAVE_SEARCH__WEB_SEARCH")
response = openai.chat.completions.create(
model="gpt-4o-mini",
messages=[
{
"role": "system",
"content": "You are a helpful assistant with access to a variety of tools.",
},
{
"role": "user",
"content": "What is ACI.dev by Aipolabs?",
},
],
tools=[brave_search_function_definition],
)
tool_call = (
response.choices[0].message.tool_calls[0]
if response.choices[0].message.tool_calls
else None
)
if tool_call:
result = aci.functions.execute(
tool_call.function.name,
json.loads(tool_call.function.arguments),
linked_account_owner_id=LINKED_ACCOUNT_OWNER_ID,
)
```
## Dynamic Tool Discovery and Execution With Tool List Expansion
In this use case, the tools list provided to LLM API calls changes according to the function definitions retrieved by the agent from the ACI.dev using the provided meta functions (tools).
The retrieved function definitions are appended to the available tools list for LLMs to decide when and how to use it in subsequent LLM calls. This leverages the ability of many LLMs to enforce adherence of function-call outputs as much as possible to the provided definition, while still offering the flexibility to essentially access as many different tools as needed by the LLM-powered agent.
The trade-off here is that the developer has to manage tool-list and know when to append or remove tools when making the LLM call.
**Example starting tools lists provided to the LLM**
```python
tools_meta = [
ACISearchFunctions.to_json_schema(FunctionDefinitionFormat.OPENAI),
]
tools_retrieved = []
```
**Adding retrieved function definitions to the tools\_retrieved list**
```python
if tool_call.function.name == ACISearchFunctions.get_name():
tools_retrieved.extend(result)
```
**Subsequent tool-calling**
```python
response = openai.chat.completions.create(
model="gpt-4o",
messages=[
{
"role": "system",
"content": prompt,
},
{
"role": "user",
"content": "Can you search online for some information about ACI.dev? Use whichever search tool you find most suitable for the task via the ACI meta functions.",
},
]
+ chat_history,
tools=tools_meta + tools_retrieved,
parallel_tool_calls=False,
)
if tool_call:
print(
f"{create_headline(f'Function Call: {tool_call.function.name}')} \n arguments: {tool_call.function.arguments}"
)
result = aci.handle_function_call(
tool_call.function.name,
json.loads(tool_call.function.arguments),
linked_account_owner_id=LINKED_ACCOUNT_OWNER_ID,
allowed_apps_only=True,
format=FunctionDefinitionFormat.OPENAI,
)
```
For a full example, [see here ](https://github.com/aipotheosis-labs/aci-agents/blob/main/examples/openai/agent_with_dynamic_tool_discovery_pattern_1.py).
## Dynamic Tool Discovery and Execution With Tool Definition as Text Content
In this use case, the tools list provided to the LLM is static, which are just the two meta functions `ACI_SEARCH_FUNCTIONS` and `ACI_EXECUTE_FUNCTION`.
The difference between this and the previous pattern is that retrieved function definitions are provided to the LLM directly as text content instead of being added to the tools list.
The LLM then has to decide whether to call the `ACI_EXECUTE_FUNCTION` to actually execute an API call.
By using the meta functions (tools) this way, the developer does not have to manage the tools list, but the accuracy of tool use can decrease.
**Example tools list provided to LLM**
```python
tools_meta = [
ACISearchFunctions.to_json_schema(FunctionDefinitionFormat.OPENAI),
ACIExecuteFunction.to_json_schema(FunctionDefinitionFormat.OPENAI),
]
```
**Tool-calling through LLM**
```python
response = openai.chat.completions.create(
model="gpt-4o",
messages=[
{
"role": "system",
"content": prompt,
},
{
"role": "user",
"content": "Can you search online for some information about ACI.dev? Use whichever search tool you find most suitable for the task via the ACI meta functions.",
},
]
+ chat_history,
tools=tools_meta,
parallel_tool_calls=False,
)
tool_call = (
response.choices[0].message.tool_calls[0]
if response.choices[0].message.tool_calls
else None
)
if tool_call:
result = aci.handle_function_call(
tool_call.function.name,
json.loads(tool_call.function.arguments),
linked_account_owner_id=LINKED_ACCOUNT_OWNER_ID,
allowed_apps_only=True,
format=FunctionDefinitionFormat.OPENAI,
)
```
For a full example, [see here ](https://github.com/aipotheosis-labs/aci-agents/blob/main/examples/openai/agent_with_dynamic_tool_discovery_pattern_2.py).